Learn how merchants integrate payment apps and how payment transactions work
with the Payment Request API.
 Eiji Kitamura [X](https://twitter.com/agektmr) [GitHub](https://github.com/agektmr) [Mastodon](https://infosec.exchange/@agektmr) [Bluesky](https://bsky.app/profile/agektmr.com)  Milica Mihajlija [X](https://twitter.com/bibydigital) [GitHub](https://github.com/mihajlija) [Homepage](https://mihajlija.github.io/)
Web Payments APIs are dedicated payment features built into the browser
for the first time. With Web Payments, merchant integration with payment apps
becomes simpler while the customer experience gets streamlined and more secure.
To learn more about the benefits of using Web Payments check out [Empowering
payment apps with Web Payments](https://web.dev/articles/empowering-payment-apps-with-web-payments).
This article walks you through a payment transaction on a merchant website and
helps you understand how payment app integration works.
The process involves 6 steps:
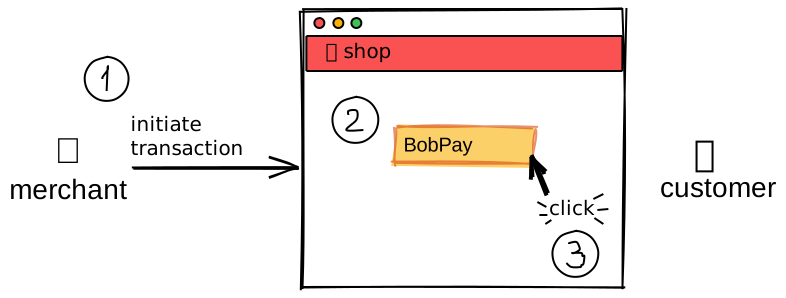
1. The merchant initiates a payment transaction.
2. The merchant shows a payment button.
3. The customer presses the payment button.
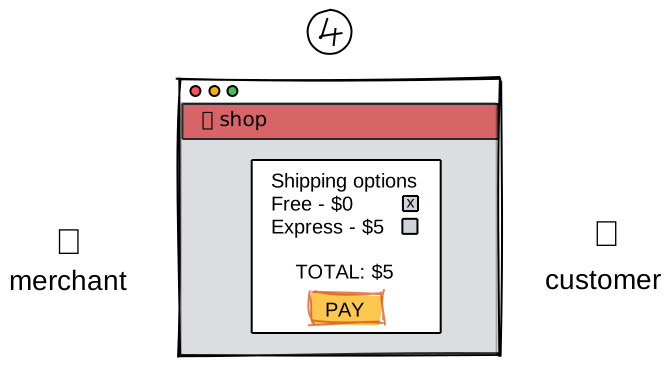
4. The browser launches the payment app.
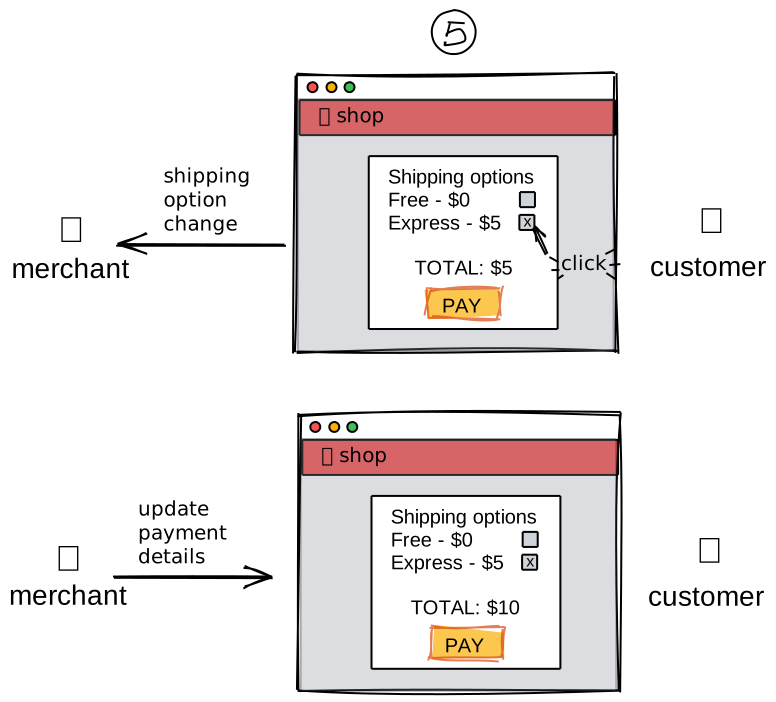
5. If the customer changes any details (such as shipping options or their
address), the merchant updates the transaction details reflecting the change.
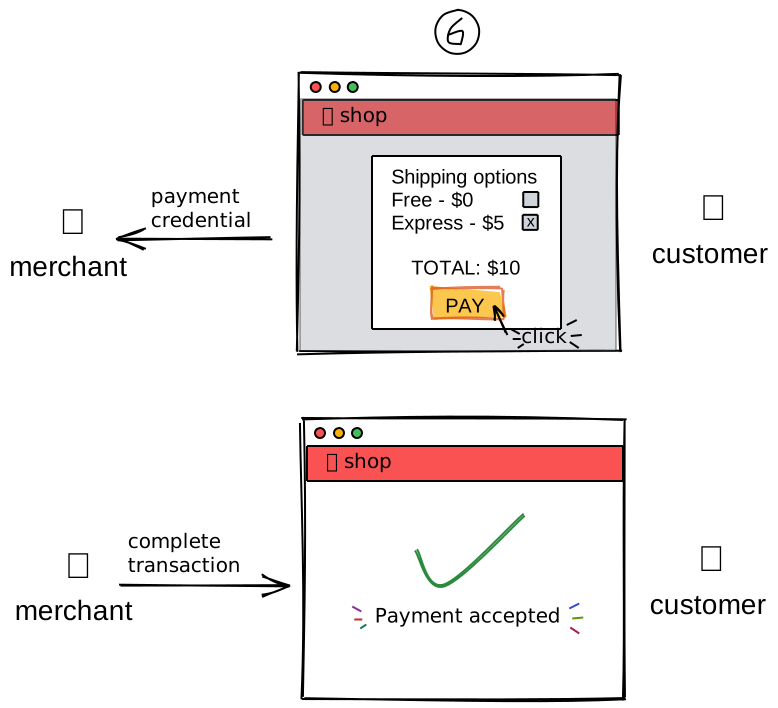
6. After the customer confirms the purchase, the merchant validates the payment
and completes the transaction.
## Step 1: The merchant initiates a payment transaction
When a customer decides to make a purchase, the merchant initiates the payment
transaction by constructing a
[`PaymentRequest`](https://developers.google.com/web/fundamentals/payments/basics/how-payment-request-api-works)
object. This object includes important information about the transaction:
- Acceptable payment methods and their data to process the transaction.
- Details, such as the total price (required) and information about the items.
- Options in which merchants can request shipping information such as a shipping address and a shipping option.
- Merchants can also request the billing address, the payer's name, email, and phone number.
- Merchants can also include optional [shipping
type](https://developers.google.com/web/fundamentals/payments/merchant-guide/deep-dive-into-payment-request#changing_the_shipping_type) (`shipping`, `delivery`, or `pickup`) in the `PaymentRequest`. The payment app can use that as a hint to display the correct labels in its UI.
```javascript
const request = new PaymentRequest([{
supportedMethods: 'https://bobpay.xyz/pay',
data: {
transactionId: '****'
}
}], {
displayItems: [{
label: 'Anvil L/S Crew Neck - Grey M x1',
amount: { currency: 'USD', value: '22.15' }
}],
total: {
label: 'Total due',
amount: { currency: 'USD', value : '22.15' }
}
}, {
requestShipping: true,
requestBillingAddress: true,
requestPayerEmail: true,
requestPayerPhone: true,
requestPayerName: true,
shippingType: 'delivery'
});
```
Including a transaction ID
Some payment handlers may require the merchant to provide the transaction ID
which they have issued in advance as part of the transaction information. A
typical integration includes communication between the merchant's and the
payment handler's server to reserve the total price. This prevents malicious
customers from manipulating the price and cheating the merchant with a
validation at the end of the transaction.
The merchant can pass a transaction ID as part of the
[`PaymentMethodData`](https://www.w3.org/TR/payment-request/#dom-paymentmethoddata)
object's `data` property.
Provided the transaction information, the browser goes through a discovery
process of payment apps specified in the `PaymentRequest` based on the payment
method identifiers. This way, the browser can determine the payment app to
launch as soon as the merchant is ready to proceed with the transaction.
To learn how the discovery process works in detail check out [Setting up a
payment
method](https://web.dev/articles/setting-up-a-payment-method#how_a_browser_discovers_a_payment_app).
## Step 2: The merchant shows a payment button
Merchants can support many payment methods, but should only present the payment
buttons for those that a customer can actually use. Showing a payment button
that is unusable is poor user experience. If a merchant can predict that a
payment method specified in the `PaymentRequest` object won't work for the
customer, they can provide a fallback solution or not show that button at all.
Using a `PaymentRequest` instance, a merchant can query whether a customer has
the payment app available.
### Does the customer have the payment app available?
The
[`canMakePayment()`](https://developer.mozilla.org/docs/Web/API/PaymentRequest/canMakePayment)
method of `PaymentRequest` returns `true` if a payment app is available on the
customer's device. "Available" means that a payment app that supports the
payment method is discovered, and that the platform-specific payment app is installed, or
the web-based payment app is [ready to be
registered](https://web.dev/articles/setting-up-a-payment-method#jit-register).
```javascript
const canMakePayment = await request.canMakePayment();
if (!canMakePayment) {
// Fallback to other means of payment or hide the button.
}
```
## Step 3: The customer presses the payment button
When the customer presses the payment button, the merchant calls the `show()`
method of the `PaymentRequest` instance which immediately triggers the launch of
the payment UI.
In case the final total price is set dynamically (for example, retrieved from a
server), the merchant can defer the launch of the payment UI until the total is
known.
### Deferring the launch of the payment UI
Check out a demo of [deferring the payment
UI](https://rsolomakhin.github.io/pr/wait/) until the final total price is
determined.
To defer the payment UI, the merchant passes a promise to the `show()` method.
The browser will show a loading indicator until the promise resolves and the
transaction is ready to begin.
```javascript
const getTotalAmount = async () => {
// Fetch the total amount from the server, etc.
};
try {
const result = await request.show(getTotalAmount());
// Process the result...
} catch(e) {
handleError(e);
}
```
If there is no promise specified as an argument for `show()`, the browser will
launch the payment UI immediately.
> [!NOTE]
> **Note:** If the payment handler is designed to return a transaction ID upon setting the total price, the ID can be passed as part of the promise result.
## Step 4: The browser launches the payment app
The browser can launch a platform-specific or a web-based payment app. (You can learn more
about [how Chrome determines which payment app to
launch](https://web.dev/articles/setting-up-a-payment-method#how-chrome-determines-which-payment-app-to-launch).)
How the payment app is built is up to the developer for the most part, but the
events emitted from and to the merchant, as well as the structure of the data
passed along with those events, are standardized.
When the payment app is launched, it receives [the transaction
information](https://w3c.github.io/payment-handler/#the-paymentrequestevent)
passed to the `PaymentRequest` object in Step 1, which includes the following:
- Payment method data
- Total price
- Payment options
The payment app uses the transaction information to label its UI.
## Step 5: How a merchant can update the transaction details depending on customer's actions
Customers have an option to change the transaction details such as payment
method and shipping option in the payment app. While the customer makes changes,
the merchant receives the change events and updates the transaction details.
There are four types of events a merchant can receive:
- Payment method change event
- Shipping address change event
- Shipping option change event
- Merchant validation event
### Payment method change event
A payment app can support multiple payment methods and a merchant may offer a
special discount depending on the customer's selection. To cover this use case,
the payment method change event can inform the merchant of the new payment
method so that they can update the total price with the discount and return it
back to the payment app.
```javascript
request.addEventListener('paymentmethodchange', e => {
e.updateWith({
// Add discount etc.
});
});
```
### Shipping address change event
A payment app can optionally provide the customer's shipping address. This is
convenient for customers because they don't have to manually enter any details
into a form and they can store their shipping address in their preferred payment
apps, rather than on multiple different merchant websites.
If a customer updates their shipping address in a payment app after the
transaction has been initiated, a `'shippingaddresschange'` event will be sent
to the merchant. This event helps the merchant determine the shipping cost based
on the new address, update the total price, and return it to the payment app.
```javascript
request.addEventListener('shippingaddresschange', e => {
e.updateWith({
// Update the details
});
});
```
If the merchant can't ship to the updated address, they can provide an error
message by adding an error parameter to the transaction details returned to the
payment app.
> [!NOTE]
> **Note:** Merchants don't receive customers' full shipping address until they've authorized the payment.
### Shipping option change event
A merchant can offer multiple shipping options to the customer and can delegate
that choice to the payment app. The shipping options are displayed as a list of
prices and service names the customer can select from. For example:
- Standard shipping - Free
- Express shipping - 5 USD
When a customer updates the shipping option in a payment app, a
`'shippingoptionchange'` event will be sent to the merchant. The merchant can
then determine the shipping cost, update the total price, and return it to the
payment app.
```javascript
request.addEventListener('shippingoptionchange', e => {
e.updateWith({
// Update the details
});
});
```
The merchant can dynamically modify the shipping options based on the customer's
shipping address as well. This is useful when a merchant wants to offer
different sets of shipping options for domestic and international customers.
### Merchant validation event
For additional security, a payment app can perform a merchant validation before
proceeding to the payment flow. The design of the validation mechanism is up to
the payment app, but the merchant validation event serves to inform the merchant
of the URL they can use to validate themselves.
```javascript
request.addEventListener('merchantvalidation', e => {
e.updateWith({
// Use `e.validateURL` to validate
});
});
```
> [!NOTE]
> **Note:** The support for the merchant validation event is limited to Apple Safari. Chromium-based browsers have not implemented this event as of May 2020.
## Step 6: The merchant validates the payment and completes the transaction
When the customer successfully authorizes the payment, the `show()` method
returns a promise that resolves to a
[`PaymentResponse`](https://w3c.github.io/payment-request/#paymentresponse-interface).
The `PaymentResponse` object includes the following information:
- Payment result details
- Shipping address
- Shipping option
- Contact information
At this point, the browser UI may still show a loading indicator meaning that
the transaction is not completed yet.
If the payment app is terminated because of a payment failure or error, the
promise returned from `show()` rejects, and the browser terminates the payment
transaction.
### Processing and validating the payment
The `details` in `PaymentResponse` is the payment credential object returned
from the payment app. The merchant can use the credential to process or validate
the payment. How this critical process works is up to the payment handler.
### Completing or retrying the transaction
After the merchant determines whether the transaction has succeded or failed,
they can either:
- Call the `.complete()` method to complete the transaction and dismiss the loading indicator.
- Let the customer retry by calling the `retry()` method.
```javascript
async function doPaymentRequest() {
try {
const request = new PaymentRequest(methodData, details, options);
const response = await request.show();
await validateResponse(response);
} catch (err) {
// AbortError, SecurityError
console.error(err);
}
}
async function validateResponse(response) {
try {
const errors = await checkAllValuesAreGood(response);
if (errors.length) {
await response.retry(errors);
return validateResponse(response);
}
await response.complete("success");
} catch (err) {
// Something went wrong...
await response.complete("fail");
}
}
// Must be called as a result of a click
// or some explicit user action.
doPaymentRequest();
```
## Next steps
- Learn how to declare a payment method identifier in detail in [Setting up a
payment method](https://web.dev/articles/setting-up-a-payment-method).
- Learn how to build a platform-specific payment app in [Android payment apps developer's guide](https://web.dev/articles/android-payment-apps-developers-guide.md.txt).
- Learn how to build a web-based payment app in [Web-based payment apps developer's
guide](https://web.dev/articles/web-based-payment-apps-overview).