
How to squeeze the most out of your build configuration

Introduction
If the Grunt world is new to you, an ideal place to start is Chris Coyier’s excellent article “Grunt for People Who Think Things Like Grunt are Weird and Hard”. After Chris’ introduction, you will have set up your own Grunt project and have tasted a slice of the power Grunt offers.
In this article, we won’t focus on what numerous Grunt plugins do to your actual project code, but on the Grunt build process itself. We will give you practical ideas on:
- How to keep your Gruntfile neat and tidy,
- How to dramatically improve your build time,
- And how to be notified when a build happens.
Time for a quick disclaimer: Grunt is just one of many tools you could use to accomplish the task. If Gulp is more your style, great! If after surveying the options out there, you’d still like to build your own toolchain, that’s ok too! We chose to focus on Grunt for this article due to its strong ecosystem and long-standing user base.
Organizing your Gruntfile
Whether you include a lot of Grunt plugins or have to write a lot of manual tasks in your Gruntfile, it can quickly become very unwieldy and hard to maintain. Fortunately, there are quite a few plugins that focus on exactly that problem: Making your Gruntfile neat and tidy again.
The Gruntfile, before optimization
Here is how our Gruntfile looks like before we’ve done any optimization on it:
module.exports = function(grunt) {

  grunt.initConfig({
    pkg: grunt.file.readJSON('package.json'),
    concat: {
      dist: {
        src: ['src/js/jquery.js','src/js/intro.js', 'src/js/main.js', 'src/js/outro.js'],
        dest: 'dist/build.js',
      }
    },
    uglify: {
      dist: {
        files: {
          'dist/build.min.js': ['dist/build.js']
        }
      }
    },
    imagemin: {
      options: {
        cache: false
      },

      dist: {
        files: [{
          expand: true,
          cwd: 'src/',
          src: ['**/*.{png,jpg,gif}'],
          dest: 'dist/'
        }]
      }
    }
  });

  grunt.loadNpmTasks('grunt-contrib-concat');
  grunt.loadNpmTasks('grunt-contrib-uglify');
  grunt.loadNpmTasks('grunt-contrib-imagemin');

  grunt.registerTask('default', ['concat', 'uglify', 'imagemin']);

};
If now you’re saying “Hey! I was expecting much worse! That is actually maintainable!”, you’re probably right. For the sake of simplicity, we’ve only included three plugins without much customization. Using an actual production Gruntfile building a moderately sized project would require infinite scrolling in this article. So let’s see what we can do!
Autoload your Grunt plugins
When adding a new Grunt plugin you want to use to your project, you will have to add it both to your package.json file as an npm dependency and then load it within the Gruntfile. For the plugin “grunt-contrib-concat”, that might look like the following:
// tell Grunt to load that plugin
grunt.loadNpmTasks('grunt-contrib-concat');
If you now uninstall the plugin via npm and update your package.json, but forget to update your Gruntfile, your build will break. This is where the nifty plugin load-grunt-tasks comes to help.
While before, we’ve had to manually load our Grunt plugins, like so:
grunt.loadNpmTasks('grunt-contrib-concat');
grunt.loadNpmTasks('grunt-contrib-uglify');
grunt.loadNpmTasks('grunt-contrib-imagemin');
With load-grunt-tasks, you can collapse that down to the following one-liner:
require('load-grunt-tasks')(grunt);
After requiring the plugin, it will analyze your package.json file, determine which of the dependencies are Grunt plugins and load them all automatically.
Splitting your Grunt configuration into different files
load-grunt-tasks shrunk your Gruntfile in code and complexity a little, but as you configure a large application, it will still become a very large file. This is where load-grunt-config comes into play. load-grunt-config lets you break up your Gruntfile config by task. Moreover, it encapsulates load-grunt-tasks and its functionality!
Important, however: Splitting your Gruntfile might not always work for every situation. If you have lots of shared configuration between your tasks (i.e. use a lot of the Grunt templating), you should be a little careful.
With load-grunt-config, your Gruntfile.js will look like this:
module.exports = function(grunt) {
  require('load-grunt-config')(grunt);
};
Yes, that’s really it, the whole file! Now where do our task configurations live?
Create a folder called grunt/ in the directory of your Gruntfile. By default, the plugin includes files within that folder that match the name of the task you want to use. Our directory structure should look like this:
- myproject/
-- Gruntfile.js
-- grunt/
--- concat.js
--- uglify.js
--- imagemin.js
Let’s now put the task configuration of each of our tasks directly into the respective files (you’ll see that these are mostly just copy and pastes from the original Gruntfile into a new structure):
grunt/concat.js
module.exports = {
  dist: {
    src: ['src/js/jquery.js', 'src/js/intro.js', 'src/js/main.js', 'src/js/outro.js'],
    dest: 'dist/build.js',
  }
};
grunt/uglify.js
module.exports = {
  dist: {
    files: {
      'dist/build.min.js': ['dist/build.js']
    }
  }
};
grunt/imagemin.js
module.exports = {
  options: {
    cache: false
  },

  dist: {
    files: [{
      expand: true,
      cwd: 'src/',
      src: ['**/*.{png,jpg,gif}'],
      dest: 'dist/'
    }]
  }
};
If JavaScript configuration blocks are not really your thing, load-grunt-tasks even allows you to use YAML or CoffeeScript syntax instead. Let’s write our final required file in YAML – the “aliases” file. This is a special file that registers task aliases, something we had to do as part of the Gruntfile before via the registerTask function. Here’s ours:
grunt/aliases.yaml
default:
  - 'concat'
  - 'uglify'
  - 'imagemin'
And that’s it! Execute the following command in your terminal:
$ grunt
If everything worked, this will now look at the “default” task and run everything in order. Now that we stripped down our main Gruntfile to three lines of code we never need to touch and externalized every task configuration, we’re done here. But man, it’s still pretty slow to get everything built. Let’s see what we can do to improve that.
Minimizing your build time
Even though your web app’s runtime and load time performance is much more business critical than the time required to execute a build, a slow build is still problematic. It will render it difficult to execute automatic builds with plugins like grunt-contrib-watch or after a Git commit fast enough, and introduces a “penalty” to actually run the build – the faster the build time, the more agile your workflow. If your production build takes longer than 10 minutes to run, you’ll only run the build when you absolutely have to, and you’ll wander off to get coffee while it runs. That’s a productivity killer. We’ve got things to speed up.
Only build files that actually changed: grunt-newer
After an initial build of your site, it’s likely that you’ll have only touched a few files in the project when you get around to building again. Let’s say that in our example, you changed an image in the src/img/ directory – running imagemin to re-optimize images would make sense, but only for that single image – and of course, re-running concat and uglify is just wasting precious CPU cycles.
Of course, you could always run $ grunt imagemin from your terminal instead of $ grunt to only selectively execute a task at hand, but there is a smarter way. It’s called grunt-newer.
Grunt-newer has a local cache in which it stores information about what files have actually changed, and only executes your tasks for the files that did, in fact, change. Let’s take a look on how to activate it.
Remember our aliases.yaml file? Change it from this:
default:
  - 'concat'
  - 'uglify'
  - 'imagemin'
to this:
default:
  - 'newer:concat'
  - 'newer:uglify'
  - 'newer:imagemin'
Simply prepending “newer:” to any of your tasks pipes your source and destination files through the grunt-newer plugin first, which then determines for what files, if any, the task should run.
Run multiple tasks in parallel: grunt-concurrent
grunt-concurrent is a plugin that becomes really useful when you have plenty of tasks that are independent from each other and consume a lot of time. It utilizes the number of CPUs in your device and executes multiple tasks in parallel.
Best of all, its configuration is super simple. Assuming you use load-grunt-config, create the following new file:
grunt/concurrent.js
module.exports = {
  first: ['concat'],
  second: ['uglify', 'imagemin']
};
We just setup to parallel execution tracks with the names “first” and “second”. The concat task needs to run first, and there’s nothing else to run in the meantime in our example. In our second track, we put both uglify and imagemin, since these two are independent from each other, and both take a considerable amount of time.
This on its own does not do anything yet. We have to change our default task alias to point to the concurrent jobs instead of the direct ones. Here’s the new content of grunt/aliases.yaml:
default:
  - 'concurrent:first'
  - 'concurrent:second'
If you now rerun your grunt build, the concurrent plugin will run the concat task first, and then spawn two threads on two different CPU cores to run both imagemin and uglify in parallel. Yay!
A word of advice though: Chances are that in our basic example, grunt-concurrent will not make your build significantly faster. The reason for this is the overhead created by spawning different instances of Grunt in different threads: In my case, at least +300ms pro spawn.
How much time did it take? time-grunt
Now that we’re optimizing every of our tasks, it would be really helpful to understand how much time every individual task required to execute. Fortunately, there’s a plugin for that as well: time-grunt.
time-grunt is not a classical grunt plugin that you load as npm task, but rather a plugin you include directly, similar to load-grunt-config. We’ll add a require for time-grunt to our Gruntfile, just like we did with load-grunt-config. Our Gruntfile should look like this now:
module.exports = function(grunt) {

  // measures the time each task takes
  require('time-grunt')(grunt);

  // load grunt config
  require('load-grunt-config')(grunt);

};
And I’m sorry to disappoint, but that’s it – try rerunning Grunt from your Terminal and for every task (and additionally the total build), you should see a nicely formatted info panel on execution time:

Automatic system notifications
Now that you have a heavily optimized Grunt build that executes swiftly, and provided you auto-build it in some way (i.e. by watching files with grunt-contrib-watch, or after commits), wouldn’t it be great if your system could notify you when your fresh build is ready to consume, or when anything bad happened? Meet grunt-notify.
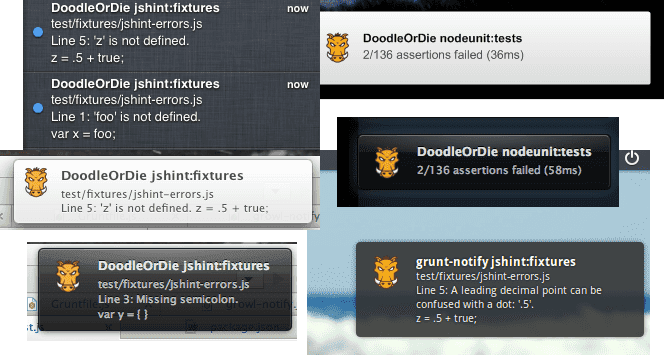
By default, grunt-notify provides automatic notifications for all Grunt errors and warnings using whatever notification system available on your OS: Growl for OS X or Windows, Mountain Lion’s and Mavericks’ Notification Center, and Notify-send. Amazingly, all you need in order to get this functionality is to install the plugin from npm and load it in your Gruntfile (remember, if you’re using grunt-load-config above, this step is automated!).
Here is how it will look like, depending on your operating system:
In addition to errors and warnings, let’s configure it so it runs after our last task finished executing. Assuming you are using grunt-load-config to split up tasks across files, this is the file we’ll need:
grunt/notify.js
module.exports = {
  imagemin: {
    options: {
      title: 'Build complete',  // optional
        message: '<%= pkg.name %> build finished successfully.' //required
      }
    }
  }
}
In the first level of our config object, the key has to match the name of the task we want to connect it to. This example will cause the message to appear right after the imagemin task has executed, which is the last one in our build chain.
Wrapping it all up
If you’ve followed from the top, you are now the proud owner of a build process that is super tidy and organized, is blazingly fast due to parallelization and selective processing and notifies you when anything goes wrong.
If you discover another gem that improves Grunt and its plugins further, please do let us know! Until then, happy grunting!
Update (2/14/2014): To grab a copy of the full, working example Grunt project, click here.