
ウェブプッシュの一般的な実装パターンを見てみましょう。
これには、Service Worker で利用可能ないくつかの API を使用します。
通知の閉鎖イベント
前のセクションでは、notificationclick イベントをリッスンする方法について説明しました。
また、ユーザーが通知を閉じた場合(通知をクリックするのではなく、クロスをクリックするか、通知をスワイプして閉じた場合)に呼び出される notificationclose イベントもあります。
このイベントは通常、通知に対するユーザーのエンゲージメントをトラッキングするアナリティクスに使用されます。
self.addEventListener('notificationclose', function (event) {
  const dismissedNotification = event.notification;

  const promiseChain = notificationCloseAnalytics();
  event.waitUntil(promiseChain);
});
通知にデータを追加する
プッシュ メッセージが受信されたときに、ユーザーが通知をクリックした場合にのみ有用なデータが存在することがよくあります。たとえば、通知がクリックされたときに開く URL などです。
プッシュ イベントからデータを取得して通知に添付する最も簡単な方法は、showNotification() に渡されるオプション オブジェクトに data パラメータを追加することです。次に例を示します。
const options = {
  body:
    'This notification has data attached to it that is printed ' +
    "to the console when it's clicked.",
  tag: 'data-notification',
  data: {
    time: new Date(Date.now()).toString(),
    message: 'Hello, World!',
  },
};
registration.showNotification('Notification with Data', options);
クリック ハンドラ内では、event.notification.data を使用してデータにアクセスできます。
const notificationData = event.notification.data;
console.log('');
console.log('The notification data has the following parameters:');
Object.keys(notificationData).forEach((key) => {
  console.log(`  ${key}: ${notificationData[key]}`);
});
console.log('');
ウィンドウを開く
通知に対する最も一般的なレスポンスの 1 つは、特定の URL のウィンドウ / タブを開くことです。これは clients.openWindow() API を使用して行えます。
notificationclick イベントでは、次のようなコードを実行します。
const examplePage = '/demos/notification-examples/example-page.html';
const promiseChain = clients.openWindow(examplePage);
event.waitUntil(promiseChain);
次のセクションでは、ユーザーをリダイレクトするページがすでに開いているかどうかを確認する方法について説明します。これにより、新しいタブを開くのではなく、開いているタブにフォーカスを合わせることができます。
既存のウィンドウにフォーカスを合わせる
可能であれば、ユーザーが通知をクリックするたびに新しいウィンドウを開くのではなく、ウィンドウにフォーカスを当てる必要があります。
これを実現する方法を確認する前に、これはオリジンのページでのみ可能であることに注意してください。これは、Google が確認できるのは、サイトに属する開いているページのみであるためです。これにより、デベロッパーはユーザーが閲覧しているすべてのサイトを確認できなくなります。
前述の例を基に、/demos/notification-examples/example-page.html がすでに開いているかどうかを確認するようにコードを変更します。
const urlToOpen = new URL(examplePage, self.location.origin).href;

const promiseChain = clients
  .matchAll({
    type: 'window',
    includeUncontrolled: true,
  })
  .then((windowClients) => {
    let matchingClient = null;

    for (let i = 0; i < windowClients.length; i++) {
      const windowClient = windowClients[i];
      if (windowClient.url === urlToOpen) {
        matchingClient = windowClient;
        break;
      }
    }

    if (matchingClient) {
      return matchingClient.focus();
    } else {
      return clients.openWindow(urlToOpen);
    }
  });

event.waitUntil(promiseChain);
コードを順を追って見てみましょう。
まず、URL API を使用してサンプルページを解析します。これは Jeff Posnick から学んだ便利な方法です。location オブジェクトで new URL() を呼び出すと、渡された文字列が相対の場合、絶対 URL が返されます(つまり、/ は https://example.com/ になります)。
URL を絶対パスにすることで、後でウィンドウの URL と照合できるようにします。
const urlToOpen = new URL(examplePage, self.location.origin).href;
次に、WindowClient オブジェクトのリストを取得します。これは、現在開いているタブとウィンドウのリストです。(これらのタブはオリジン専用です)。
const promiseChain = clients.matchAll({
  type: 'window',
  includeUncontrolled: true,
});
matchAll に渡されるオプションは、ブラウザに「window」タイプのクライアントのみを検索するように指示します(つまり、タブとウィンドウのみを検索し、ウェブワーカーを除外します)。includeUncontrolled を使用すると、現在のサービス ワーカー(このコードを実行しているサービス ワーカー)によって制御されていないオリジンのすべてのタブを検索できます。通常、matchAll() を呼び出すときは常に includeUncontrolled を true にする必要があります。
返された Promise を promiseChain としてキャプチャし、後で event.waitUntil() に渡して、サービス ワーカーを存続させます。
matchAll() プロミスが解決すると、返されたウィンドウ クライアントを反復処理し、その URL を開きたい URL と比較します。一致が見つかった場合は、そのクライアントにフォーカスを当て、そのウィンドウをユーザーの注意を引くようにします。フォーカスは matchingClient.focus() 呼び出しで実行されます。
一致するクライアントが見つからない場合は、前のセクションと同じように新しいウィンドウが開きます。
.then((windowClients) => {
  let matchingClient = null;

  for (let i = 0; i < windowClients.length; i++) {
    const windowClient = windowClients[i];
    if (windowClient.url === urlToOpen) {
      matchingClient = windowClient;
      break;
    }
  }

  if (matchingClient) {
    return matchingClient.focus();
  } else {
    return clients.openWindow(urlToOpen);
  }
});
通知の統合
通知にタグを追加すると、同じタグを持つ既存の通知が置き換えられる動作が有効になります。
ただし、Notifications API を使用して通知の折りたたみをより高度に行うことができます。たとえば、チャットアプリで、最新のメッセージのみを表示するのではなく、「Matt から 2 件のメッセージがあります」のようなメッセージを新しい通知に表示したい場合などです。
これを行うには、registration.getNotifications() API を使用します。この API を使用すると、ウェブアプリで現在表示されているすべての通知にアクセスできます。
この API を使用してチャット例を実装する方法を見てみましょう。
チャットアプリでは、各通知にユーザー名を含むデータがあるとします。
まず、特定のユーザーの未読の通知を探します。registration.getNotifications() を取得してループし、特定のユーザー名の notification.data を確認します。
const promiseChain = registration.getNotifications().then((notifications) => {
  let currentNotification;

  for (let i = 0; i < notifications.length; i++) {
    if (notifications[i].data && notifications[i].data.userName === userName) {
      currentNotification = notifications[i];
    }
  }

  return currentNotification;
});
次のステップでは、この通知を新しい通知に置き換えます。
この偽のメッセージ アプリでは、新しい通知のデータにカウントを追加し、新しい通知ごとにカウントをインクリメントすることで、新着メッセージの数を追跡します。
.then((currentNotification) => {
  let notificationTitle;
  const options = {
    icon: userIcon,
  }

  if (currentNotification) {
    // We have an open notification, let's do something with it.
    const messageCount = currentNotification.data.newMessageCount + 1;

    options.body = `You have ${messageCount} new messages from ${userName}.`;
    options.data = {
      userName: userName,
      newMessageCount: messageCount
    };
    notificationTitle = `New Messages from ${userName}`;

    // Remember to close the old notification.
    currentNotification.close();
  } else {
    options.body = `"${userMessage}"`;
    options.data = {
      userName: userName,
      newMessageCount: 1
    };
    notificationTitle = `New Message from ${userName}`;
  }

  return registration.showNotification(
    notificationTitle,
    options
  );
});
現在表示されている通知がある場合は、メッセージ数をインクリメントし、通知のタイトルと本文メッセージをそれに応じて設定します。通知がない場合、newMessageCount が 1 の新しい通知が作成されます。
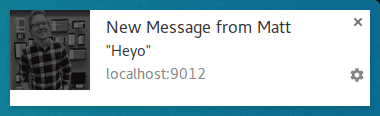
最初のメッセージは次のようになります。
2 つ目の通知が届くと、通知は次のようにまとめられます。

このアプローチの利点は、通知が重なって表示されるため、最新のメッセージに置き換えるだけの場合よりも、統一感のある外観と操作感を実現できることです。
ルールの例外
プッシュを受信したときに通知を表示する必要がある必要がありますと説明してきましたが、これはほとんどの場合に当てはまります。通知を表示する必要がないシナリオは、ユーザーがサイトを開いてフォーカスしている場合です。
プッシュ イベント内で、ウィンドウ クライアントを調べてフォーカスされているウィンドウを探すことで、通知を表示する必要があるかどうかを確認できます。
すべてのウィンドウを取得してフォーカスされているウィンドウを探すコードは次のようになります。
function isClientFocused() {
  return clients
    .matchAll({
      type: 'window',
      includeUncontrolled: true,
    })
    .then((windowClients) => {
      let clientIsFocused = false;

      for (let i = 0; i < windowClients.length; i++) {
        const windowClient = windowClients[i];
        if (windowClient.focused) {
          clientIsFocused = true;
          break;
        }
      }

      return clientIsFocused;
    });
}
clients.matchAll() を使用してすべてのウィンドウ クライアントを取得し、それらをループして focused パラメータをチェックします。
プッシュ イベント内で、この関数を使用して通知を表示する必要があるかどうかを判断します。
const promiseChain = isClientFocused().then((clientIsFocused) => {
  if (clientIsFocused) {
    console.log("Don't need to show a notification.");
    return;
  }

  // Client isn't focused, we need to show a notification.
  return self.registration.showNotification('Had to show a notification.');
});

event.waitUntil(promiseChain);
プッシュ イベントからページにメッセージを送信する
ユーザーが現在サイトにアクセスしている場合は、通知の表示をスキップできます。イベントが発生したことをユーザーに知らせたいが、通知はやりすぎだと感じる場合はどうすればよいでしょうか。
1 つの方法は、サービス ワーカーからページにメッセージを送信することです。これにより、ウェブページで通知や更新を表示して、イベントをユーザーに知らせることができます。これは、ページ内の控えめな通知がユーザーにとってより適切で親しみやすい状況に役立ちます。
プッシュを受信し、ウェブアプリが現在フォーカスされていることを確認したら、開いている各ページに「メッセージを投稿」できます。
const promiseChain = isClientFocused().then((clientIsFocused) => {
  if (clientIsFocused) {
    windowClients.forEach((windowClient) => {
      windowClient.postMessage({
        message: 'Received a push message.',
        time: new Date().toString(),
      });
    });
  } else {
    return self.registration.showNotification('No focused windows', {
      body: 'Had to show a notification instead of messaging each page.',
    });
  }
});

event.waitUntil(promiseChain);
各ページで、メッセージ イベント リスナーを追加してメッセージをリッスンします。
navigator.serviceWorker.addEventListener('message', function (event) {
  console.log('Received a message from service worker: ', event.data);
});
このメッセージ リスナーでは、ページにカスタム UI を表示したり、メッセージを完全に無視したりなど、任意の処理を行うことができます。
また、ウェブページでメッセージ リスナーを定義しない場合、サービス ワーカーからのメッセージは何もしません。
ページをキャッシュに保存してウィンドウを開く
このガイドの範囲外ですが、検討に値するシナリオとして、通知をクリックした後にユーザーがアクセスすることが予想されるウェブページをキャッシュに保存することで、ウェブアプリの全体的な UX を改善できる点が挙げられます。
これを行うには、fetch イベントを処理するようにサービス ワーカーを設定する必要があります。fetch イベント リスナーを実装する場合は、通知を表示する前に必要なページとアセットをキャッシュに保存して、push イベントでそのリスナーを利用するようにしてください。
ブラウザの互換性
notificationclose イベント
' d='M96 183a64 64 0 0 1-23-23L17 64a128 128 0 0 0 111 192l55-96a64 64 0 0 1-87 23Z'/%3E%3Cpath fill='url(%23b)' d='M192 128a64 64 0 0 1-9 32l-55 96A128 128 0 0 0 239 64H128a64 64 0 0 1 64 64Z'/%3E%3Ccircle cx='128' cy='128' r='52' fill='%231a73e8'/%3E%3Cpath fill='url(%23c)' d='M96 73a64 64 0 0 1 32-9h111a128 128 0 0 0-222 0l56 96a64 64 0 0 1 23-87Z'/%3E%3C/svg%3E)
' xlink:href='%23A'%3E%3Cstop offset='.76' stop-opacity='0'/%3E%3Cstop offset='.95' stop-opacity='.5'/%3E%3Cstop offset='1'/%3E%3C/radialGradient%3E%3CradialGradient id='F' cx='2523' cy='4680' r='20243' gradientTransform='matrix(-.03715 .99931 -2.12836 -.07913 13579 3530)' xlink:href='%23A'%3E%3Cstop offset='0' stop-color='%2335c1f1'/%3E%3Cstop offset='.11' stop-color='%2334c1ed'/%3E%3Cstop offset='.23' stop-color='%232fc2df'/%3E%3Cstop offset='.31' stop-color='%232bc3d2'/%3E%3Cstop offset='.67' stop-color='%2336c752'/%3E%3C/radialGradient%3E%3CradialGradient id='G' cx='24247' cy='7758' r='9734' gradientTransform='matrix(.28109 .95968 -.78353 .22949 24510 -16292)' xlink:href='%23A'%3E%3Cstop offset='0' stop-color='%2366eb6e'/%3E%3Cstop offset='1' stop-color='%2366eb6e' stop-opacity='0'/%3E%3C/radialGradient%3E%3Cpath id='H' d='M24105 20053a9345 9345 0 01-1053 472 10202 10202 0 01-3590 646c-4732 0-8855-3255-8855-7432 0-1175 680-2193 1643-2729-4280 180-5380 4640-5380 7253 0 7387 6810 8137 8276 8137 791 0 1984-230 2704-456l130-44a12834 12834 0 006660-5282c220-350-168-757-535-565z'/%3E%3Cpath id='I' d='M11571 25141a7913 7913 0 01-2273-2137 8145 8145 0 01-1514-4740 8093 8093 0 013093-6395 8082 8082 0 011373-859c312-148 846-414 1554-404a3236 3236 0 012569 1297 3184 3184 0 01636 1866c0-21 2446-7960-8005-7960-4390 0-8004 4166-8004 7820 0 2319 538 4170 1212 5604a12833 12833 0 007684 6757 12795 12795 0 003908 610c1414 0 2774-233 4045-656a7575 7575 0 01-6278-803z'/%3E%3Cpath id='J' d='M16231 15886c-80 105-330 250-330 566 0 260 170 512 472 723 1438 1003 4149 868 4156 868a5954 5954 0 003027-839 6147 6147 0 001133-850 6180 6180 0 001910-4437c26-2242-796-3732-1133-4392-2120-4141-6694-6525-11668-6525-7011 0-12703 5635-12798 12620 47-3654 3679-6605 7996-6605 350 0 2346 34 4200 1007 1634 858 2490 1894 3086 2921 618 1067 728 2415 728 2952s-271 1333-780 1990z'/%3E%3Cuse fill='url(%23B)' xlink:href='%23H'/%3E%3Cuse fill='url(%23D)' opacity='.35' xlink:href='%23H'/%3E%3Cuse fill='url(%23C)' xlink:href='%23I'/%3E%3Cuse fill='url(%23E)' opacity='.4' xlink:href='%23I'/%3E%3Cuse fill='url(%23F)' xlink:href='%23J'/%3E%3Cuse fill='url(%23G)' xlink:href='%23J'/%3E%3C/svg%3E)
' gradientUnits='userSpaceOnUse'%3E%3Cstop offset='.2' stop-color='%239059ff' stop-opacity='0'/%3E%3Cstop offset='.3' stop-color='%238c4ff3' stop-opacity='.1'/%3E%3Cstop offset='.8' stop-color='%237716a8' stop-opacity='.5'/%3E%3Cstop offset='1' stop-color='%236e008b' stop-opacity='.6'/%3E%3C/radialGradient%3E%3CradialGradient id='ff-g' cx='239.1' cy='34.6' r='171.6' gradientUnits='userSpaceOnUse'%3E%3Cstop offset='0' stop-color='%23ffe226'/%3E%3Cstop offset='.1' stop-color='%23ffdb27'/%3E%3Cstop offset='.3' stop-color='%23ffc82a'/%3E%3Cstop offset='.5' stop-color='%23ffa930'/%3E%3Cstop offset='.7' stop-color='%23ff7e37'/%3E%3Cstop offset='.8' stop-color='%23ff7139'/%3E%3C/radialGradient%3E%3CradialGradient id='ff-h' cx='374' cy='-74.3' r='732.2' gradientUnits='userSpaceOnUse'%3E%3Cstop offset='.1' stop-color='%23fff44f'/%3E%3Cstop offset='.5' stop-color='%23ff980e'/%3E%3Cstop offset='.6' stop-color='%23ff5634'/%3E%3Cstop offset='.7' stop-color='%23ff3647'/%3E%3Cstop offset='.9' stop-color='%23e31587'/%3E%3C/radialGradient%3E%3CradialGradient id='ff-i' cx='304.6' cy='7.1' r='536.4' gradientTransform='rotate(84 303 4)' gradientUnits='userSpaceOnUse'%3E%3Cstop offset='0' stop-color='%23fff44f'/%3E%3Cstop offset='.1' stop-color='%23ffe847'/%3E%3Cstop offset='.2' stop-color='%23ffc830'/%3E%3Cstop offset='.3' stop-color='%23ff980e'/%3E%3Cstop offset='.4' stop-color='%23ff8b16'/%3E%3Cstop offset='.5' stop-color='%23ff672a'/%3E%3Cstop offset='.6' stop-color='%23ff3647'/%3E%3Cstop offset='.7' stop-color='%23e31587'/%3E%3C/radialGradient%3E%3CradialGradient id='ff-j' cx='235' cy='98.1' r='457.1' gradientUnits='userSpaceOnUse'%3E%3Cstop offset='.1' stop-color='%23fff44f'/%3E%3Cstop offset='.5' stop-color='%23ff980e'/%3E%3Cstop offset='.6' stop-color='%23ff5634'/%3E%3Cstop offset='.7' stop-color='%23ff3647'/%3E%3Cstop offset='.9' stop-color='%23e31587'/%3E%3C/radialGradient%3E%3CradialGradient id='ff-k' cx='355.7' cy='124.9' r='500.3' gradientUnits='userSpaceOnUse'%3E%3Cstop offset='.1' stop-color='%23fff44f'/%3E%3Cstop offset='.2' stop-color='%23ffe141'/%3E%3Cstop offset='.5' stop-color='%23ffaf1e'/%3E%3Cstop offset='.6' stop-color='%23ff980e'/%3E%3C/radialGradient%3E%3ClinearGradient id='ff-a' x1='446.9' y1='76.8' x2='47.9' y2='461.8' gradientUnits='userSpaceOnUse'%3E%3Cstop offset='.1' stop-color='%23fff44f'/%3E%3Cstop offset='.1' stop-color='%23ffe847'/%3E%3Cstop offset='.2' stop-color='%23ffc830'/%3E%3Cstop offset='.4' stop-color='%23ff980e'/%3E%3Cstop offset='.4' stop-color='%23ff8b16'/%3E%3Cstop offset='.5' stop-color='%23ff672a'/%3E%3Cstop offset='.5' stop-color='%23ff3647'/%3E%3Cstop offset='.7' stop-color='%23e31587'/%3E%3C/linearGradient%3E%3ClinearGradient id='ff-l' x1='442.1' y1='74.8' x2='102.6' y2='414.3' gradientUnits='userSpaceOnUse'%3E%3Cstop offset='.2' stop-color='%23fff44f' stop-opacity='.8'/%3E%3Cstop offset='.3' stop-color='%23fff44f' stop-opacity='.6'/%3E%3Cstop offset='.5' stop-color='%23fff44f' stop-opacity='.2'/%3E%3Cstop offset='.6' stop-color='%23fff44f' stop-opacity='0'/%3E%3C/linearGradient%3E%3C/defs%3E%3Cpath d='M479 166c-11-25-32-52-49-60a249 249 0 0 1 25 73c-27-68-73-95-111-155a255 255 0 0 1-8-14 44 44 0 0 1-4-9 1 1 0 0 0 0-1 1 1 0 0 0-1 0c-60 35-81 101-83 134a120 120 0 0 0-66 25 71 71 0 0 0-6-5 111 111 0 0 1-1-58c-25 11-44 29-58 44-9-12-9-52-8-60l-8 4a175 175 0 0 0-24 21 210 210 0 0 0-22 26 203 203 0 0 0-32 73l-1 2-2 15a229 229 0 0 0-4 34v1a240 240 0 0 0 477 40l1-9c5-41 0-84-15-121zM202 355l3 1-3-1zm55-145zm198-31z' fill='url(%23ff-a)'/%3E%3Cpath d='M479 166c-11-25-32-52-49-60 14 26 22 53 25 72v1a207 207 0 0 1-206 279c-113-3-212-87-231-197-3-17 0-26 2-40-2 11-3 14-4 34v1a240 240 0 0 0 477 40l1-9c5-41 0-84-15-121z' fill='url(%23ff-b)'/%3E%3Cpath d='M479 166c-11-25-32-52-49-60 14 26 22 53 25 72v1a207 207 0 0 1-206 279c-113-3-212-87-231-197-3-17 0-26 2-40-2 11-3 14-4 34v1a240 240 0 0 0 477 40l1-9c5-41 0-84-15-121z' fill='url(%23ff-c)'/%3E%3Cpath d='m362 195 1 1a130 130 0 0 0-22-29C266 92 322 5 331 0c-60 35-81 101-83 134l9-1c45 0 84 25 105 62z' fill='url(%23ff-d)'/%3E%3Cpath d='M257 210c-1 6-22 26-29 26-68 0-80 41-80 41 3 35 28 64 57 79l4 2 7 3a107 107 0 0 0 31 6c120 6 143-143 57-186 22-4 45 5 58 14-21-37-60-62-105-62l-9 1a120 120 0 0 0-66 25l17 16c16 16 58 33 58 35z' fill='url(%23ff-e)'/%3E%3Cpath d='M257 210c-1 6-22 26-29 26-68 0-80 41-80 41 3 35 28 64 57 79l4 2 7 3a107 107 0 0 0 31 6c120 6 143-143 57-186 22-4 45 5 58 14-21-37-60-62-105-62l-9 1a120 120 0 0 0-66 25l17 16c16 16 58 33 58 35z' fill='url(%23ff-f)'/%3E%3Cpath d='m171 151 5 3a111 111 0 0 1-1-58c-25 11-44 29-58 44 1 0 36 0 54 11z' fill='url(%23ff-g)'/%3E%3Cpath d='M18 261a242 242 0 0 0 231 197 207 207 0 0 0 206-279c8 56-20 110-64 146-86 71-169 43-186 31l-3-1c-50-24-71-70-67-110-42 0-57-35-57-35s38-28 89-4c46 22 90 4 90 4 0-2-42-19-58-35l-17-16a71 71 0 0 0-6-5l-5-3c-18-11-52-11-54-11-9-12-9-51-8-60l-8 4a175 175 0 0 0-24 21 210 210 0 0 0-22 26 203 203 0 0 0-32 73c0 1-9 38-5 57z' fill='url(%23ff-h)'/%3E%3Cpath d='M341 167a130 130 0 0 1 22 29 46 46 0 0 1 4 3c55 50 26 121 24 126 44-36 72-90 64-146-27-68-73-95-111-155a255 255 0 0 1-8-14 44 44 0 0 1-4-9 1 1 0 0 0 0-1 1 1 0 0 0-1 0c-9 5-65 92 10 167z' fill='url(%23ff-i)'/%3E%3Cpath d='M367 199a46 46 0 0 0-4-3l-1-1c-13-9-36-18-58-15 86 44 63 193-57 187a107 107 0 0 1-31-6 131 131 0 0 1-11-5c17 12 99 39 186-31 2-5 31-76-24-126z' fill='url(%23ff-j)'/%3E%3Cpath d='M148 277s12-41 80-41c7 0 28-20 29-26s-44 18-90-4c-51-24-89 4-89 4s15 35 57 35c-4 40 16 85 67 110l3 1c-29-15-54-44-57-79z' fill='url(%23ff-k)'/%3E%3Cpath d='M479 166c-11-25-32-52-49-60a249 249 0 0 1 25 73c-27-68-73-95-111-155a255 255 0 0 1-8-14 44 44 0 0 1-4-9 1 1 0 0 0 0-1 1 1 0 0 0-1 0c-60 35-81 101-83 134l9-1c45 0 84 25 105 62-13-9-36-18-58-14 86 43 63 192-57 186a107 107 0 0 1-31-6 131 131 0 0 1-11-5l-3-1 3 1c-29-15-54-44-57-79 0 0 12-41 80-41 7 0 28-20 29-26 0-2-42-19-58-35l-17-16a71 71 0 0 0-6-5 111 111 0 0 1-1-58c-25 11-44 29-58 44-9-12-9-52-8-60l-8 4a175 175 0 0 0-24 21 210 210 0 0 0-22 26 203 203 0 0 0-32 73l-1 2-2 15a279 279 0 0 0-4 34v1a240 240 0 0 0 477 40l1-9c5-41 0-84-15-121zm-24 13z' fill='url(%23ff-l)'/%3E%3C/svg%3E)
' xlink:href='%23s-b'%3E%3Cstop offset='0' stop-color='%2324a5f3' stop-opacity='0' /%3E%3Cstop offset='1' stop-color='%231e8ceb' /%3E%3C/radialGradient%3E%3CradialGradient id='s-j' cx='109.3' cy='13.8' r='93.1' gradientTransform='matrix(-.02 1.1 -1.04 -.02 137 -115)' xlink:href='%23s-b'%3E%3Cstop offset='0' stop-opacity='0' /%3E%3Cstop offset='1' stop-color='%235488d6' stop-opacity='0' /%3E%3Cstop offset='1' stop-color='%235d96eb' /%3E%3C/radialGradient%3E%3C/defs%3E%3Crect width='220' height='220' x='22' y='-107' fill='url(%23s-a)' ry='49' transform='matrix(.57 0 0 .57 187 256)' /%3E%3Cg transform='translate(194 190)'%3E%3Ccircle cx='67.8' cy='67.7' fill='url(%23s-c)' paint-order='stroke fill markers' r='54' /%3E%3Ccircle cx='-69.9' cy='69.3' fill='url(%23s-i)' transform='translate(138 -2)' r='54' /%3E%3C/g%3E%3Cellipse cx='120' cy='14.2' fill='url(%23s-j)' rx='93.1' ry='93.7' transform='matrix(.58 0 0 .58 192 250)' /%3E%3Cg transform='matrix(.58 0 0 .57 197 182)'%3E%3Cpath fill='%23cac7c8' d='M46 192h1l72-48-7-9-66 57Z' /%3E%3Cpath fill='%23fbfffc' d='M46 191v1l66-57-7-9-59 65Z' /%3E%3Cpath fill='url(%23s-d)' d='m119 144-7-9 66-57-59 66Z' /%3E%3Cpath fill='%23fb645c' d='m105 126 7 9 66-57-1-1-72 49Z' /%3E%3C/g%3E%3Cpath stroke='%23fff' stroke-linecap='round' stroke-miterlimit='1' stroke-width='1.3' d='m287 278 3-2m-12-17 8-2m-8-3h4m-4-13 8 2m-8 3h4m-1-13 7 3m-4-11 7 4m-2-11 6 6m0-12 6 7m1-11 4 6m4-10 3 7m5-9 2 7m15-7-1 7m10-5-3 7m11-4-4 7m11-2-5 6m16 7-7 4m10 4-7 3m10 6-8 1m8 16-8-2m5 10-7-3m4 11-7-4m2 11-6-5m0 11-5-6m-2 11-4-7m-4 11-3-8m-6 10-1-8m-16 8 2-8m-10 5 3-7m-11 4 4-7m-11 2 5-6m-8 3 3-3m4 8 2-3m5 8 2-4m6 7 1-4m8 5v-4m8 4v-4m9 3-1-4m9 1-2-4m9 0-2-4m9-2-3-3m8-4-3-2m8-5-4-2m7-6-4-1m5-8h-4m4-8h-4m3-9-4 1m1-9-4 2m-1-9-3 2m-2-9-3 3m-4-8-2 3m-5-8-2 4m-6-6-1 3m-8-5v4m-8-4v4m-9-2 1 3m-9 0 2 3m-9 1 2 3m-9 2 3 3m-8 4 3 2m-8 5 4 2m-7 6 4 1m-4 25 4-1m-2 5 7-3m-6 7 4-2m-2 6 7-4m-13-21h8m41-41v-8m0 99v-8m49-42h-8' transform='translate(-65 8)' /%3E%3C/svg%3E)
Clients.openWindow()
ServiceWorkerRegistration.getNotifications()
clients.matchAll()
詳細については、サービス ワーカーの概要に関する投稿をご覧ください。
次のステップ
- ウェブプッシュ通知の概要
- プッシュの仕組み
- ユーザーを登録する
- 権限の UX
- ウェブプッシュ ライブラリを使用したメッセージの送信
- ウェブ プッシュ プロトコル
- プッシュ イベントの処理
- 通知の表示
- 通知の動作
- 一般的な通知パターン
- プッシュ通知に関するよくある質問
- 一般的な問題とバグの報告