
A foundational overview of how to build an adaptive favicon.

In this post I want to share thinking on how to build an adaptive favicon with SVG. Try the demo.
If you prefer video, here's a YouTube version of this post:
Overview
A custom favicon is
a great way to polish a web project. It displays on desktop browser tabs, and
also inside "save for later" readers, other blog posts linking to your site, and
more. Traditionally this has been done with the .ico file type, but recently
browsers have allowed use of
SVG, a vector format. Using
progressive
enhancement
you can serve well supported .ico favicons, and upgrade to an .svg if
available.
SVG is able to scale up and down without quality loss, and can potentially be very small in size, they can also have embedded CSS, even embedded media queries. This means if an SVG favicon is used in a reader app or bookmarks bars, there's a chance the user could get a theme relevant (light or dark) icon due to dark preference styles provided inside the SVG. The SVG then adapts using its embedded styling for light and dark user preferences.
Markup
SVG markup is
XML using
an .svg file type extension which allows it to hold more dynamic types of
code.
Start by making favicon.svg
Make a new file called favicon.svg and add the following:
<svg xmlns="http://www.w3.org/2000/svg" viewBox="0 0 400 400">

</svg>
Here's my SVG file, I've sized the viewBox relevant to my artwork:
<svg xmlns="http://www.w3.org/2000/svg" viewBox="0 0 447 428">

</svg>
Adding shapes and paths
Next, add SVG path code. Often this means opening the SVG in a code editor, but that code is generally not human friendly. Here's a great guide that guides you through exporting and optimizing SVG from design tools.
The artwork for this GUI Challenge came from a designer who made it in Adobe Illustrator. I heavily optimized it. I ran it through SVGOMG and then hand-edited the cruft away.
Here's an example of the skull artwork path group from mine, after cleaning
it:
<svg xmlns="http://www.w3.org/2000/svg" viewBox="0 0 447 428">
  <g id="skull">
    <path id="skull-outline" class="favicon-stroke" stroke-linejoin="round" d="M19.62 188.39A166.62 166.62 0 0 1 186.24 21.77c115.25 0 166.61 74.59 166.61 166.62 0 1.83-.08 3.64-.13 5.46h.13s.68 175.09.68 178.65c0 30.11-16.26 41.67-36.32 41.67-12.7 0-35.22-3.93-36.22-32.69h-.2c-1 28.76-16.81 32.69-36.22 32.69-18 0-32.87-6.78-35.77-32.53-2.9 25.75-17.8 32.53-35.8 32.53-20.06 0-36.32-11.56-36.32-41.67 0-2.48.36-24.88.36-24.88A166.68 166.68 0 0 1 19.62 188.39Z" />
    <path id="eyes-and-nose" d="M180.77 205.76c0 23.64 12.84 42.81 28.68 42.81s28.68-19.17 28.68-42.81-12.84-42.82-28.68-42.82-28.68 19.17-28.68 42.82M275 205.76c0 23.64 12.84 42.81 28.68 42.81s28.68-19.17 28.68-42.81-12.84-42.82-28.68-42.82S275 182.11 275 205.76M264.51 276.85s-29.26 43.53-20.12 49.23c7.07 4.41 20.49-16.71 20.49-16.71s12.82 22.58 16.76 20c16.24-10.71-17.13-52.5-17.13-52.5"/>
    <path id="jawline" class="favicon-stroke" fill="none" stroke-linecap="round" d="M114.92 284.33c22.54-1 22 7 22 62.48" />
  </g>
</svg>
Notice the human readable ID
selectors like
#eyes-and-nose and
classes like
.favicon-stroke. These are from my hand editing, in preparation for CSS.
Adding classes and ID's is not required for your SVG to be an adaptive favicon.
Link the favicon SVG from HTML
In the <head> tag of your HTML, after the .ico favicon, add the following:
<link rel="icon" href="/favicon.ico" sizes="any">
<link rel="icon" href="/favicon.svg" type="image/svg+xml">
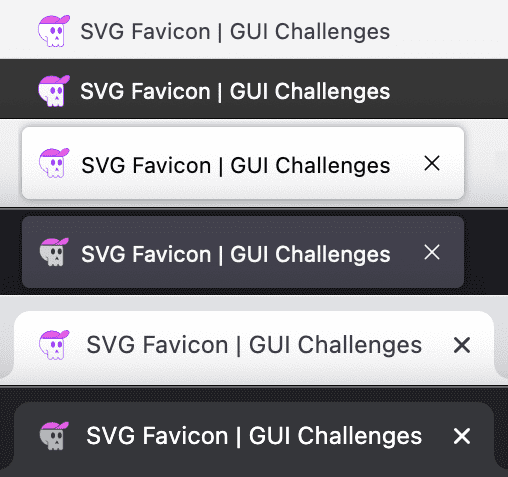
As the new icon may look identical to the .ico version verify that it is being
used. Open the Network panel of DevTools. Filter by images and search for
favicon:

Styles
Like HTML, you can add a <style> tag to the markup for use against that
document scope:
<svg xmlns="http://www.w3.org/2000/svg" viewBox="0 0 447 428">
  <style>

  </style>
  …
</svg>
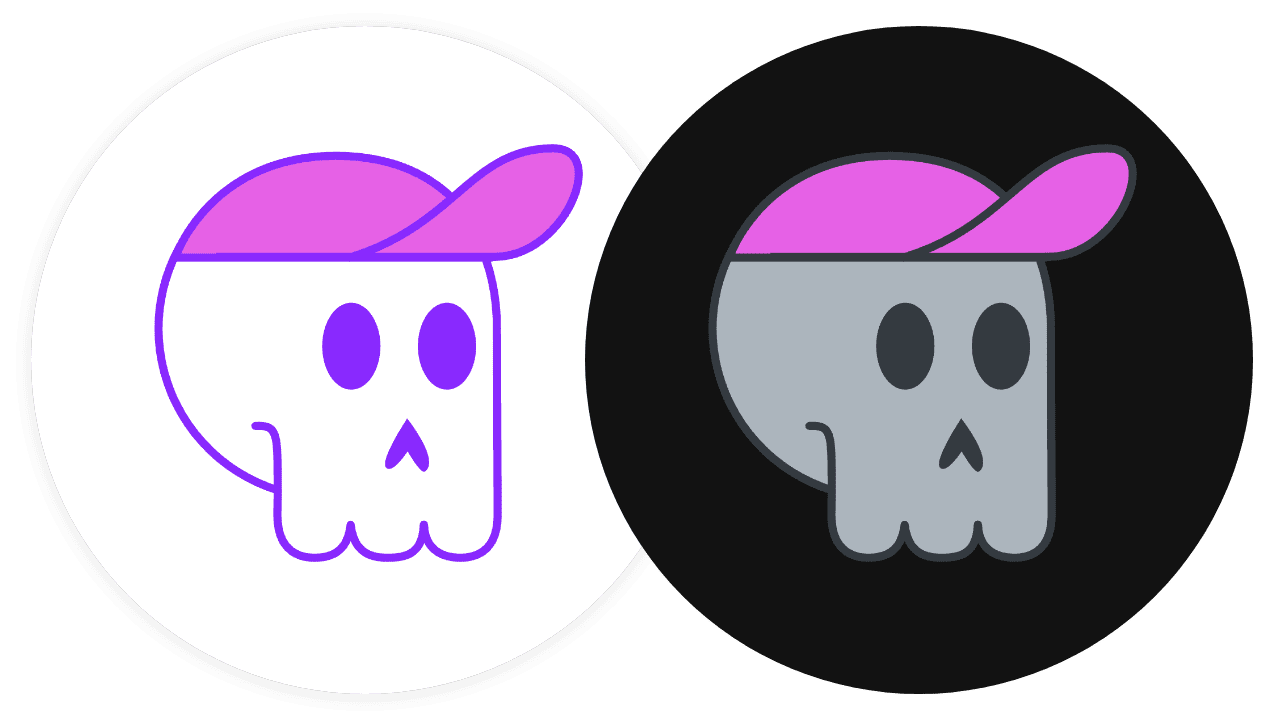
The light theme version will be the default coloring of my favicon SVG. The styles I wrote for that were mostly stroke and fill colors:
<svg xmlns="http://www.w3.org/2000/svg" viewBox="0 0 447 428">
  <style>
    .favicon-stroke {
      stroke-width: 8px;
      stroke: #8929ff;
    }
    #skull-outline { fill: white }
    #eyes-and-nose, #hat-outline { fill: #8929ff }
    #hat-fill, #hat-bill { fill: #e662e6 }
  </style>
  …
</svg>

Next, the most fun part, styling the dark theme version of your favicon. The styles for that will go into a media query within the style tag:
<svg xmlns="http://www.w3.org/2000/svg" viewBox="0 0 447 428">
  <style>
    …
    @media (prefers-color-scheme: dark) {
      /* dark theme styles */
    }
  </style>
  …
</svg>

Mine ended up like this:
<svg xmlns="http://www.w3.org/2000/svg" viewBox="0 0 447 428">
  <style>
    …
    @media (prefers-color-scheme: dark) {
      .favicon-stroke { stroke: #343a40 }
      #skull-outline { fill: #adb5bd }
      #hat-outline { fill: #343a40 }
      #eyes-and-nose { fill: #343a40 }
    }
  </style>
  …
</svg>

I chose to swap the bright purple borders for a nice cool dark gray (#343a40),
changed the skull bone color from white to a light cool gray (#adb5bd), but
left the pink accent hat.

Conclusion
Now that you know how I did it, how would you‽ 🙂
Let's diversify our approaches and learn all the ways to build on the web. Create a demo, tweet me links, and I'll add it to the community remixes section below!