

Introduction
“Find Your Way to Oz” is a new Google Chrome Experiment brought to the web by Disney. It allows you to take an interactive journey through a Kansas circus, which leads you to the land of Oz after you are swept up by a massive storm.
Our goal was to combine the richness of cinema with the technical capabilities of the browser to create a fun, immersive experience that users can form a strong connection with.
The job is a bit too big to capture in its whole in this piece so we’ve dived in and pulled out some chapters to the technology story that we think are interesting. Along the way we extracted some focused tutorials of increasing difficulty.
Many people worked hard to make this experience possible: too many to be listed here. Please visit the site to check out the credits page under the menu section for the full story.
A Peek Under the Hood
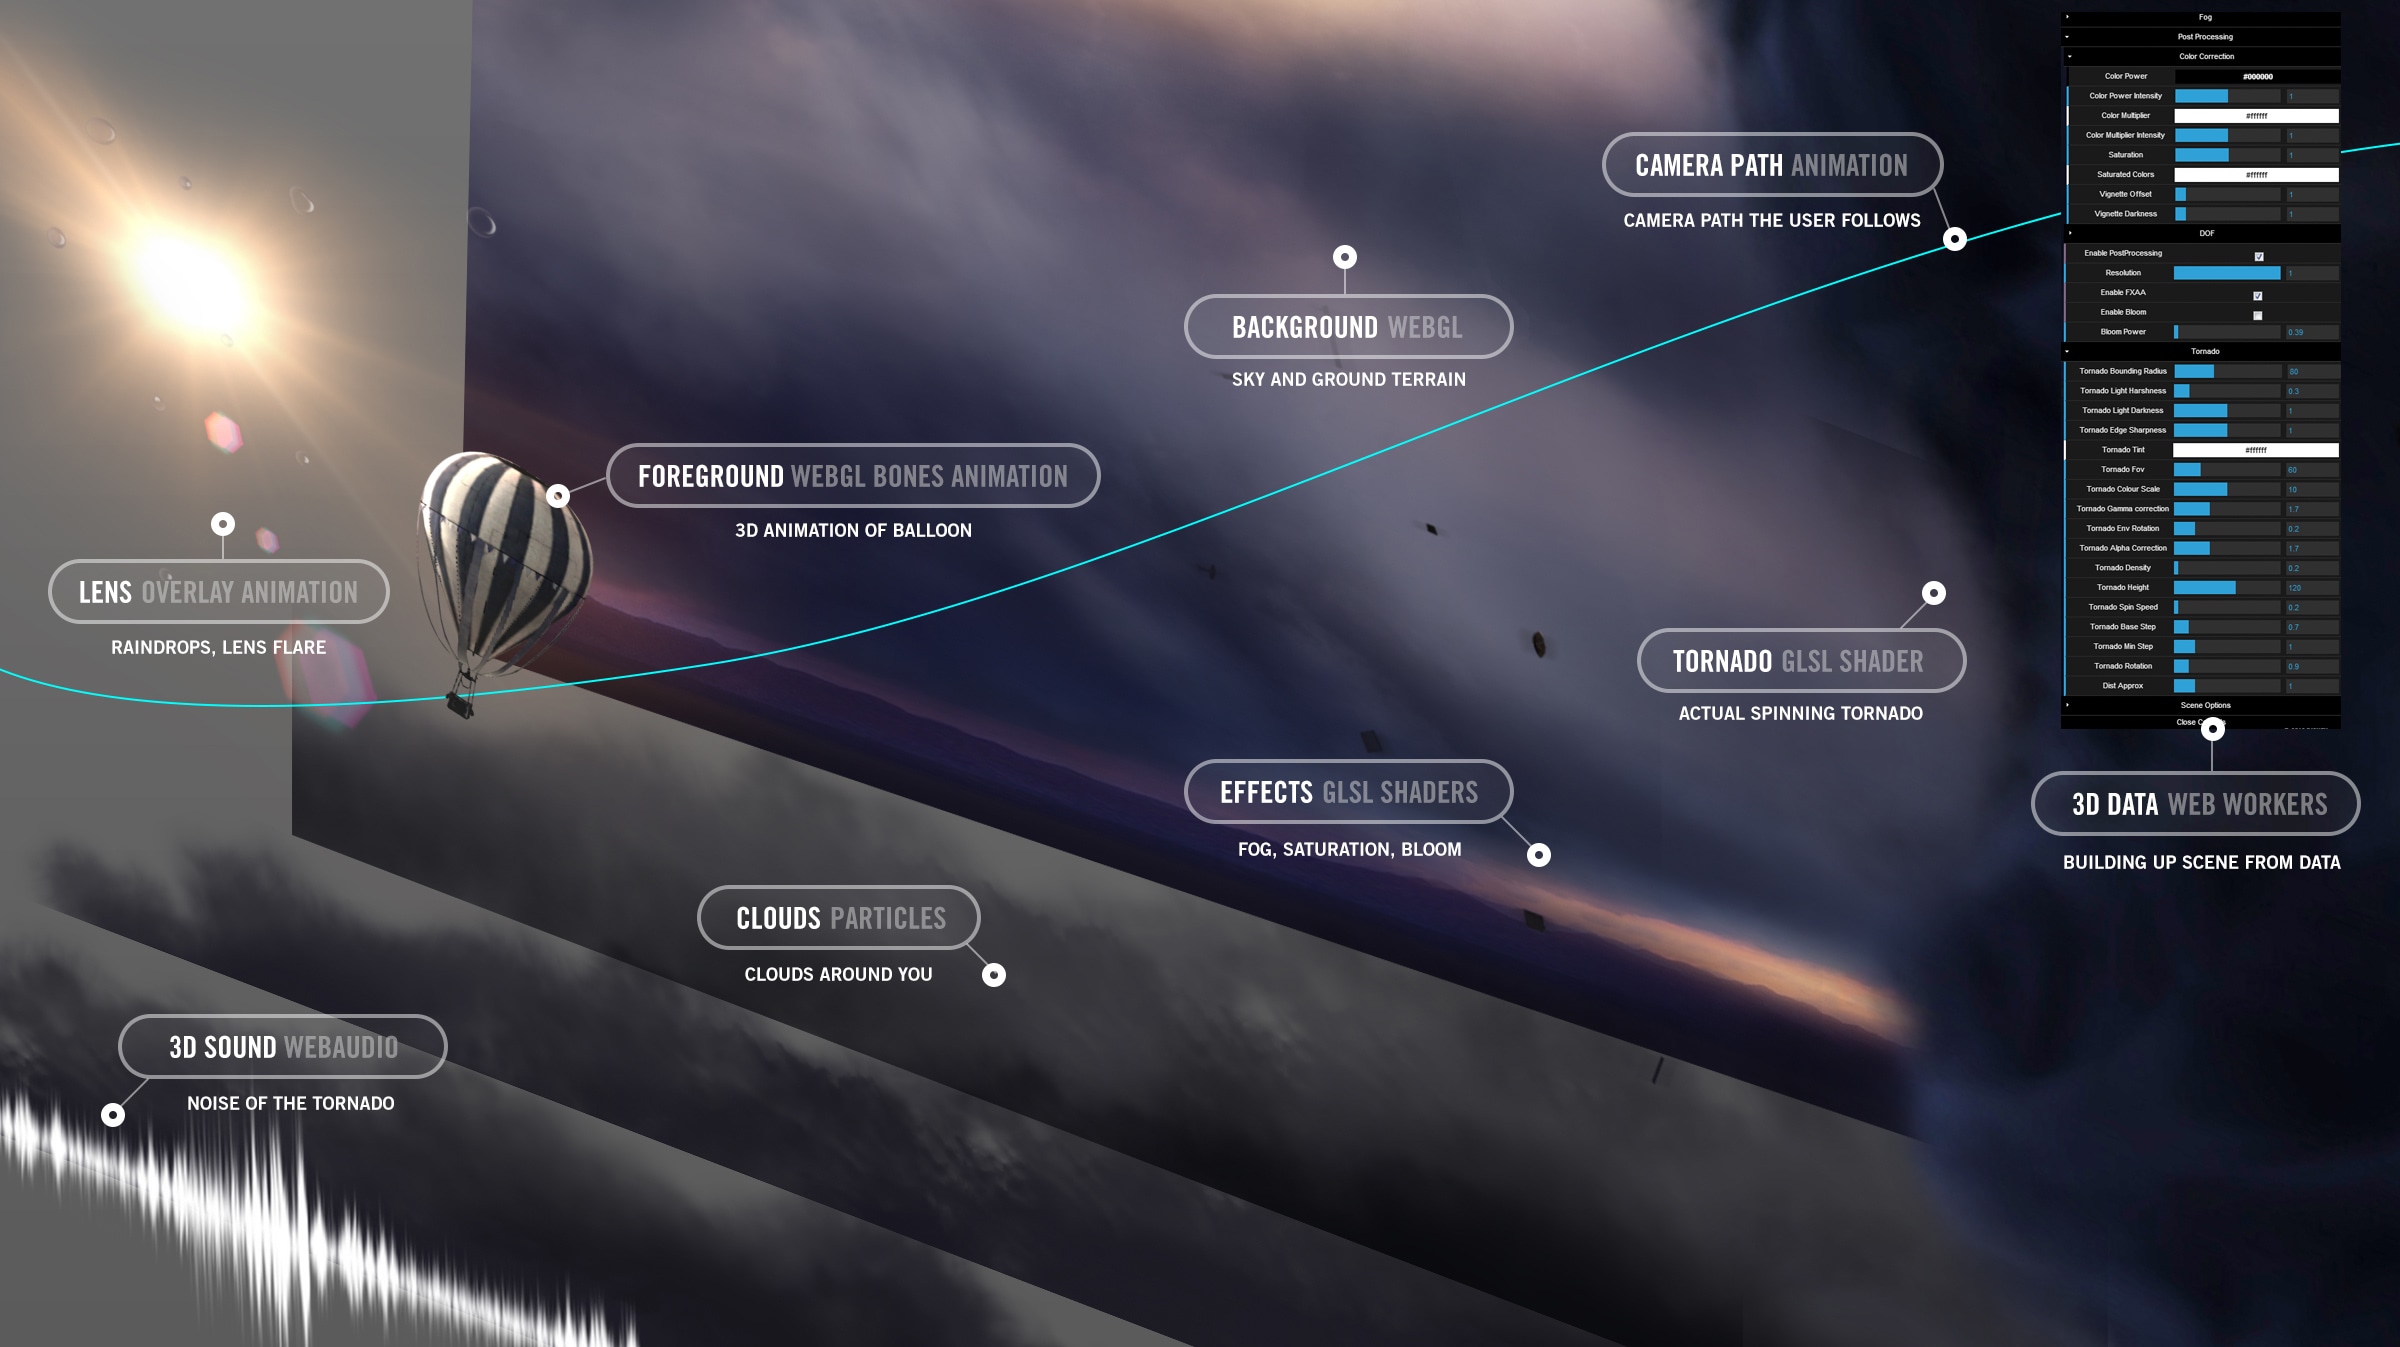
Find Your Way to Oz on desktop is a rich immersive world. We use 3D and several layers of traditional filmmaking inspired effects that combine to create a near-realistic scene. The most prominent technologies are WebGL with Three.js, custom built shaders and DOM animated elements using CSS3 features. Beyond this, getUserMedia API (WebRTC) for interactive experiences allowing the user to add their image directly from Webcam and WebAudio for 3D sound.
But the magic of a technological experience like this is how it comes together. This is also one of the main challenges: how to blend visual effects and interactive elements together in one scene to create a consistent whole? This visual complexity was difficult to manage: making it difficult to tell what stage in development we were at any one time.
To address the problem of interconnected visual effects and optimisation we made heavy use of a control panel that would capture all the relevant settings we were reviewing at that point in time. The scene could be adjusted live in browser for anything from brightness, to depth of field, gamma etc… Anyone could try tweaking values of the significant parameters in the experience and take part in discovering what worked best.
Before we share our secret we want to warn you that it might crash, just like if you were to poke around inside a car engine. Make sure you don’t have anything important on and go visit the main url of the site and append ?debug=on to the address. Wait for the site to load and once you are inside (press?) the key Ctrl-I and you will see a dropdown appear on the right hand side. If you uncheck the “Exit camera path” option you can use the keys A, W, S, D and the mouse to move freely around the space.

We won’t go through all the settings here, but we encourage you to experiment: the keys reveal different settings in different scenes. In the final storm sequence there is an additional key: Ctrl-A with which you can toggle the animation playback and fly around. In this scene if you press Esc (to exit the mouse lock functionality) and press again Ctrl-I you can access settings that are particular to the storm scene. Have a look around and capture some nice postcard views like the one below.

To make this happen and to ensure it was flexible enough to our needs, we used a lovely library called dat.gui (see here for a past tutorial on how to use it). It allowed us to quickly change what settings were exposed to the visitors of the site.
A Bit Like Matte Painting
In many classic Disney films and animations creating scenes meant combining different layers. There were layers of live action, cell animation, even physical sets and on top layers created by painting on glass: a technique called matte-painting.
In many ways the structure of the experience we created is similar; even though some of the “layers” are much more than static visuals. In fact, they affect the way things look according to more complex computations. Nevertheless, at least at the big-picture level we are dealing with views, composited one on top of the other. At the top you see a UI layer, with a 3D scene below it: itself made of different scene components.
The top interface layer was created using DOM and CSS 3 which meant that editing the interactions could be done in many ways independently of the 3D experience with communication between the two according to a select list of events. This communication uses Backbone Router + onHashChange HTML5 event that controls which area should animate in/out. (project source: /develop/coffee/router/Router.coffee).
Tutorial: Sprite Sheets and Retina support
One fun optimisation technique we relied on for the interface was to combine the many interface overlay images in one single PNG to reduce server requests. In this project the interface was made up of 70+ images (not counting 3D textures) loaded all upfront to reduce latency of the website. You can see the live sprite sheet here:
Normal Display - http://findyourwaytooz.com/img/home/interface_1x.png Retina Display - http://findyourwaytooz.com/img/home/interface_2x.png
Here’s some tips of how we leveraged the usage of Sprite Sheets, and how to use them for retina devices and get the interface as sharp and neat as possible.
Creating Spritesheets
To create SpriteSheets we used TexturePacker which outputs in any format you need. In this case we have exported as EaselJS which is really clean and could’ve been used to create animated sprites as well.
Using the generated Sprite Sheet
Once you created your Sprite Sheet you should see a JSON file like this:
{
   "images": ["interface_2x.png"],
   "frames": [
       [2, 1837, 88, 130],
       [2, 2, 1472, 112],
       [1008, 774, 70, 68],
       [562, 1960, 86, 86],
       [473, 1960, 86, 86]
   ],

   "animations": {
       "allow_web":[0],
       "bottomheader":[1],
       "button_close":[2],
       "button_facebook":[3],
       "button_google":[4]
   },
}
Where:
- image refers to the URL of the sprite sheet
- frames are the coordinates of each UI element [x, y, width, height]
- animations are the names of each asset
Note that we have used the high density images to create the Sprite sheet, then we’ve created the normal version just resizing it to the half of its size.
Putting everything together
Now that we’re all set we just need a JavaScript snippet to use it.
var SSAsset = function (asset, div) {
  var css, x, y, w, h;

  // Divide the coordinates by 2 as retina devices have 2x density
  x = Math.round(asset.x / 2);
  y = Math.round(asset.y / 2);
  w = Math.round(asset.width / 2);
  h = Math.round(asset.height / 2);

  // Create an Object to store CSS attributes
  css = {
    width                : w,
    height               : h,
    'background-image'   : "url(" + asset.image_1x_url + ")",
    'background-size'    : "" + asset.fullSize[0] + "px " + asset.fullSize[1] + "px",
    'background-position': "-" + x + "px -" + y + "px"
  };

  // If retina devices

  if (window.devicePixelRatio === 2) {

    /*
    set -webkit-image-set
    for 1x and 2x
    All the calculations of X, Y, WIDTH and HEIGHT is taken care by the browser
    */

    css['background-image'] = "-webkit-image-set(url(" + asset.image_1x_url + ") 1x,";
    css['background-image'] += "url(" + asset.image_2x_url + ") 2x)";

  }

  // Set the CSS to the DIV
  div.css(css);
};
And this is how you would use it:
logo = new SSAsset(
{
  fullSize     : [1024, 1024],               // image 1x dimensions Array [x,y]
  x            : 1790,                       // asset x coordinate on SpriteSheet
  y            : 603,                        // asset y coordinate on SpriteSheet
  width        : 122,                        // asset width
  height       : 150,                        // asset height
  image_1x_url : 'img/spritesheet_1x.png',   // background image 1x URL
  image_2x_url : 'img/spritesheet_2x.png'    // background image 2x URL
},$('#logo'));
To understand a bit more about Variable Pixel Densities you can read this article by Boris Smus.
The 3D Content Pipeline
The environment experience is set up on a WebGL layer. When you think about a 3D scene, one of the trickiest questions is how are you going to make sure you can create content which enables the maximum expressive potential from the modeling, animation and effects sides. In many ways at the core of this issue is the content pipeline: an agreed process to follow to create content for the 3D scene.
We wanted to create an awe inspiring world; so we needed a solid process that would enable 3D artists to create it. They would need to be given as much expressive freedom in their 3D modeling and animation software as possible; and we would need to render it on screen through code.
We had been working on this sort of problem for some time because every time we created a 3D site in the past we had found limitations in the tools we could use. So we had created this tool, called 3D Librarian: a piece of internal research. And it was just about ready to be applied to a real job.
This tool had some history: originally it was for Flash, and it would allow you to bring in a big Maya scene as one single compressed file that was optimised for unpacking runtime. The reason it was optimal was because it effectively packed the scene in basically the same data structure that is manipulated during render and animation. There is very little parsing that needs to be done to the file when loaded. Unpacking in Flash was pretty quick because the file was in AMF format, that Flash could unpack natively. Using the same format in WebGL requires a bit more work on the CPU. In fact we had to re-create a data-unpack Javascript layer of code, that would essentially decompress those files and recreate the data structures needed for WebGL to work. Unpacking the entire 3D scene is a mildly CPU-heavy operation: unpacking scene 1 in Find Your Way To Oz requires about 2 seconds on a mid to high end machine. Therefore this is done using Web Workers technology, at ”scene setup” time (before the scene is actually launched), so as not to hang the experience for the user.
This handy tool can import the most of the 3D scene: models, textures, bones animations. You create a single library file, that can then be loaded by the 3D engine. You stuff all the models you need in your scene within this library, and, voilà, spawn them into your scene.
A problem we had though, was that we were now dealing with WebGL: the new kid on the block. This was a pretty tough kid: that was setting the standard for browser based 3D experiences. So we created an ad hoc Javascript layer that would take the 3D Librarian compressed 3D scene files, and properly translate them to a format that WebGL would understand.
Tutorial: Let There Be Wind
A recurring theme in “Find Your Way To Oz” was wind. A thread of the storyline is structured to be a crescendo of wind.
The first scene of the carnival is relatively calm. And going through the various scenes, the user experiences a progressively stronger wind, culminating into the final scene, the storm.
Therefore it was important to provide an immersive wind effect.
In order to create this, we populated the 3 carnival scenes with objects that were soft, and thus supposed to be affected by wind, such as tents, flags the surface of the photo booth, and the balloon itself.

Desktop games are these days usually built around a core physics engine. So when a soft-object needs to be simulated in the 3D world, a full physics simulation gets run for it, creating a believable soft-behavior.
In WebGL / Javascript we don’t (yet) have the luxury to run a full blown physics simulation. So in Oz we had to find a way to create the effect of wind, without actually simulating it.
We embedded the information of “wind sensitivity” for each object in the 3D model itself. Each vertex of the 3D model had a ”Wind Attribute” that specified how much that vertex was supposed to be affected by wind. So, this specified wind sensitivity of 3D Objects. Then we needed to create the wind itself.
We did this by generating an image containing Perlin Noise. This image is intended to cover a certain “area of wind”. So, a good way to think about it, is to imagine a picture of cloud like noise being laid over a certain rectangular area of the 3D scene. Each pixel, gray level value, of this image specifies how strong the wind is in a certain moment in the 3D area “surrounding it”.
In order to produce the wind effect the image is moved, in time, at constant speed, in a specific direction; the direction of the wind. And to make sure the “windy area” doesn’t affect everything in the scene we wrap the wind image around the edges, confined to the area of effect.
A Simple 3D Wind Tutorial
Let’s now create the effect of wind in a simple 3D scene in Three.js.
We’re going to create wind in a simple ”procedural grass field”.
Let’s first create the scene. We’re going to have a simple, textured flat terrain. And then each bit of grass, is simply going to be represented with an upside-down 3D cone.

Here is how to create this simple scene in Three.js using CoffeeScript.
First of all we’re going to setup Three.js, and hook it up with Camera, Mouse controller, and Some Light, of sorts:
constructor: ->

   @clock =  new THREE.Clock()

   @container = document.createElement( 'div' );
   document.body.appendChild( @container );

   @renderer = new THREE.WebGLRenderer();
   @renderer.setSize( window.innerWidth, window.innerHeight );
   @renderer.setClearColorHex( 0x808080, 1 )
   @container.appendChild(@renderer.domElement);

   @camera = new THREE.PerspectiveCamera( 50, window.innerWidth / window.innerHeight, 1, 5000 );
   @camera.position.x = 5;
   @camera.position.y = 10;
   @camera.position.z = 40;

   @controls = new THREE.OrbitControls( @camera, @renderer.domElement );
   @controls.enabled = true

   @scene = new THREE.Scene();
   @scene.add( new THREE.AmbientLight 0xFFFFFF )

   directional = new THREE.DirectionalLight 0xFFFFFF
   directional.position.set( 10,10,10)
   @scene.add( directional )

   # Demo data
   @grassTex = THREE.ImageUtils.loadTexture("textures/grass.png");
   @initGrass()
   @initTerrain()

   # Stats
   @stats = new Stats();
   @stats.domElement.style.position = 'absolute';
   @stats.domElement.style.top = '0px';
   @container.appendChild( @stats.domElement );
   window.addEventListener( 'resize', @onWindowResize, false );
   @animate()
The initGrass, and initTerrain function calls populate the scene with grass and terrain respectively:
initGrass:->
   mat = new THREE.MeshPhongMaterial( { map: @grassTex } )
   NUM = 15
   for i in [0..NUM] by 1
       for j in [0..NUM] by 1
           x = ((i/NUM) - 0.5) * 50 + THREE.Math.randFloat(-1,1)
           y = ((j/NUM) - 0.5) * 50 + THREE.Math.randFloat(-1,1)
           @scene.add( @instanceGrass( x, 2.5, y, 5.0, mat ) )

instanceGrass:(x,y,z,height,mat)->
   geometry = new THREE.CylinderGeometry( 0.9, 0.0, height, 3, 5 )
   mesh = new THREE.Mesh( geometry, mat )
   mesh.position.set( x, y, z )
   return mesh
Here we’re creating a grid of 15 by 15 bits of grass. We add a bit of randomization to each grass position, so that they don’t line up like soldiers, which would look odd.
This terrain is just a horizontal plane, placed at the base of the pieces of grass (y = 2.5).
initTerrain:->
  @plane = new THREE.Mesh( new THREE.PlaneGeometry(60, 60, 2, 2), new THREE.MeshPhongMaterial({ map: @grassTex }))
  @plane.rotation.x = -Math.PI/2
  @scene.add( @plane )
So, what we’ve done so far is to simply create a Three.js scene, and to add a few bits of grass, made of procedurally generated reversed cones, and a simple terrain.
Nothing fancy so far.
Now, it’s time to begin adding wind. First thing, we want to embed the wind sensitivity information into the grass 3D model.
We are going to embed this information as a custom attribute, for each vertex of the grass 3D model. And we’re going to use the rule that: bottom end of the grass model (tip of the cone) has zero sensitivity, as it’s attached to the ground. The top part of the grass model (base of the cone) has maximum wind sensitivity, as it’s the part that’s farther away from ground.
Here’s how the instanceGrass function gets re-coded, in order to add wind sensitivity as a custom attribute for the grass 3D model.
instanceGrass:(x,y,z,height)->

  geometry = new THREE.CylinderGeometry( 0.9, 0.0, height, 3, 5 )

  for i in [0..geometry.vertices.length-1] by 1
      v = geometry.vertices[i]
      r = (v.y / height) + 0.5
      @windMaterial.attributes.windFactor.value[i] = r * r * r

  # Create mesh
  mesh = new THREE.Mesh( geometry, @windMaterial )
  mesh.position.set( x, y, z )
  return mesh
We now use a custom material, windMaterial, instead of the MeshPhongMaterial we used previously. WindMaterial wraps the WindMeshShader that we are going to see in a minute.
So, the code in instanceGrass loops through all vertices of the grass model, and for each vertex it adds a custom vertex attribute, called windFactor. This windFactor is set to 0, for the bottom end of the grass model (where it’s supposed to touch the terrain), and it values 1 for the top end of the grass model.
The other ingredient we need is to add the actual wind to our scene. As discussed we are going make use of Perlin noise for this. We will procedurally generate a Perlin noise texture.
For the sake of clarity we are going to assign this texture to the terrain itself, in place of the previous green texture it had. This will make it easier to get a feel of what’s going on with wind.
So, this Perlin noise texture will spatially cover the extension of our terrain, and each pixel of the texture will specify wind intensity of the terrain area where that pixel falls. The terrain rectangle is going to be our “area of wind”.
Perlin noise is procedurally generated through a shader, called NoiseShader. This shader uses 3d simplex noise algorithms from: https://github.com/ashima/webgl-noise . The WebGL version of this was taken verbatim from one of MrDoob’s Three.js samples, at: http://mrdoob.github.com/three.js/examples/webgl_terrain_dynamic.html.
NoiseShader takes a time, a scale, and an offset set of parameters, as uniforms, and outputs a nice 2D distribution of Perlin noise.
class NoiseShader

  uniforms:
    "fTime"  : { type: "f", value: 1 }
    "vScale"  : { type: "v2", value: new THREE.Vector2(1,1) }
    "vOffset"  : { type: "v2", value: new THREE.Vector2(1,1) }

...
We are going to use this Shader to render our Perlin Noise to a texture. This is done in the initNoiseShader function.
initNoiseShader:->
  @noiseMap  = new THREE.WebGLRenderTarget( 256, 256, { minFilter: THREE.LinearMipmapLinearFilter, magFilter: THREE.LinearFilter, format: THREE.RGBFormat } );
  @noiseShader = new NoiseShader()
  @noiseShader.uniforms.vScale.value.set(0.3,0.3)
  @noiseScene = new THREE.Scene()
  @noiseCameraOrtho = new THREE.OrthographicCamera( window.innerWidth / - 2, window.innerWidth / 2,  window.innerHeight / 2, window.innerHeight / - 2, -10000, 10000 );
  @noiseCameraOrtho.position.z = 100
  @noiseScene.add( @noiseCameraOrtho )

  @noiseMaterial = new THREE.ShaderMaterial
      fragmentShader: @noiseShader.fragmentShader
      vertexShader: @noiseShader.vertexShader
      uniforms: @noiseShader.uniforms
      lights:false

  @noiseQuadTarget = new THREE.Mesh( new THREE.PlaneGeometry(window.innerWidth,window.innerHeight,100,100), @noiseMaterial )
  @noiseQuadTarget.position.z = -500
  @noiseScene.add( @noiseQuadTarget )
What the above code does is to setup noiseMap as a Three.js render target, equip it with the NoiseShader, and then render it with an orthographic camera, so as to avoid perspective distortions.
As discussed, we are now going to use this texture also as the main rendering texture for the terrain. This is not really necessary for the wind effect itself to work. But it’s nice to have, so that we can better visually understand what’s going on with wind generation.
Here’s the reworked initTerrain function, using noiseMap as a texture:
initTerrain:->
  @plane = new THREE.Mesh( new THREE.PlaneGeometry(60, 60, 2, 2), new THREE.MeshPhongMaterial( { map: @noiseMap, lights: false } ) )
  @plane.rotation.x = -Math.PI/2
  @scene.add( @plane )
Now that we have our wind texture in place, let’s take a look at WindMeshShader, that is responsible for deforming the grass models according to wind.
In order to create this shader we started from the standard Three.js MeshPhongMaterial shader, and modified it. This is a good quick and dirty way to get started with a shader that works, without having to start from scratch.
We're not going to copy the entire shader code here (feel free to look at it in the source code file), because most of it would be a replica of MeshPhongMaterial shader. But let’s take a look at the modified, wind related, parts, in the Vertex Shader.
vec4 wpos = modelMatrix * vec4( position, 1.0 );
vec4 wpos = modelMatrix * vec4( position, 1.0 );

wpos.z = -wpos.z;
vec2 totPos = wpos.xz - windMin;
vec2 windUV = totPos / windSize;
vWindForce = texture2D(tWindForce,windUV).x;

float windMod = ((1.0 - vWindForce)* windFactor ) * windScale;
vec4 pos = vec4(position , 1.0);
pos.x += windMod * windDirection.x;
pos.y += windMod * windDirection.y;
pos.z += windMod * windDirection.z;

mvPosition = modelViewMatrix *  pos;
So, what this shader does is to first calculate windUV texture lookup coordinate, based on the 2D, xz (horizontal) position of the vertex. This UV coordinate is used to lookup the wind force, vWindForce, from the Perlin noise wind texture.
This vWindForce value, is composited with the vertex specific windFactor, custom attribute discussed above, in order to compute how much deformation the vertex needs. We also have a global windScale, parameter, to control the overall strength of the wind, and a windDirection, vector, that specifies in which direction the wind deformation needs to take place.
So, this creates wind based deformation of our pieces of grass. However we’re still not done. As it is now, this deformation is static, and it will not convey the effect of a windy area.
As we had mentioned, we’re going to need to slide the noise texture over time, across the area of wind, so that our glass can wave.
This is done by shifting over time, the vOffset uniform that is passed to the NoiseShader. This is a vec2 parameter, that will allow us to specify noise offset, along a certain direction (our wind direction).
We do this in the render, function, that gets called at every frame:
render: =>
  delta = @clock.getDelta()

  if @windDirection
      @noiseShader.uniforms[ "fTime" ].value += delta * @noiseSpeed
      @noiseShader.uniforms[ "vOffset" ].value.x -= (delta * @noiseOffsetSpeed) * @windDirection.x
      @noiseShader.uniforms[ "vOffset" ].value.y += (delta * @noiseOffsetSpeed) * @windDirection.z
...
And that is it! We just created a scene with "procedural grass" affected by wind.
Adding dust to the mix
Now let's spice up our scene a little bit. Let's add a bit of flying dust, so as to make the scene more interesting.

Dust is supposed to be affected by wind, after all, so it makes perfect sense to have dust flying around in our wind scene.
Dust is setup in the initDust function as a particle system.
initDust:->
  for i in [0...5] by 1
      shader = new WindParticleShader()
      params = {}
      params.fragmentShader = shader.fragmentShader
      params.vertexShader   = shader.vertexShader
      params.uniforms       = shader.uniforms
      params.attributes     = { speed: { type: 'f', value: [] } }

      mat  = new THREE.ShaderMaterial(params)
      mat.map = shader.uniforms["map"].value = THREE.ImageUtils.loadCompressedTexture("textures/dust#{i}.dds")
      mat.size = shader.uniforms["size"].value = Math.random()
      mat.scale = shader.uniforms["scale"].value = 300.0
      mat.transparent = true
      mat.sizeAttenuation = true
      mat.blending = THREE.AdditiveBlending
      shader.uniforms["tWindForce"].value      = @noiseMap
      shader.uniforms[ "windMin" ].value       = new THREE.Vector2(-30,-30 )
      shader.uniforms[ "windSize" ].value      = new THREE.Vector2( 60, 60 )
      shader.uniforms[ "windDirection" ].value = @windDirection

      geom = new THREE.Geometry()
      geom.vertices = []
      num = 130
      for k in [0...num] by 1

          setting = {}

          vert = new THREE.Vector3
          vert.x = setting.startX = THREE.Math.randFloat(@dustSystemMinX,@dustSystemMaxX)
          vert.y = setting.startY = THREE.Math.randFloat(@dustSystemMinY,@dustSystemMaxY)
          vert.z = setting.startZ = THREE.Math.randFloat(@dustSystemMinZ,@dustSystemMaxZ)

          setting.speed =  params.attributes.speed.value[k] = 1 + Math.random() * 10

          setting.sinX = Math.random()
          setting.sinXR = if Math.random() < 0.5 then 1 else -1
          setting.sinY = Math.random()
          setting.sinYR = if Math.random() < 0.5 then 1 else -1
          setting.sinZ = Math.random()
          setting.sinZR = if Math.random() < 0.5 then 1 else -1

          setting.rangeX = Math.random() * 5
          setting.rangeY = Math.random() * 5
          setting.rangeZ = Math.random() * 5

          setting.vert = vert
          geom.vertices.push vert
          @dustSettings.push setting

      particlesystem = new THREE.ParticleSystem( geom , mat )
      @dustSystems.push particlesystem
      @scene.add particlesystem
Here 130 particles of dust get created. And note that each of them gets equipped with a special WindParticleShader.
Now, at each frame, we are going to move around the particles a little bit, using CoffeeScript, independently of wind. Here’s the code.
moveDust:(delta)->

  for setting in @dustSettings

    vert = setting.vert
    setting.sinX = setting.sinX + (( 0.002 * setting.speed) * setting.sinXR)
    setting.sinY = setting.sinY + (( 0.002 * setting.speed) * setting.sinYR)
    setting.sinZ = setting.sinZ + (( 0.002 * setting.speed) * setting.sinZR)

    vert.x = setting.startX + ( Math.sin(setting.sinX) * setting.rangeX )
    vert.y = setting.startY + ( Math.sin(setting.sinY) * setting.rangeY )
    vert.z = setting.startZ + ( Math.sin(setting.sinZ) * setting.rangeZ )
In addition to that we are going to offset each particle position according to wind. This is done in the WindParticleShader. Specifically in the vertex shader.
The code for this shader is a modified version of Three.js ParticleMaterial, and this what the core of it looks like:
vec4 mvPosition;
vec4 wpos = modelMatrix * vec4( position, 1.0 );
wpos.z = -wpos.z;
vec2 totPos = wpos.xz - windMin;
vec2 windUV = totPos / windSize;
float vWindForce = texture2D(tWindForce,windUV).x;
float windMod = (1.0 - vWindForce) * windScale;
vec4 pos = vec4(position , 1.0);
pos.x += windMod * windDirection.x;
pos.y += windMod * windDirection.y;
pos.z += windMod * windDirection.z;

mvPosition = modelViewMatrix *  pos;

fSpeed = speed;
float fSize = size * (1.0 + sin(time * speed));

#ifdef USE_SIZEATTENUATION
    gl_PointSize = fSize * ( scale / length( mvPosition.xyz ) );
#else,
    gl_PointSize = fSize;
#endif

gl_Position = projectionMatrix * mvPosition;
This vertex shader is not that different from what we had for the wind based deformation of grass. It takes the Perlin noise texture as input, and depending on dust world position it looks up a vWindForce, value in the noise texture. Then, it uses this value to modify position of the dust particle.
Riders On The Storm
The most adventurous of our WebGL scenes was probably the last scene, which you can see if you click your way through the balloon into the eye of the tornado to reach the end of your journey in the site, and exclusive video of the upcoming release.
When we created this scene we knew that we needed to have a central feature to the experience that would be impactful. The spinning tornado would act as the centerpiece and layers of other content would mold this feature in place to create a dramatic effect. To achieve this we built what would be the equivalent of a film studio set around this strange shader.
We used a mixed approach to create the realistic composite. Some were visual tricks like light shapes to make a lens flare effect, or raindrops that animate as layers on top of the scene you are looking at. In other cases we had flat surfaces drawn to appear to move around, like the low flying clouds layers moving according to a particle system code. While the bits of debris orbiting around the tornado were layers of in a 3D scene sorted to move in front and behind the tornado.
The main reason we had to build the scene in this way was to ensure we had enough GPU to handle the tornado shader in balance with the other effects that we were applying. Initially we had big GPU balancing issues but later this scene was optimised and became lighter than the main scenes.
Tutorial: The Storm Shader
To create the final storm sequence many different techniques were combined, but the centerpiece of this work was a custom GLSL shader that looks like a tornado. We had tried many different techniques from vertex shaders to create interesting geometric whirlpools to particle based animations and even 3D animations of twisted geometric shapes. None of the effects seemed to recreate the feeling of a tornado or required too much in terms of processing.
A completely different project eventually provided us with the answer. A parallel project involving games for science to map out the brain of the mouse from the Max Planck Institute (brainflight.org) had generated interesting visual effects. We had managed to create movies of the inside of a mouse neuron using a custom volumetric shader.

We found that the inside of a brain cell looked a bit like the funnel of a tornado. And since we were using a volumetric technique we knew we could view this shader from all directions in space. We could set the render of the shader to combine with the storm scene, particularly if sandwiched under layers of clouds and above a dramatic background.
The shader technique involves a trick that basically uses a single GLSL shader to render a whole object with a simplified render algorithm called ray marching rendering with a distance field. In this technique a pixel shader is created which estimates the closest distance to a surface for each point on the screen.
A good reference to the algorithm can be found in the overview by iq: Rendering Worlds With Two Triangles - Iñigo Quilez. Also exploring the gallery of shaders on glsl.heroku.com, there are many examples of this technique to be found there that can be experimented with.
The heart of the shader begins with the main function, it sets up the camera transforms and enters a loop which repeatedly evaluates the distance to a surface. The call RaytraceFoggy( direction_vector, max_iterations, color, color_multiplier ) is where the core ray marching calculation happens.
for(int i=0;i < number_of_steps;i++) // run the ray marching loop
{
  old_d=d;
  float shape_value=Shape(q); // find out the approximate distance to or density of the tornado cone
  float density=-shape_value;
  d=max(shape_value*step_scaling,0.0);// The max function clamps values smaller than 0 to 0

  float step_dist=d+extra_step; // The point is advanced by larger steps outside the tornado,
  //  allowing us to skip empty space quicker.

  if (density>0.0) {  // When density is positive, we are inside the cloud
    float brightness=exp(-0.6*density);  // Brightness decays exponentially inside the cloud

    // This function combines density layers to create a translucent fog
    FogStep(step_dist*0.2,clamp(density, 0.0,1.0)*vec3(1,1,1), vec3(1)*brightness, colour, multiplier);
  }
  if(dist>max_dist || multiplier.x < 0.01) { return;  } // if we've gone too far stop, we are done
  dist+=step_dist; // add a new step in distance
  q=org+dist*dir; // trace its direction according to the ray casted
}
The idea is that as we advance into the shape of the tornado we regularly add contributions of color to the final color value of the pixel, as well as contributions to the opacity along the ray. This creates a layered soft quality to the texture of the tornado.
The next core aspect of the tornado is the actual shape itself which is created by composing a number of functions. It is a cone to begin with, which is composed with noise to create an organic rough edge, and is subsequently twisted along its main axis and rotated in time.
mat2 Spin(float angle){
  return mat2(cos(angle),-sin(angle),sin(angle),cos(angle)); // a rotation matrix
}

// This takes noise function and makes ridges at the points where that function crosses zero
float ridged(float f){
  return 1.0-2.0*abs(f);
}

// the isosurface shape function, the surface is at o(q)=0
float Shape(vec3 q)
{
    float t=time;

    if(q.z < 0.0) return length(q);

    vec3 spin_pos=vec3(Spin(t-sqrt(q.z))*q.xy,q.z-t*5.0); // spin the coordinates in time

    float zcurve=pow(q.z,1.5)*0.03; // a density function dependent on z-depth

    // the basic cloud of a cone is perturbed with a distortion that is dependent on its spin
    float v=length(q.xy)-1.5-zcurve-clamp(zcurve*0.2,0.1,1.0)*snoise(spin_pos*vec3(0.1,0.1,0.1))*5.0;

    // create ridges on the tornado
    v=v-ridged(snoise(vec3(Spin(t*1.5+0.1*q.z)*q.xy,q.z-t*4.0)*0.3))*1.2;

    return v;
}
The work involved in creating this sort of shader is tricky. Beyond the issues involved with the abstraction of the operations you are creating there are serious optimisation and cross platform compatibility problems that you need to trace and solve before you can use the work in production.
The first part of the problem: optimising this shader for our scene. To deal with this we needed to have a “safe” approach in case the shader was going to be too heavy. To do this we composited the tornado shader at a different sampled resolution from the rest of the scene. This is from the file stormTest.coffee (yes, this was a test!).
We start with a renderTarget that matches the scene width and height so we can have independence of resolution of tornado shader to scene. And then we decide the downsampling of resolution of the storm shader dynamically dependent on the frame rate we are getting.
...
Line 1383
@tornadoRT = new THREE.WebGLRenderTarget( @SCENE_WIDTH, @SCENE_HEIGHT, paramsN )

...
Line 1403
# Change settings based on FPS
if @fpsCount > 0
    if @fpsCur < 20
        @tornadoSamples = Math.min( @tornadoSamples + 1, @MAX_SAMPLES )
    if @fpsCur > 25
        @tornadoSamples = Math.max( @tornadoSamples - 1, @MIN_SAMPLES )
    @tornadoW = @SCENE_WIDTH  / @tornadoSamples // decide tornado resWt
    @tornadoH = @SCENE_HEIGHT / @tornadoSamples // decide tornado resHt
Finally we render the tornado to screen using a simplified sal2x algorithm, (to avoid the blocky look) @line 1107 in stormTest.coffee. This means that worse case we end up having a more blurry tornado but at least it works without taking away control from the user.
The next optimisation step requires diving into the algorithm. The driving computational factor in the shader is the iteration that is performed on each pixel to try to approximate the distance of the surface function: the number of iterations of the raymarching loop. Using a larger step size we could get a tornado surface estimate with fewer iterations while we were outside its cloudy surface. When inside we would decrease the step size for precision and to be able to mix values to create the misty effect. Also creating a bounding cylinder to get a depth estimate for the casted ray gave good speed-up.
The next part of the problem was to make sure this shader would run on different video cards. We did some testing each time and starting building up an intuition for the type of compatibility issues that we might run into. The reason we couldn’t do much better than intuition is that we could not always get good debugging information on the errors. A typical scenario is just a GPU error with little more to go on, or even a system crash!
Cross video board compatibility issues had similar solutions: make sure static constants are entered of the precise data type as defined, IE: 0.0 for float and 0 for int. Take care when writing longer functions; it is preferable to break things up in multiple simpler functions and interim variables because the compilers seemed to not handle certain cases correctly. Make sure textures are all a power of 2, not too large and in any case exercising “caution” when looking up texture data in a loop.
The biggest problems we had in compatibility were from the lighting effect for the storm. We used a premade texture wrapped around the tornado so we could color its wisps. It was a gorgeous effect, and made it easy to blend the tornado into the scene colors but took a long time to try to make run on other platforms.

The Mobile Web Site
The mobile experience couldn’t be a straight translation of the desktop version because the technology and processing requirements were just too heavy. We had to build something new, that targeted the mobile user specifically.
We thought it would be cool to have the Carnival Photo-Booth from desktop as a mobile web application which would use the user’s mobile camera. Something we had not seen done so far.
To add flavour, we coded 3D transformations in CSS3. Having linked it with gyroscope and accelerometer, we were able to add a lot of depth to the experience. The site responds to the way you hold, move and look at your phone.
When writing this article, we thought it would be worth to give you some hints on how to run mobile development process smoothly. Here they go! Go ahead and see what you can learn from it!
Mobile tips and tricks
Preloader is something that's needed, not something that should be avoided. We know, that sometimes the latter happens. This is mainly because you need to keep maintaining the list of things you preload as your project grows. What's worse, it's not very clear on how you should calculate the loading progress if you're pulling different resources, and many of them at the same time. This is where our custom and very generic abstract class 'Task' comes handy. Its main idea is to allow endlessly nested structure where a Task can have it's own sub-Tasks, which can have their etc… Furthermore, each task computes its progress with respect to its sub-tasks' progress (but not to parent's progress). Making all the MainPreloadTask, AssetPreloadTask and TemplatePreFetchTask derive from Task, we created a structure that looks like this:

Thanks to such approach and the Task class, we can easily know the global progress (MainPreloadTask), or just progress of assets (AssetPreloadTask), or progress of loading templates (TemplatePreFetchTask). Even progress of a particular file. To see how it is done, have a look at the Task class at /m/javascripts/raw/util/Task.js and the actual task implementations at /m/javascripts/preloading/task. As an example, this is an extract from how we set up the /m/javascripts/preloading/task/MainPreloadTask.js class which is our ultimate preloading wrapper:
Package('preloading.task', [
  Import('util.Task'),
...

  Class('public MainPreloadTask extends Task', {

    _public: {

  MainPreloadTask : function() {

    var subtasks = [
      new AssetPreloadTask([
        {name: 'cutout/cutout-overlay-1', ext: 'png', type: ImagePreloader.TYPE_BACKGROUND, responsive: true},
        {name: 'journey/scene1', ext: 'jpg', type: ImagePreloader.TYPE_IMG, responsive: false}, ...
...
      ]),

      new TemplatePreFetchTask([
        'page.HomePage',
        'page.CutoutPage',
        'page.JourneyToOzPage1', ...
...
      ])
    ];

    this._super(subtasks);

      }
    }
  })
]);
In the /m/javascripts/preloading/task/subtask/AssetPreloadTask.js class, besides noting how it communicates with the MainPreloadTask (via the shared Task implementation), it's also worth noting how we load assets that are platform dependent. Basically, we have four types of images. Mobile standard (.ext, where ext is file extension, typically .png or .jpg), mobile retina (-2x.ext), tablet standard (-tab.ext) and tablet retina (-tab-2x.ext). Instead of doing the detection in the MainPreloadTask and hardcoding four asset arrays, we just say what is the name and extension of the asset to preload and if the asset is platform dependent (responsive = true / false). Then, the AssetPreloadTask will generate the file name for us:
resolveAssetUrl : function(assetName, extension, responsive) {
  return AssetPreloadTask.ASSETS_ROOT + assetName + (responsive === true ? ((Detection.getInstance().tablet ? '-tab' : '') + (Detection.getInstance().retina ? '-2x' : '')) : '') + '.' +  extension;
}
Further down the classes chain, the actual code that does the asset preloading looks as follows (/m/javascripts/raw/util/ImagePreloader.js):
loadUrl : function(url, type, completeHandler) {
  if(type === ImagePreloader.TYPE_BACKGROUND) {
    var $bg = $('<div>').hide().css('background-image', 'url(' + url + ')');
    this.$preloadContainer.append($bg);
  } else {
    var $img= $('<img />').attr('src', url).hide();
    this.$preloadContainer.append($img);
  }

  var image = new Image();
  this.cache[this.generateKey(url)] = image;
  image.onload = completeHandler;
  image.src = url;
}

generateKey : function(url) {
  return encodeURIComponent(url);
}
Tutorial: HTML5 Photo Booth (iOS6/Android)
When developing OZ mobile, we found out we spend a lot of time actually playing with the photo booth instead of working :D That was simply because it's fun. So we made a demo for you to play with.

You can see a live demo here (run it on your iPhone or Android phone):
http://u9html5rocks.appspot.com/demos/mobile_photo_booth
To set it up, you need a free Google App Engine application instance where you can run the backend. The front end code is not complex but there are a couple of possible gotchas. Let's go through them now:
- Allowed Image file type
We want people to be able to upload images only (as it's a photo booth, not video booth). In theory, you can just specify the filter in HTML, as follows:
input id="fileInput" class="fileInput" type="file" name="file" accept="image/*"However that seems to work on iOS only, so we need to add an additional check against the RegExp once a file has been selected:
   this.$fileInput.fileupload({

   dataType: 'json',
   autoUpload : true,

   add : function(e, data) {
     if(!data.files[0].name.match(/(\.|\/)(gif|jpe?g|png)$/i)) {
      return self.onFileTypeNotSupported();
     }
   }
   });
- Canceling an upload or file selection Another inconsistency that we noticed during the development process is how different devices notify a canceled file selection. iOS phones and tablets do nothing, they don’t notify at all. So we don't need any special action for this case, however, Android phones trigger the add() function anyway, even if no file is selected. Here's how to cater for this:
    add : function(e, data) {

    if(data.files.length === 0 || (data.files[0].size === 0 && data.files[0].name === "" && data.files[0].fileName === "")) {

    return self.onNoFileSelected();

    } else if(data.files.length > 1) {

    return self.onMultipleFilesSelected();
    }
    }
The rest works rather smooth across platforms. Have fun!
Conclusion
Given the massive size of Find Your Way To Oz, and the wide mix of different technologies involved, in this article we were able to cover only a few of the approaches that we used.
If you are curious to explore the whole enchilada, feel free to peek around the full source code of Find Your Way To Oz at this link.
Credits
Click here for the full credits list
References
- CoffeeScript - http://coffeescript.org/
- Backbone.js - http://backbonejs.org/
- Three.js - http://mrdoob.github.com/three.js/
- Max Planck Institute (brainflight.org) - http://brainflight.org/