

简介
媒体源扩展 (MSE) 为 HTML5 <audio> 和 <video> 元素提供扩展的缓冲和播放控制功能。虽然最初开发这些 API 是为了方便开发基于 HTTP 的动态自适应流式传输 (DASH) 的视频播放器,但下面我们将看到它们如何用于音频,尤其是用于无缝播放。
您可能听过歌曲在曲目之间无缝衔接的音乐专辑;您甚至可能正在听这样的专辑。音乐人创作这些无缝播放体验,既是出于艺术选择,也是黑胶唱片和CD 的一种表现形式,因为这些媒体上的音频是以一个连续的流写入的。遗憾的是,由于 MP3 和 AAC 等现代音频编解码器的工作方式,这种无缝的听觉体验如今往往会丢失。
我们将在下文中详细说明原因,但现在先从演示开始。以下是精彩的 Sintel 的前 30 秒,该视频被切分为五个单独的 MP3 文件,然后使用 MSE 重新组装。红线表示在创建(编码)每个 MP3 时引入的间隙;您会在这些点听到故障。
真恶心!这并不是理想的体验;我们可以做得更好。只需稍作调整,使用上述演示中完全相同的 MP3 文件,我们就可以使用 MSE 来消除这些令人恼火的间隙。在下一个演示中,绿线表示文件已联接,间隙已移除。在 Chrome 38 及更高版本中,此功能可实现无缝播放!
您可以通过多种方式创建无间断内容。在本演示中,我们将重点介绍普通用户可能拥有的文件类型。其中每个文件都经过单独编码,而无需考虑其前后的音频片段。
基本设置
首先,我们来回顾一下 MediaSource 实例的基本设置。顾名思义,媒体源扩展程序只是对现有媒体元素的扩展。在下例中,我们将表示 MediaSource 实例的 Object URL 分配给音频元素的 source 属性;就像设置标准网址一样。
var audio = document.createElement('audio');
var mediaSource = new MediaSource();
var SEGMENTS = 5;

mediaSource.addEventListener('sourceopen', function () {
  var sourceBuffer = mediaSource.addSourceBuffer('audio/mpeg');

  function onAudioLoaded(data, index) {
    // Append the ArrayBuffer data into our new SourceBuffer.
    sourceBuffer.appendBuffer(data);
  }

  // Retrieve an audio segment via XHR.  For simplicity, we're retrieving the
  // entire segment at once, but we could also retrieve it in chunks and append
  // each chunk separately.  MSE will take care of assembling the pieces.
  GET('sintel/sintel_0.mp3', function (data) {
    onAudioLoaded(data, 0);
  });
});

audio.src = URL.createObjectURL(mediaSource);
MediaSource 对象连接后,它会执行一些初始化操作,并最终触发 sourceopen 事件;此时,我们可以创建 SourceBuffer。在上面的示例中,我们创建了一个 audio/mpeg,它可以解析和解码 MP3 片段;还有几种其他类型可供选择。
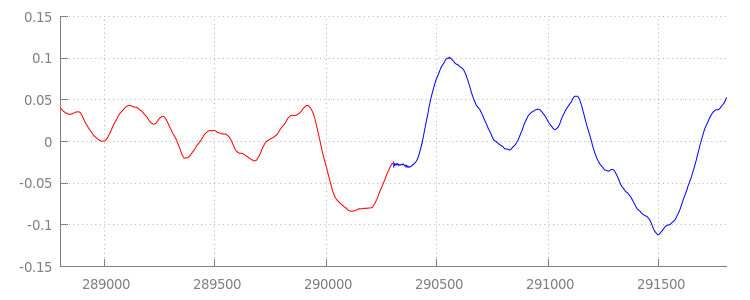
异常波形
我们稍后会再来看这段代码,但现在先仔细看看我们刚刚附加的文件,尤其是文件的末尾。下图显示了 sintel_0.mp3 轨道中两个渠道的最后 3, 000 个样本的平均值。红线上的每个像素都是一个介于 [-1.0, 1.0] 之间的浮点样本。

为什么会有这么多零(静音)样本?实际上是由编码期间引入的压缩伪影造成的。几乎每个编码器都会引入某种类型的填充。在这种情况下,LAME 在文件末尾添加了 576 个填充样本。
除了末尾的填充之外,每个文件还在开头添加了填充。如果我们提前查看 sintel_1.mp3 轨道,会发现前面还有 576 个填充样本。填充量因编码器和内容而异,但我们可以根据每个文件中包含的 metadata 确定确切的值。
每个文件开头和结尾处的静音部分会导致之前演示中的片段之间出现故障。为了实现无间断播放,我们需要移除这些静音部分。幸运的是,使用 MediaSource 可以轻松完成此操作。下面,我们将修改 onAudioLoaded() 方法,以使用附加窗口和时间戳偏移来移除此静音。
示例代码
function onAudioLoaded(data, index) {
  // Parsing gapless metadata is unfortunately non trivial and a bit messy, so
  // we'll glaze over it here; see the appendix for details.
  // ParseGaplessData() will return a dictionary with two elements:
  //
  //    audioDuration: Duration in seconds of all non-padding audio.
  //    frontPaddingDuration: Duration in seconds of the front padding.
  //
  var gaplessMetadata = ParseGaplessData(data);

  // Each appended segment must be appended relative to the next.  To avoid any
  // overlaps, we'll use the end timestamp of the last append as the starting
  // point for our next append or zero if we haven't appended anything yet.
  var appendTime = index > 0 ? sourceBuffer.buffered.end(0) : 0;

  // Simply put, an append window allows you to trim off audio (or video) frames
  // which fall outside of a specified time range.  Here, we'll use the end of
  // our last append as the start of our append window and the end of the real
  // audio data for this segment as the end of our append window.
  sourceBuffer.appendWindowStart = appendTime;
  sourceBuffer.appendWindowEnd = appendTime + gaplessMetadata.audioDuration;

  // The timestampOffset field essentially tells MediaSource where in the media
  // timeline the data given to appendBuffer() should be placed.  I.e., if the
  // timestampOffset is 1 second, the appended data will start 1 second into
  // playback.
  //
  // MediaSource requires that the media timeline starts from time zero, so we
  // need to ensure that the data left after filtering by the append window
  // starts at time zero.  We'll do this by shifting all of the padding we want
  // to discard before our append time (and thus, before our append window).
  sourceBuffer.timestampOffset =
    appendTime - gaplessMetadata.frontPaddingDuration;

  // When appendBuffer() completes, it will fire an updateend event signaling
  // that it's okay to append another segment of media.  Here, we'll chain the
  // append for the next segment to the completion of our current append.
  if (index == 0) {
    sourceBuffer.addEventListener('updateend', function () {
      if (++index < SEGMENTS) {
        GET('sintel/sintel_' + index + '.mp3', function (data) {
          onAudioLoaded(data, index);
        });
      } else {
        // We've loaded all available segments, so tell MediaSource there are no
        // more buffers which will be appended.
        mediaSource.endOfStream();
        URL.revokeObjectURL(audio.src);
      }
    });
  }

  // appendBuffer() will now use the timestamp offset and append window settings
  // to filter and timestamp the data we're appending.
  //
  // Note: While this demo uses very little memory, more complex use cases need
  // to be careful about memory usage or garbage collection may remove ranges of
  // media in unexpected places.
  sourceBuffer.appendBuffer(data);
}
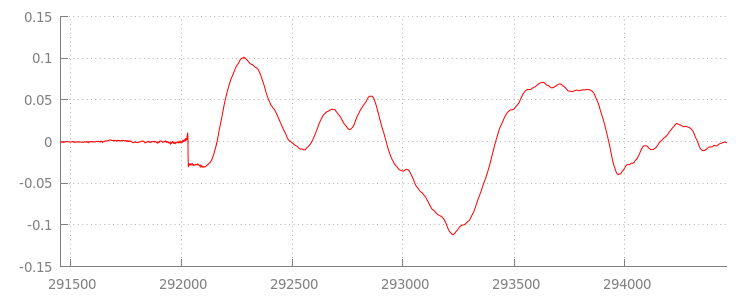
无缝波形
让我们再次查看应用附加窗口后的波形,看看我们闪亮的新代码实现了什么。在下图中,您可以看到 sintel_0.mp3 末尾的静音部分(红色)和 sintel_1.mp3 开头的静音部分(蓝色)已被移除;这样一来,各片段之间的过渡就变得顺畅无缝。
总结
这样一来,我们就将所有五个片段无缝拼接成一个片段,演示也随之结束。在结束之前,您可能已经注意到,我们的 onAudioLoaded() 方法没有考虑容器或编解码器。这意味着,无论容器或编解码器类型如何,所有这些技术都将发挥作用。您可以在下方重放原始的、支持 DASH 的分段 MP4 演示,而不是 MP3。
如果您想了解更多信息,请查看以下附录,深入了解无间隙内容创建和元数据解析。您还可以探索 gapless.js,详细了解支持此演示的代码。
感谢您阅读本邮件!
附录 A:创建无间隙内容
无间隙内容可能难以正确创建。下面,我们将逐步介绍此演示中使用的 Sintel 媒体的创建过程。首先,您需要一份 Sintel 的无损 FLAC 原声带;为了方便日后参考,下面提供了 SHA1。对于工具,您需要 FFmpeg、MP4Box、LAME 和安装了 afconvert 的 OSX。
    unzip Jan_Morgenstern-Sintel-FLAC.zip
    sha1sum 1-Snow_Fight.flac
    # 0535ca207ccba70d538f7324916a3f1a3d550194  1-Snow_Fight.flac
首先,我们将 1-Snow_Fight.flac 轨道的前 31.5 秒拆分出来。我们还想添加一个从 28 秒开始的 2.5 秒淡出效果,以避免在播放结束后出现任何点击。使用下面的 FFmpeg 命令行,我们可以完成所有这些操作,并将结果放入 sintel.flac 中。
ffmpeg -i 1-Snow_Fight.flac -t 31.5 -af "afade=t=out:st=28:d=2.5" sintel.flac
接下来,我们将文件拆分为 5 个时长均为 6.5 秒的 wave 文件;最好使用 wave,因为几乎所有编码器都支持提取这种文件。同样,我们可以使用 FFmpeg 精确地执行此操作,之后我们将获得:sintel_0.wav、sintel_1.wav、sintel_2.wav、sintel_3.wav 和 sintel_4.wav。
    ffmpeg -i sintel.flac -acodec pcm_f32le -map 0 -f segment \
           -segment_list out.list -segment_time 6.5 sintel_%d.wav
接下来,我们来创建 MP3 文件。LAME 提供了多种用于创建无间隙内容的选项。如果您可以控制内容,不妨考虑使用 --nogap 对所有文件进行批量编码,以完全避免片段之间的填充。不过,在此演示中,我们需要该填充,因此我们将使用标准的高画质 VBR 编码来编码 Wave 文件。
    lame -V=2 sintel_0.wav sintel_0.mp3
    lame -V=2 sintel_1.wav sintel_1.mp3
    lame -V=2 sintel_2.wav sintel_2.mp3
    lame -V=2 sintel_3.wav sintel_3.mp3
    lame -V=2 sintel_4.wav sintel_4.mp3
创建 MP3 文件只需执行这些操作。现在,我们来介绍如何创建分段 MP4 文件。我们将遵循 Apple 的指导,制作经过 iTunes 母带处理的媒体内容。 下面,我们将按照说明将 Wave 文件转换为中间 CAF 文件,然后再使用建议的参数将这些文件编码为 MP4 容器中的 AAC。
    afconvert sintel_0.wav sintel_0_intermediate.caf -d 0 -f caff \
              --soundcheck-generate
    afconvert sintel_1.wav sintel_1_intermediate.caf -d 0 -f caff \
              --soundcheck-generate
    afconvert sintel_2.wav sintel_2_intermediate.caf -d 0 -f caff \
              --soundcheck-generate
    afconvert sintel_3.wav sintel_3_intermediate.caf -d 0 -f caff \
              --soundcheck-generate
    afconvert sintel_4.wav sintel_4_intermediate.caf -d 0 -f caff \
              --soundcheck-generate
    afconvert sintel_0_intermediate.caf -d aac -f m4af -u pgcm 2 --soundcheck-read \
              -b 256000 -q 127 -s 2 sintel_0.m4a
    afconvert sintel_1_intermediate.caf -d aac -f m4af -u pgcm 2 --soundcheck-read \
              -b 256000 -q 127 -s 2 sintel_1.m4a
    afconvert sintel_2_intermediate.caf -d aac -f m4af -u pgcm 2 --soundcheck-read \
              -b 256000 -q 127 -s 2 sintel_2.m4a
    afconvert sintel_3_intermediate.caf -d aac -f m4af -u pgcm 2 --soundcheck-read \
              -b 256000 -q 127 -s 2 sintel_3.m4a
    afconvert sintel_4_intermediate.caf -d aac -f m4af -u pgcm 2 --soundcheck-read \
              -b 256000 -q 127 -s 2 sintel_4.m4a
现在,我们有多个 M4A 文件,需要先对它们进行适当的分段,然后才能与 MediaSource 搭配使用。就本文档而言,我们将使用 1 秒的 fragment 大小。MP4Box 会将每个分段 MP4 写出为 sintel_#_dashinit.mp4,同时还会写出一个可舍弃的 MPEG-DASH 清单 (sintel_#_dash.mpd)。
    MP4Box -dash 1000 sintel_0.m4a && mv sintel_0_dashinit.mp4 sintel_0.mp4
    MP4Box -dash 1000 sintel_1.m4a && mv sintel_1_dashinit.mp4 sintel_1.mp4
    MP4Box -dash 1000 sintel_2.m4a && mv sintel_2_dashinit.mp4 sintel_2.mp4
    MP4Box -dash 1000 sintel_3.m4a && mv sintel_3_dashinit.mp4 sintel_3.mp4
    MP4Box -dash 1000 sintel_4.m4a && mv sintel_4_dashinit.mp4 sintel_4.mp4
    rm sintel_{0,1,2,3,4}_dash.mpd
大功告成!现在,我们拥有了包含正确元数据的分段 MP4 和 MP3 文件,这些元数据是实现无缝播放所必需的。如需详细了解该元数据的外观,请参阅附录 B。
附录 B:解析无间隙元数据
与创建无间断内容一样,解析无间断元数据可能很棘手,因为没有标准的存储方法。下文将介绍两种最常见的编码器(LAME 和 iTunes)如何存储无间隙元数据。我们先来设置一些辅助方法,并为上面使用的 ParseGaplessData() 设置一个大纲。
    // Since most MP3 encoders store the gapless metadata in binary, we'll need a
    // method for turning bytes into integers.  Note: This doesn't work for values
    // larger than 2^30 since we'll overflow the signed integer type when shifting.
    function ReadInt(buffer) {
      var result = buffer.charCodeAt(0);
      for (var i = 1; i < buffer.length; ++i) {
        result <<= 8;
        result += buffer.charCodeAt(i);
      }
      return result;
    }

    function ParseGaplessData(arrayBuffer) {
      // Gapless data is generally within the first 512 bytes, so limit parsing.
      var byteStr = new TextDecoder().decode(arrayBuffer.slice(0, 512));

      var frontPadding = 0, endPadding = 0, realSamples = 0;

      // ... we'll fill this in as we go below.
我们将先介绍 Apple 的 iTunes 元数据格式,因为这种格式最容易解析和说明。在 MP3 和 M4A 文件中,iTunes(和 afconvert)会写入一个简短的 ASCII 部分,如下所示:
iTunSMPB[ 26 bytes ]0000000 00000840 000001C0 0000000000046E00
此信息会写入 MP3 容器内的 ID3 标记中,以及 MP4 容器内的元数据原子中。就我们的目的而言,可以忽略第一个 0000000 令牌。接下来的三个令牌分别是前填充、后填充和总非填充样本数。将每个值除以音频的采样率,即可得到每个值的时长。
// iTunes encodes the gapless data as hex strings like so:
//
//    'iTunSMPB[ 26 bytes ]0000000 00000840 000001C0 0000000000046E00'
//    'iTunSMPB[ 26 bytes ]####### frontpad  endpad    real samples'
//
// The approach here elides the complexity of actually parsing MP4 atoms. It
// may not work for all files without some tweaks.
var iTunesDataIndex = byteStr.indexOf('iTunSMPB');
if (iTunesDataIndex != -1) {
  var frontPaddingIndex = iTunesDataIndex + 34;
  frontPadding = parseInt(byteStr.substr(frontPaddingIndex, 8), 16);

  var endPaddingIndex = frontPaddingIndex + 9;
  endPadding = parseInt(byteStr.substr(endPaddingIndex, 8), 16);

  var sampleCountIndex = endPaddingIndex + 9;
  realSamples = parseInt(byteStr.substr(sampleCountIndex, 16), 16);
}
另一方面,大多数开源 MP3 编码器会将无缝元数据存储在放置于静音 MPEG 帧内的特殊 Xing 标头中(之所以是静音,是因为不了解 Xing 标头的解码器只会播放静音)。遗憾的是,此标记并非始终存在,并且包含多个可选字段。在此演示中,我们可以控制媒体,但在实际应用中,还需要进行一些额外的敏感性检查,以了解何时可以实际使用无间隙元数据。
首先,我们将解析样本总数。为简单起见,我们将从 Xing 标头读取此信息,但也可以从正常的 MPEG 音频标头构建此信息。Xing 标头可以通过 Xing 或 Info 标记来标记。在此标记之后正好 4 个字节的位置,有一个 32 位数表示文件中的总帧数;将此值乘以每帧的样本数,即可得到文件中的总样本数。
    // Xing padding is encoded as 24bits within the header.  Note: This code will
    // only work for Layer3 Version 1 and Layer2 MP3 files with XING frame counts
    // and gapless information.  See the following document for more details:
    // http://www.codeproject.com/Articles/8295/MPEG-Audio-Frame-Header
    var xingDataIndex = byteStr.indexOf('Xing');
    if (xingDataIndex == -1) xingDataIndex = byteStr.indexOf('Info');
    if (xingDataIndex != -1) {
      // See section 2.3.1 in the link above for the specifics on parsing the Xing
      // frame count.
      var frameCountIndex = xingDataIndex + 8;
      var frameCount = ReadInt(byteStr.substr(frameCountIndex, 4));

      // For Layer3 Version 1 and Layer2 there are 1152 samples per frame.  See
      // section 2.1.5 in the link above for more details.
      var paddedSamples = frameCount * 1152;

      // ... we'll cover this below.
现在,我们已经获得了样本总数,接下来可以读取填充样本的数量。根据编码器的不同,此信息可能会写入嵌套在 Xing 标头中的 LAME 或 Lavf 标记下。在此标头之后的第 17 个字节处,有 3 个字节分别以 12 位表示前端和后端填充。
        xingDataIndex = byteStr.indexOf('LAME');
        if (xingDataIndex == -1) xingDataIndex = byteStr.indexOf('Lavf');
        if (xingDataIndex != -1) {
          // See http://gabriel.mp3-tech.org/mp3infotag.html#delays for details of
          // how this information is encoded and parsed.
          var gaplessDataIndex = xingDataIndex + 21;
          var gaplessBits = ReadInt(byteStr.substr(gaplessDataIndex, 3));

          // Upper 12 bits are the front padding, lower are the end padding.
          frontPadding = gaplessBits >> 12;
          endPadding = gaplessBits & 0xFFF;
        }

        realSamples = paddedSamples - (frontPadding + endPadding);
      }

      return {
        audioDuration: realSamples * SECONDS_PER_SAMPLE,
        frontPaddingDuration: frontPadding * SECONDS_PER_SAMPLE
      };
    }
这样,我们就拥有了一个完整的函数,可用于解析绝大多数无间隙内容。不过,边缘情况肯定很多,因此建议在生产环境中使用类似代码之前谨慎行事。
附录 C:关于垃圾回收
属于 SourceBuffer 实例的内存会根据内容类型、平台特定限制和当前播放位置主动进行垃圾回收。在 Chrome 中,系统会先从已播放的缓冲区回收内存。
不过,如果内存用量超出平台特定限制,系统会从未播放的缓冲区中移除内存。
当播放因回收内存而到达时间轴中的间隙时,如果间隙足够小,可能会出现故障;如果间隙过大,则可能会完全停止播放。 这两种情况都无法提供良好的用户体验,因此请务必避免一次性附加过多的数据,并手动从媒体时间轴中移除不再需要的范围。
可以通过每个 SourceBuffer 上的 remove() 方法移除范围;该方法接受以秒为单位的 [start, end] 范围。与 appendBuffer() 类似,每个 remove() 在完成后都会触发一次 updateend 事件。在事件触发之前,不应发出其他移除或附加操作。
在桌面版 Chrome 中,您可以同时将大约 12 MB 的音频内容和 150 MB 的视频内容保存在内存中。您不应依赖于不同浏览器或平台上的这些值;例如,它们肯定不能代表移动设备。
垃圾回收只会影响添加到 SourceBuffers 的数据;您可以缓冲在 JavaScript 变量中的数据量不受限制。如有必要,您也可以在同一位置重新附加相同的数据。