
簡介
本文將說明如何搭配使用 JSARToolKit 程式庫和 WebRTC getUserMedia API,在網路上執行擴增實境應用程式。至於算繪,我使用 WebGL,因為它提供更高的效能。本文的最終成果是示範應用程式,可將 3D 模型置於網路攝影機影片中的擴增實境標記上方。
JSARToolKit 是 JavaScript 的擴增實境程式庫。這是根據 GPL 發布的開放原始碼程式庫,也是我為 Mozilla Remixing Reality 示範製作的 Flash FLARToolKit 的直接移植版本。FLARToolKit 本身是 Java NyARToolKit 的移植版本,而 NyARToolKit 則是 C 版 ARToolKit 的移植版本。雖然路途遙遠,但我們終於抵達目的地。
JSARToolKit 會處理畫布元素。由於此函式需要從畫布讀取圖片,因此圖片必須來自與網頁相同的來源,或是使用 CORS 來規避同源政策。簡而言之,請將要用作紋理的圖片或影片元素的 crossOrigin 屬性設為 '' 或 'anonymous'。
將畫布傳遞給 JSARToolKit 進行分析時,JSARToolKit 會傳回圖片中找到的 AR 標記清單和對應的轉換矩陣。如要在標記上繪製 3D 物件,請將轉換矩陣傳遞至您使用的任何 3D 算繪程式庫,以便使用矩陣轉換物件。接著,在 WebGL 場景中繪製影片框架,並在其上繪製物件,即可開始使用。
如要使用 JSARToolKit 分析影片,請在畫布上繪製影片,然後將畫布傳遞給 JSARToolKit。針對每個影格執行這項操作,即可進行影片 AR 追蹤。在現今的 JavaScript 引擎上,JSARToolKit 速度夠快,即使在 640x480 的影片影格中,也能即時執行這項作業。不過,影片影格越大,處理時間就越長。適當的影片影格大小為 320x240,但如果您想使用小型標記或多個標記,建議使用 640x480。
示範
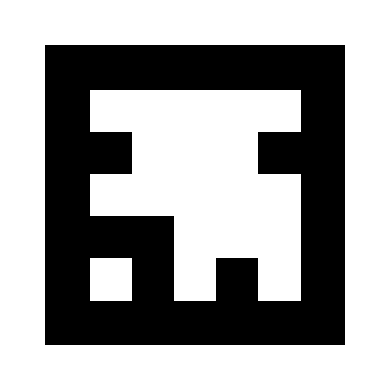
如要觀看網路攝影機示範,您必須在瀏覽器中啟用 WebRTC (在 Chrome 中,請前往 about:flags 並啟用 MediaStream)。你也需要列印下方的 AR 標記。你也可以嘗試在手機或平板電腦上開啟標記圖片,並將圖片顯示在網路攝影機上。
設定 JSARToolKit
JSARToolKit API 與 Java 非常相似,因此您必須進行一些調整才能使用。基本概念是,您有一個偵測器物件,可在光柵物件上運作。在偵測器和影像柵格之間,有一個相機參數物件,可將影像柵格座標轉換為相機座標。如要從偵測器取得偵測到的標記,請對標記進行迴迭,並將其轉換矩陣複製到程式碼中。
第一步是建立影像資料物件、相機參數物件和偵測器物件。
// Create a RGB raster object for the 2D canvas.
// JSARToolKit uses raster objects to read image data.
// Note that you need to set canvas.changed = true on every frame.
var raster = new NyARRgbRaster_Canvas2D(canvas);

// FLARParam is the thing used by FLARToolKit to set camera parameters.
// Here we create a FLARParam for images with 320x240 pixel dimensions.
var param = new FLARParam(320, 240);

// The FLARMultiIdMarkerDetector is the actual detection engine for marker detection.
// It detects multiple ID markers. ID markers are special markers that encode a number.
var detector = new FLARMultiIdMarkerDetector(param, 120);

// For tracking video set continue mode to true. In continue mode, the detector
// tracks markers across multiple frames.
detector.setContinueMode(true);

// Copy the camera perspective matrix from the FLARParam to the WebGL library camera matrix.
// The second and third parameters determine the zNear and zFar planes for the perspective matrix.
param.copyCameraMatrix(display.camera.perspectiveMatrix, 10, 10000);
使用 getUserMedia 存取網路攝影機
接下來,我將建立一個影片元素,透過 WebRTC API 取得網路攝影機影片。如果是預錄影片,只要將影片的來源屬性設為影片網址即可。如果您要從靜態圖片進行標記偵測,可以使用圖片元素來執行類似的操作。
由於 WebRTC 和 getUserMedia 仍是新興技術,因此您需要透過功能偵測這兩項技術。詳情請參閱 Eric Bidelman 的文章「在 HTML5 中擷取音訊和影片」。
var video = document.createElement('video');
video.width = 320;
video.height = 240;

var getUserMedia = function(t, onsuccess, onerror) {
  if (navigator.getUserMedia) {
    return navigator.getUserMedia(t, onsuccess, onerror);
  } else if (navigator.webkitGetUserMedia) {
    return navigator.webkitGetUserMedia(t, onsuccess, onerror);
  } else if (navigator.mozGetUserMedia) {
    return navigator.mozGetUserMedia(t, onsuccess, onerror);
  } else if (navigator.msGetUserMedia) {
    return navigator.msGetUserMedia(t, onsuccess, onerror);
  } else {
    onerror(new Error("No getUserMedia implementation found."));
  }
};

var URL = window.URL || window.webkitURL;
var createObjectURL = URL.createObjectURL || webkitURL.createObjectURL;
if (!createObjectURL) {
  throw new Error("URL.createObjectURL not found.");
}

getUserMedia({'video': true},
  function(stream) {
    var url = createObjectURL(stream);
    video.src = url;
  },
  function(error) {
    alert("Couldn't access webcam.");
  }
);
偵測標記
偵測器運作正常後,我們就可以開始提供圖片,以便偵測 AR 矩陣。首先將圖片繪製到光柵物件畫布上,然後在光柵物件上執行偵測器。偵測器會傳回圖片中找到的標記數量。
// Draw the video frame to the raster canvas, scaled to 320x240.
canvas.getContext('2d').drawImage(video, 0, 0, 320, 240);

// Tell the raster object that the underlying canvas has changed.
canvas.changed = true;

// Do marker detection by using the detector object on the raster object.
// The threshold parameter determines the threshold value
// for turning the video frame into a 1-bit black-and-white image.
//
var markerCount = detector.detectMarkerLite(raster, threshold);
最後一個步驟是逐一檢查偵測到的標記,並取得其轉換矩陣。您可以使用轉換矩陣,將 3D 物件置於標記上方。
// Create a NyARTransMatResult object for getting the marker translation matrices.
var resultMat = new NyARTransMatResult();
var markers = {};
// Go through the detected markers and get their IDs and transformation matrices.
for (var idx = 0; idx < markerCount; idx++) {
// Get the ID marker data for the current marker.
// ID markers are special kind of markers that encode a number.
// The bytes for the number are in the ID marker data.
var id = detector.getIdMarkerData(idx);
// Read bytes from the id packet.
var currId = -1;
// This code handles only 32-bit numbers or shorter.
if (id.packetLength <= 4) {
currId = 0;
for (var i = 0; i < id.packetLength; i++) {
currId = (currId << 8) | id.getPacketData(i);
}
}
// If this is a new id, let's start tracking it.
if (markers[currId] == null) {
markers[currId] = {};
}
// Get the transformation matrix for the detected marker.
detector.getTransformMatrix(idx, resultMat);
// Copy the result matrix into our marker tracker object.
markers[currId].transform = Object.asCopy(resultMat);
}
矩陣對應
以下是將 JSARToolKit 矩陣複製到 glMatrix 矩陣的程式碼 (這是 16 個元素的 FloatArrays,其中最後四個元素包含轉譯欄)。它是透過魔法運作 (也就是說,我不知道 ARToolKit 矩陣的設定方式。我猜是 Y 軸反轉了。無論如何,這個位元符號反轉的神秘技法會讓 JSARToolKit 矩陣與 glMatrix 的運作方式相同。
如要將本程式庫與其他程式庫 (例如 Three.js) 搭配使用,您必須編寫函式,將 ARToolKit 矩陣轉換為程式庫的矩陣格式。您也需要鉤掛 FLARParam.copyCameraMatrix 方法。copyCameraMatrix 方法會將 FLARParam 透視矩陣寫入 glMatrix 樣式的矩陣。
function copyMarkerMatrix(arMat, glMat) {
  glMat[0] = arMat.m00;
  glMat[1] = -arMat.m10;
  glMat[2] = arMat.m20;
  glMat[3] = 0;
  glMat[4] = arMat.m01;
  glMat[5] = -arMat.m11;
  glMat[6] = arMat.m21;
  glMat[7] = 0;
  glMat[8] = -arMat.m02;
  glMat[9] = arMat.m12;
  glMat[10] = -arMat.m22;
  glMat[11] = 0;
  glMat[12] = arMat.m03;
  glMat[13] = -arMat.m13;
  glMat[14] = arMat.m23;
  glMat[15] = 1;
}
Three.js 整合
Three.js 是熱門的 JavaScript 3D 引擎。我將說明如何在 Three.js 中使用 JSARToolKit 輸出內容。您需要三個東西:一個全螢幕四邊形,用於繪製影片圖像;一個具備 FLARParam 透視矩陣的相機;以及一個以標記矩陣做為轉換的物件。我會透過下方程式碼逐步說明整合程序。
// I'm going to use a glMatrix-style matrix as an intermediary.
// So the first step is to create a function to convert a glMatrix matrix into a Three.js Matrix4.
THREE.Matrix4.prototype.setFromArray = function(m) {
  return this.set(
    m[0], m[4], m[8], m[12],
    m[1], m[5], m[9], m[13],
    m[2], m[6], m[10], m[14],
    m[3], m[7], m[11], m[15]
  );
};

// glMatrix matrices are flat arrays.
var tmp = new Float32Array(16);

// Create a camera and a marker root object for your Three.js scene.
var camera = new THREE.Camera();
scene.add(camera);

var markerRoot = new THREE.Object3D();
markerRoot.matrixAutoUpdate = false;

// Add the marker models and suchlike into your marker root object.
var cube = new THREE.Mesh(
  new THREE.CubeGeometry(100,100,100),
  new THREE.MeshBasicMaterial({color: 0xff00ff})
);
cube.position.z = -50;
markerRoot.add(cube);

// Add the marker root to your scene.
scene.add(markerRoot);

// Next we need to make the Three.js camera use the FLARParam matrix.
param.copyCameraMatrix(tmp, 10, 10000);
camera.projectionMatrix.setFromArray(tmp);


// To display the video, first create a texture from it.
var videoTex = new THREE.Texture(videoCanvas);

// Then create a plane textured with the video.
var plane = new THREE.Mesh(
  new THREE.PlaneGeometry(2, 2, 0),
  new THREE.MeshBasicMaterial({map: videoTex})
);

// The video plane shouldn't care about the z-buffer.
plane.material.depthTest = false;
plane.material.depthWrite = false;

// Create a camera and a scene for the video plane and
// add the camera and the video plane to the scene.
var videoCam = new THREE.Camera();
var videoScene = new THREE.Scene();
videoScene.add(plane);
videoScene.add(videoCam);

...

// On every frame do the following:
function tick() {
  // Draw the video frame to the canvas.
  videoCanvas.getContext('2d').drawImage(video, 0, 0);
  canvas.getContext('2d').drawImage(videoCanvas, 0, 0, canvas.width, canvas.height);

  // Tell JSARToolKit that the canvas has changed.
  canvas.changed = true;

  // Update the video texture.
  videoTex.needsUpdate = true;

  // Detect the markers in the video frame.
  var markerCount = detector.detectMarkerLite(raster, threshold);
  for (var i=0; i<markerCount; i++) {
    // Get the marker matrix into the result matrix.
    detector.getTransformMatrix(i, resultMat);

    // Copy the marker matrix to the tmp matrix.
    copyMarkerMatrix(resultMat, tmp);

    // Copy the marker matrix over to your marker root object.
    markerRoot.matrix.setFromArray(tmp);
  }

  // Render the scene.
  renderer.autoClear = false;
  renderer.clear();
  renderer.render(videoScene, videoCam);
  renderer.render(scene, camera);
}
摘要
本文將介紹 JSARToolKit 的基本概念。您現在可以使用 JavaScript 建構自己的攝影機擴增實境應用程式。
將 JSARToolKit 與 Three.js 整合雖然有點麻煩,但確實可行。我不確定在示範中是否有任何錯誤,因此如果您知道有更好的方式完成整合,請告訴我。歡迎提供修補程式 :)