ऐप्लिकेशन स्टोर, डेवलपर को ऐप्लिकेशन इंस्टॉल करने से पहले उन्हें दिखाने की सुविधा देते हैं. इसमें स्क्रीनशॉट और टेक्स्ट की जानकारी शामिल होती है. इससे उपयोगकर्ता को ऐप्लिकेशन इंस्टॉल करने का विकल्प चुनने में मदद मिलती है. बेहतर इंस्टॉल यूज़र इंटरफ़ेस (यूआई), वेब ऐप्लिकेशन डेवलपर को अपने उपयोगकर्ताओं को सीधे ब्राउज़र से ऐप्लिकेशन इंस्टॉल करने का न्योता देने के लिए, इसी तरह की सुविधा देता है. यह बेहतर यूज़र इंटरफ़ेस (यूआई), Android और डेस्कटॉप एनवायरमेंट के लिए Chrome में उपलब्ध है.
डिफ़ॉल्ट प्रॉम्प्ट
डिफ़ॉल्ट अनुभव का उदाहरण यहां दिया गया है. इसमें ज़रूरी जानकारी नहीं दी गई है.


बेहतर इंस्टॉल यूज़र इंटरफ़ेस (यूआई)
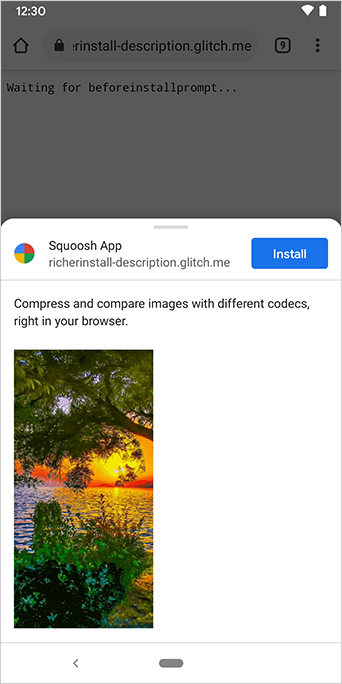
छोटे डिफ़ॉल्ट प्रॉम्प्ट के बजाय, ज़्यादा जानकारी वाला इंस्टॉल यूज़र इंटरफ़ेस (यूआई) डायलॉग पाने के लिए, अपने वेब मेनिफ़ेस्ट में screenshots और description फ़ील्ड जोड़ें. नीचे दिया गया Squoosh.app का उदाहरण देखें:

बेहतर इंस्टॉल यूज़र इंटरफ़ेस (यूआई) डायलॉग, वेब मेनिफ़ेस्ट में मौजूद description और screenshots फ़ील्ड के कॉन्टेंट से मिलकर बना होता है.
डायलॉग को ट्रिगर करने के लिए, आपको सिर्फ़ संबंधित फ़ॉर्म फ़ैक्टर के लिए कम से कम एक स्क्रीनशॉट जोड़ना होगा. हालांकि, हमारा सुझाव है कि आप जानकारी भी जोड़ें. इन फ़ील्ड के बारे में ज़्यादा जानने के लिए, यहां दी गई जानकारी देखें.
स्क्रीनशॉट
स्क्रीनशॉट, नए इंस्टॉल यूज़र इंटरफ़ेस (यूआई) को ज़्यादा 'रिच' बनाते हैं. इसलिए, हम इनका इस्तेमाल करने का सुझाव देते हैं. अपने मेनिफ़ेस्ट में screenshots सदस्य को जोड़ें. यह एक ऐसा कलेक्शन होता है जिसमें कम से कम एक इमेज की ज़रूरत होती है. Chrome, ज़्यादा से ज़्यादा आठ इमेज दिखाएगा. नीचे एक उदाहरण दिया गया है.
 "screenshots": [
    {
     "src": "source/image1.png",
      "sizes": "640x320",
      "type": "image/png",
      "form_factor": "wide",
      "label": "Wonder Widgets"
    }
]
स्क्रीनशॉट इन शर्तों के मुताबिक होने चाहिए:
- चौड़ाई और ऊंचाई, कम से कम 320 पिक्सल और ज़्यादा से ज़्यादा 3,840 पिक्सल होनी चाहिए.
- आपके स्क्रीनशॉट का डाइमेंशन, डाइमेंशन की कम से कम सीमा के 2.3 गुना से ज़्यादा नहीं होना चाहिए.
- एक ही फ़ॉर्म फ़ैक्टर वैल्यू वाले सभी स्क्रीनशॉट का आस्पेक्ट रेशियो एक जैसा होना चाहिए.
- सिर्फ़ JPEG और PNG इमेज फ़ॉर्मैट काम करते हैं.
- सिर्फ़ आठ स्क्रीनशॉट दिखाए जाएंगे. अगर इससे ज़्यादा हेडर जोड़े जाते हैं, तो उपयोगकर्ता एजेंट उन्हें अनदेखा कर देता है.
साथ ही, आपको इमेज का साइज़ और टाइप भी शामिल करना होगा, ताकि वह सही तरीके से रेंडर हो सके.
form_factor से ब्राउज़र को पता चलता है कि स्क्रीनशॉट को डेस्कटॉप (wide) या मोबाइल एनवायरमेंट (narrow) पर दिखाना है.
ब्यौरा
description सदस्य, ऐप्लिकेशन के बारे में जानकारी देता है, ताकि उपयोगकर्ता को ऐप्लिकेशन रखने के लिए न्योता दिया जा सके.
description के बिना भी डायलॉग दिखेगा, लेकिन इसका इस्तेमाल करने का सुझाव दिया जाता है.
टेक्स्ट की सात लाइनों (लगभग 324 वर्ण) के बाद, एक सीमा लागू हो जाती है. इसके बाद, लंबे ब्यौरे को छोटा कर दिया जाता है और उसके आखिर में एलिप्सिस जोड़ दिया जाता है.
{
…
"description": "Compress and compare images with different codecs
right in your browser."
}


ब्यौरा, इंस्टॉल करने के लिए दिखने वाले प्रॉम्प्ट में सबसे ऊपर दिखता है.
स्क्रीनशॉट से पता चलता है कि इंस्टॉलेशन डायलॉग में, ऐप्लिकेशन के सोर्स की जानकारी भी दी जाती है. अगर ऑरिजिन बहुत लंबे हैं, तो उन्हें यूज़र इंटरफ़ेस (यूआई) में फ़िट करने के लिए छोटा कर दिया जाता है. इसे एलडिंग भी कहा जाता है. इसका इस्तेमाल उपयोगकर्ताओं की सुरक्षा के लिए किया जाता है.
इसके बारे में और पढ़ें
डेमो
एचटीएमएल
<!DOCTYPE html>
<html lang="en">
  <head>
    <meta charset="utf-8" />
    <meta name="viewport" content="width=device-width, initial-scale=1" />
    <meta name="color-scheme" content="dark light" />
    <link rel="manifest" href="manifest.json" />
    <title>How to add Richer Install UI to your web app</title>
    <!-- TODO: Devsite - Removed inline handlers -->
    <!-- <script>
      if ('serviceWorker' in navigator) {
        window.addEventListener('load', () => {
          navigator.serviceWorker.register('sw.js');
        });
      }
    </script>
    <script type="module" src="script.js"></script> -->
  </head>
  <body>
    <h1>How to add Richer Install UI to your web app</h1>
    <ol>
      <li>
        Install the app by clicking the button below. After the installation,
        the button is disabled.
        <p>
          <button disabled type="button">Install</button>
        </p>
      </li>
      <li>
        When you click on install a dialog similar to the ones from app stores
        will be displayed.
      </li>
      <li>
        The dialog includes the `description` and `screenshots` set in the app
        manifest.
      </li>
      <li>
        Screenshots should be different depending if the app is being installed
        on a mobile or desktop device, according to the `form_factor` value set
        for the screenshots on the manifest
      </li>
    </ol>
  </body>
</html>
JS
        // The install button.
const installButton = document.querySelector('button');

// Only relevant for browsers that support installation.
if ('BeforeInstallPromptEvent' in window) {
  // Variable to stash the `BeforeInstallPromptEvent`.
  let installEvent = null;

  // Function that will be run when the app is installed.
  const onInstall = () => {
    // Disable the install button.
    installButton.disabled = true;
    // No longer needed.
    installEvent = null;
  };

  window.addEventListener('beforeinstallprompt', (event) => {
    // Do not show the install prompt quite yet.
    event.preventDefault();
    // Stash the `BeforeInstallPromptEvent` for later.
    installEvent = event;
    // Enable the install button.
    installButton.disabled = false;
  });

  installButton.addEventListener('click', async () => {
    // If there is no stashed `BeforeInstallPromptEvent`, return.
    if (!installEvent) {
      return;
    }
    // Use the stashed `BeforeInstallPromptEvent` to prompt the user.
    installEvent.prompt();
    const result = await installEvent.userChoice;
    // If the user installs the app, run `onInstall()`.
    if (result.outcome === 'accepted') {
      onInstall();
    }
  });

  // The user can decide to ignore the install button
  // and just use the browser prompt directly. In this case
  // likewise run `onInstall()`.
  window.addEventListener('appinstalled', () => {
    onInstall();
  });
}


