
웹 푸시의 일반적인 구현 패턴을 살펴보겠습니다.
이를 위해서는 서비스 워커에서 사용할 수 있는 몇 가지 API를 사용해야 합니다.
알림 닫기 이벤트
이전 섹션에서는 notificationclick 이벤트를 수신 대기하는 방법을 알아봤습니다.
사용자가 알림 중 하나를 닫을 때 호출되는 notificationclose 이벤트도 있습니다 (즉, 사용자가 알림을 클릭하는 대신 십자 아이콘을 클릭하거나 알림을 스와이프하여 닫음).
이 이벤트는 일반적으로 알림에 대한 사용자 참여도를 추적하는 분석에 사용됩니다.
self.addEventListener('notificationclose', function (event) {
  const dismissedNotification = event.notification;

  const promiseChain = notificationCloseAnalytics();
  event.waitUntil(promiseChain);
});
알림에 데이터 추가
푸시 메시지가 수신되면 사용자가 알림을 클릭한 경우에만 유용한 데이터가 있는 경우가 많습니다. 예를 들어 알림을 클릭할 때 열려야 하는 URL입니다.
푸시 이벤트에서 데이터를 가져와 알림에 연결하는 가장 쉬운 방법은 다음과 같이 showNotification()에 전달된 옵션 객체에 data 매개변수를 추가하는 것입니다.
const options = {
  body:
    'This notification has data attached to it that is printed ' +
    "to the console when it's clicked.",
  tag: 'data-notification',
  data: {
    time: new Date(Date.now()).toString(),
    message: 'Hello, World!',
  },
};
registration.showNotification('Notification with Data', options);
클릭 핸들러 내에서 event.notification.data를 사용하여 데이터에 액세스할 수 있습니다.
const notificationData = event.notification.data;
console.log('');
console.log('The notification data has the following parameters:');
Object.keys(notificationData).forEach((key) => {
  console.log(`  ${key}: ${notificationData[key]}`);
});
console.log('');
창 열기
알림에 대한 가장 일반적인 응답 중 하나는 특정 URL의 창 / 탭을 여는 것입니다. clients.openWindow() API를 사용하면 됩니다.
notificationclick 이벤트에서는 다음과 같은 코드를 실행합니다.
const examplePage = '/demos/notification-examples/example-page.html';
const promiseChain = clients.openWindow(examplePage);
event.waitUntil(promiseChain);
다음 섹션에서는 사용자를 안내하려는 페이지가 이미 열려 있는지 확인하는 방법을 살펴봅니다. 이렇게 하면 새 탭을 여는 대신 열려 있는 탭에 포커스를 맞출 수 있습니다.
기존 창에 포커스 맞추기
가능한 경우 사용자가 알림을 클릭할 때마다 새 창을 여는 대신 창에 포커스를 맞춰야 합니다.
이를 실행하는 방법을 살펴보기 전에 출처의 페이지에서만 가능하다는 점에 유의하세요. Google에서는 사이트에 속한 열려 있는 페이지만 볼 수 있기 때문입니다. 이렇게 하면 개발자가 사용자가 보고 있는 모든 사이트를 볼 수 없습니다.
이전 예를 사용하여 코드를 변경하여 /demos/notification-examples/example-page.html가 이미 열려 있는지 확인해 보겠습니다.
const urlToOpen = new URL(examplePage, self.location.origin).href;

const promiseChain = clients
  .matchAll({
    type: 'window',
    includeUncontrolled: true,
  })
  .then((windowClients) => {
    let matchingClient = null;

    for (let i = 0; i < windowClients.length; i++) {
      const windowClient = windowClients[i];
      if (windowClient.url === urlToOpen) {
        matchingClient = windowClient;
        break;
      }
    }

    if (matchingClient) {
      return matchingClient.focus();
    } else {
      return clients.openWindow(urlToOpen);
    }
  });

event.waitUntil(promiseChain);
코드를 단계별로 살펴보겠습니다.
먼저 URL API를 사용하여 예시 페이지를 파싱합니다. 이 방법은 제프 폴스닉님에게서 배운 멋진 방법입니다. location 객체로 new URL()를 호출하면 전달된 문자열이 상대적 (즉, /이 https://example.com/이 됨)인 경우 절대 URL이 반환됩니다.
나중에 창 URL과 일치시킬 수 있도록 URL을 절대 URL로 만듭니다.
const urlToOpen = new URL(examplePage, self.location.origin).href;
그런 다음 현재 열려 있는 탭과 창의 목록인 WindowClient 객체 목록을 가져옵니다. 이 탭은 출처 전용 탭입니다.
const promiseChain = clients.matchAll({
  type: 'window',
  includeUncontrolled: true,
});
matchAll에 전달된 옵션은 브라우저에 '창' 유형 클라이언트만 검색하려고 함을 알립니다 (즉, 탭과 창만 찾고 웹 워커는 제외함). includeUncontrolled를 사용하면 현재 서비스 워커(즉, 이 코드를 실행하는 서비스 워커)가 제어하지 않는 출처의 모든 탭을 검색할 수 있습니다. 일반적으로 matchAll()를 호출할 때는 항상 includeUncontrolled가 true여야 합니다.
나중에 서비스 워커를 유지하면서 반환된 약속을 event.waitUntil()에 전달할 수 있도록 promiseChain로 캡처합니다.
matchAll() 약속이 해결되면 반환된 창 클라이언트를 반복하고 URL을 열려는 URL과 비교합니다. 일치하는 항목이 있으면 해당 클라이언트에 초점을 맞추고 이 창을 사용자의 주목을 끕니다. 포커스는 matchingClient.focus() 호출로 설정됩니다.
일치하는 클라이언트를 찾을 수 없는 경우 이전 섹션과 마찬가지로 새 창을 엽니다.
.then((windowClients) => {
  let matchingClient = null;

  for (let i = 0; i < windowClients.length; i++) {
    const windowClient = windowClients[i];
    if (windowClient.url === urlToOpen) {
      matchingClient = windowClient;
      break;
    }
  }

  if (matchingClient) {
    return matchingClient.focus();
  } else {
    return clients.openWindow(urlToOpen);
  }
});
알림 병합
알림에 태그를 추가하면 동일한 태그가 있는 기존 알림이 대체되는 동작이 선택됩니다.
하지만 Notifications API를 사용하여 알림 접기를 더 정교하게 처리할 수 있습니다. 채팅 앱을 예로 들 수 있습니다. 개발자는 새 알림에 최신 메시지만 표시하는 대신 'Matt님으로부터 받은 메시지 2개'와 같은 메시지를 표시하고 싶을 수 있습니다.
웹 앱에 현재 표시되는 모든 알림에 액세스할 수 있는 registration.getNotifications() API를 사용하여 이를 실행하거나 다른 방법으로 현재 알림을 조작할 수 있습니다.
이 API를 사용하여 채팅 예시를 구현하는 방법을 살펴보겠습니다.
채팅 앱에서 각 알림에 사용자 이름이 포함된 데이터가 있다고 가정해 보겠습니다.
먼저 특정 사용자의 열려 있는 알림을 찾습니다. registration.getNotifications()를 가져와서 루프하고 특정 사용자 이름이 있는지 notification.data를 확인합니다.
const promiseChain = registration.getNotifications().then((notifications) => {
  let currentNotification;

  for (let i = 0; i < notifications.length; i++) {
    if (notifications[i].data && notifications[i].data.userName === userName) {
      currentNotification = notifications[i];
    }
  }

  return currentNotification;
});
다음 단계는 이 알림을 새 알림으로 교체하는 것입니다.
이 가짜 메시지 앱에서는 새 알림 데이터에 수를 추가하여 새 메시지 수를 추적하고 새 알림이 올 때마다 수를 늘립니다.
.then((currentNotification) => {
  let notificationTitle;
  const options = {
    icon: userIcon,
  }

  if (currentNotification) {
    // We have an open notification, let's do something with it.
    const messageCount = currentNotification.data.newMessageCount + 1;

    options.body = `You have ${messageCount} new messages from ${userName}.`;
    options.data = {
      userName: userName,
      newMessageCount: messageCount
    };
    notificationTitle = `New Messages from ${userName}`;

    // Remember to close the old notification.
    currentNotification.close();
  } else {
    options.body = `"${userMessage}"`;
    options.data = {
      userName: userName,
      newMessageCount: 1
    };
    notificationTitle = `New Message from ${userName}`;
  }

  return registration.showNotification(
    notificationTitle,
    options
  );
});
현재 표시된 알림이 있는 경우 메시지 수를 늘리고 알림 제목과 본문 메시지를 적절하게 설정합니다. 알림이 없으면 newMessageCount이 1인 새 알림을 만듭니다.
따라서 첫 번째 메시지는 다음과 같이 표시됩니다.
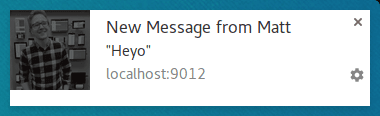
두 번째 알림은 알림을 다음과 같이 접습니다.

이 접근 방식의 좋은 점은 사용자가 알림이 서로 겹쳐 표시되는 것을 보면 알림을 최신 메시지로 대체하는 것보다 더 일관된 느낌을 줄 수 있다는 것입니다.
규칙의 예외
푸시를 수신할 때 알림을 표시해야 한다고 언급해 왔으며 이는 대부분의 경우 사실입니다. 사용자가 사이트를 열고 포커스를 맞춘 상태인 경우 알림을 표시하지 않아도 됩니다.
푸시 이벤트 내에서 창 클라이언트를 검사하고 포커스가 있는 창을 찾아 알림을 표시해야 하는지 확인할 수 있습니다.
모든 창을 가져오고 포커스가 있는 창을 찾는 코드는 다음과 같습니다.
function isClientFocused() {
  return clients
    .matchAll({
      type: 'window',
      includeUncontrolled: true,
    })
    .then((windowClients) => {
      let clientIsFocused = false;

      for (let i = 0; i < windowClients.length; i++) {
        const windowClient = windowClients[i];
        if (windowClient.focused) {
          clientIsFocused = true;
          break;
        }
      }

      return clientIsFocused;
    });
}
clients.matchAll()를 사용하여 모든 창 클라이언트를 가져온 다음 focused 매개변수를 확인하면서 루프를 실행합니다.
푸시 이벤트 내에서 이 함수를 사용하여 알림을 표시해야 하는지 결정합니다.
const promiseChain = isClientFocused().then((clientIsFocused) => {
  if (clientIsFocused) {
    console.log("Don't need to show a notification.");
    return;
  }

  // Client isn't focused, we need to show a notification.
  return self.registration.showNotification('Had to show a notification.');
});

event.waitUntil(promiseChain);
푸시 이벤트에서 페이지에 메시지 보내기
사용자가 현재 사이트에 있는 경우 알림 표시를 건너뛸 수 있습니다. 하지만 이벤트가 발생했음을 사용자에게 알리고 싶지만 알림이 너무 강력하다면 어떻게 해야 할까요?
한 가지 방법은 서비스 워커에서 페이지로 메시지를 전송하는 것입니다. 이렇게 하면 웹페이지에서 사용자에게 알림이나 업데이트를 표시하여 이벤트를 알릴 수 있습니다. 이는 페이지의 은근한 알림이 사용자에게 더 좋고 친근한 경우에 유용합니다.
푸시를 수신하고 웹 앱이 현재 포커스를 받고 있는지 확인한 후 다음과 같이 열려 있는 각 페이지에 '메시지를 게시'할 수 있습니다.
const promiseChain = isClientFocused().then((clientIsFocused) => {
  if (clientIsFocused) {
    windowClients.forEach((windowClient) => {
      windowClient.postMessage({
        message: 'Received a push message.',
        time: new Date().toString(),
      });
    });
  } else {
    return self.registration.showNotification('No focused windows', {
      body: 'Had to show a notification instead of messaging each page.',
    });
  }
});

event.waitUntil(promiseChain);
각 페이지에서 메시지 이벤트 리스너를 추가하여 메시지를 리슨합니다.
navigator.serviceWorker.addEventListener('message', function (event) {
  console.log('Received a message from service worker: ', event.data);
});
이 메시지 리스너에서 원하는 작업을 실행하거나 페이지에 맞춤 UI를 표시하거나 메시지를 완전히 무시할 수 있습니다.
또한 웹페이지에서 메시지 리스너를 정의하지 않으면 서비스 워커의 메시지가 아무것도 실행하지 않습니다.
페이지를 캐시하고 창 열기
이 가이드의 범위에 해당하지 않지만 논의할 가치가 있는 시나리오 하나는 사용자가 알림을 클릭한 후 방문할 것으로 예상되는 웹페이지를 캐시하여 웹 앱의 전반적인 UX를 개선하는 것입니다.
이렇게 하려면 fetch 이벤트를 처리하도록 서비스 워커를 설정해야 하지만 fetch 이벤트 리스너를 구현하는 경우 알림을 표시하기 전에 필요한 페이지와 애셋을 캐시하여 push 이벤트에서 이를 활용해야 합니다.
브라우저 호환성
notificationclose 이벤트
' d='M96 183a64 64 0 0 1-23-23L17 64a128 128 0 0 0 111 192l55-96a64 64 0 0 1-87 23Z'/%3E%3Cpath fill='url(%23b)' d='M192 128a64 64 0 0 1-9 32l-55 96A128 128 0 0 0 239 64H128a64 64 0 0 1 64 64Z'/%3E%3Ccircle cx='128' cy='128' r='52' fill='%231a73e8'/%3E%3Cpath fill='url(%23c)' d='M96 73a64 64 0 0 1 32-9h111a128 128 0 0 0-222 0l56 96a64 64 0 0 1 23-87Z'/%3E%3C/svg%3E)
' xlink:href='%23A'%3E%3Cstop offset='.76' stop-opacity='0'/%3E%3Cstop offset='.95' stop-opacity='.5'/%3E%3Cstop offset='1'/%3E%3C/radialGradient%3E%3CradialGradient id='F' cx='2523' cy='4680' r='20243' gradientTransform='matrix(-.03715 .99931 -2.12836 -.07913 13579 3530)' xlink:href='%23A'%3E%3Cstop offset='0' stop-color='%2335c1f1'/%3E%3Cstop offset='.11' stop-color='%2334c1ed'/%3E%3Cstop offset='.23' stop-color='%232fc2df'/%3E%3Cstop offset='.31' stop-color='%232bc3d2'/%3E%3Cstop offset='.67' stop-color='%2336c752'/%3E%3C/radialGradient%3E%3CradialGradient id='G' cx='24247' cy='7758' r='9734' gradientTransform='matrix(.28109 .95968 -.78353 .22949 24510 -16292)' xlink:href='%23A'%3E%3Cstop offset='0' stop-color='%2366eb6e'/%3E%3Cstop offset='1' stop-color='%2366eb6e' stop-opacity='0'/%3E%3C/radialGradient%3E%3Cpath id='H' d='M24105 20053a9345 9345 0 01-1053 472 10202 10202 0 01-3590 646c-4732 0-8855-3255-8855-7432 0-1175 680-2193 1643-2729-4280 180-5380 4640-5380 7253 0 7387 6810 8137 8276 8137 791 0 1984-230 2704-456l130-44a12834 12834 0 006660-5282c220-350-168-757-535-565z'/%3E%3Cpath id='I' d='M11571 25141a7913 7913 0 01-2273-2137 8145 8145 0 01-1514-4740 8093 8093 0 013093-6395 8082 8082 0 011373-859c312-148 846-414 1554-404a3236 3236 0 012569 1297 3184 3184 0 01636 1866c0-21 2446-7960-8005-7960-4390 0-8004 4166-8004 7820 0 2319 538 4170 1212 5604a12833 12833 0 007684 6757 12795 12795 0 003908 610c1414 0 2774-233 4045-656a7575 7575 0 01-6278-803z'/%3E%3Cpath id='J' d='M16231 15886c-80 105-330 250-330 566 0 260 170 512 472 723 1438 1003 4149 868 4156 868a5954 5954 0 003027-839 6147 6147 0 001133-850 6180 6180 0 001910-4437c26-2242-796-3732-1133-4392-2120-4141-6694-6525-11668-6525-7011 0-12703 5635-12798 12620 47-3654 3679-6605 7996-6605 350 0 2346 34 4200 1007 1634 858 2490 1894 3086 2921 618 1067 728 2415 728 2952s-271 1333-780 1990z'/%3E%3Cuse fill='url(%23B)' xlink:href='%23H'/%3E%3Cuse fill='url(%23D)' opacity='.35' xlink:href='%23H'/%3E%3Cuse fill='url(%23C)' xlink:href='%23I'/%3E%3Cuse fill='url(%23E)' opacity='.4' xlink:href='%23I'/%3E%3Cuse fill='url(%23F)' xlink:href='%23J'/%3E%3Cuse fill='url(%23G)' xlink:href='%23J'/%3E%3C/svg%3E)
' gradientUnits='userSpaceOnUse'%3E%3Cstop offset='.2' stop-color='%239059ff' stop-opacity='0'/%3E%3Cstop offset='.3' stop-color='%238c4ff3' stop-opacity='.1'/%3E%3Cstop offset='.8' stop-color='%237716a8' stop-opacity='.5'/%3E%3Cstop offset='1' stop-color='%236e008b' stop-opacity='.6'/%3E%3C/radialGradient%3E%3CradialGradient id='ff-g' cx='239.1' cy='34.6' r='171.6' gradientUnits='userSpaceOnUse'%3E%3Cstop offset='0' stop-color='%23ffe226'/%3E%3Cstop offset='.1' stop-color='%23ffdb27'/%3E%3Cstop offset='.3' stop-color='%23ffc82a'/%3E%3Cstop offset='.5' stop-color='%23ffa930'/%3E%3Cstop offset='.7' stop-color='%23ff7e37'/%3E%3Cstop offset='.8' stop-color='%23ff7139'/%3E%3C/radialGradient%3E%3CradialGradient id='ff-h' cx='374' cy='-74.3' r='732.2' gradientUnits='userSpaceOnUse'%3E%3Cstop offset='.1' stop-color='%23fff44f'/%3E%3Cstop offset='.5' stop-color='%23ff980e'/%3E%3Cstop offset='.6' stop-color='%23ff5634'/%3E%3Cstop offset='.7' stop-color='%23ff3647'/%3E%3Cstop offset='.9' stop-color='%23e31587'/%3E%3C/radialGradient%3E%3CradialGradient id='ff-i' cx='304.6' cy='7.1' r='536.4' gradientTransform='rotate(84 303 4)' gradientUnits='userSpaceOnUse'%3E%3Cstop offset='0' stop-color='%23fff44f'/%3E%3Cstop offset='.1' stop-color='%23ffe847'/%3E%3Cstop offset='.2' stop-color='%23ffc830'/%3E%3Cstop offset='.3' stop-color='%23ff980e'/%3E%3Cstop offset='.4' stop-color='%23ff8b16'/%3E%3Cstop offset='.5' stop-color='%23ff672a'/%3E%3Cstop offset='.6' stop-color='%23ff3647'/%3E%3Cstop offset='.7' stop-color='%23e31587'/%3E%3C/radialGradient%3E%3CradialGradient id='ff-j' cx='235' cy='98.1' r='457.1' gradientUnits='userSpaceOnUse'%3E%3Cstop offset='.1' stop-color='%23fff44f'/%3E%3Cstop offset='.5' stop-color='%23ff980e'/%3E%3Cstop offset='.6' stop-color='%23ff5634'/%3E%3Cstop offset='.7' stop-color='%23ff3647'/%3E%3Cstop offset='.9' stop-color='%23e31587'/%3E%3C/radialGradient%3E%3CradialGradient id='ff-k' cx='355.7' cy='124.9' r='500.3' gradientUnits='userSpaceOnUse'%3E%3Cstop offset='.1' stop-color='%23fff44f'/%3E%3Cstop offset='.2' stop-color='%23ffe141'/%3E%3Cstop offset='.5' stop-color='%23ffaf1e'/%3E%3Cstop offset='.6' stop-color='%23ff980e'/%3E%3C/radialGradient%3E%3ClinearGradient id='ff-a' x1='446.9' y1='76.8' x2='47.9' y2='461.8' gradientUnits='userSpaceOnUse'%3E%3Cstop offset='.1' stop-color='%23fff44f'/%3E%3Cstop offset='.1' stop-color='%23ffe847'/%3E%3Cstop offset='.2' stop-color='%23ffc830'/%3E%3Cstop offset='.4' stop-color='%23ff980e'/%3E%3Cstop offset='.4' stop-color='%23ff8b16'/%3E%3Cstop offset='.5' stop-color='%23ff672a'/%3E%3Cstop offset='.5' stop-color='%23ff3647'/%3E%3Cstop offset='.7' stop-color='%23e31587'/%3E%3C/linearGradient%3E%3ClinearGradient id='ff-l' x1='442.1' y1='74.8' x2='102.6' y2='414.3' gradientUnits='userSpaceOnUse'%3E%3Cstop offset='.2' stop-color='%23fff44f' stop-opacity='.8'/%3E%3Cstop offset='.3' stop-color='%23fff44f' stop-opacity='.6'/%3E%3Cstop offset='.5' stop-color='%23fff44f' stop-opacity='.2'/%3E%3Cstop offset='.6' stop-color='%23fff44f' stop-opacity='0'/%3E%3C/linearGradient%3E%3C/defs%3E%3Cpath d='M479 166c-11-25-32-52-49-60a249 249 0 0 1 25 73c-27-68-73-95-111-155a255 255 0 0 1-8-14 44 44 0 0 1-4-9 1 1 0 0 0 0-1 1 1 0 0 0-1 0c-60 35-81 101-83 134a120 120 0 0 0-66 25 71 71 0 0 0-6-5 111 111 0 0 1-1-58c-25 11-44 29-58 44-9-12-9-52-8-60l-8 4a175 175 0 0 0-24 21 210 210 0 0 0-22 26 203 203 0 0 0-32 73l-1 2-2 15a229 229 0 0 0-4 34v1a240 240 0 0 0 477 40l1-9c5-41 0-84-15-121zM202 355l3 1-3-1zm55-145zm198-31z' fill='url(%23ff-a)'/%3E%3Cpath d='M479 166c-11-25-32-52-49-60 14 26 22 53 25 72v1a207 207 0 0 1-206 279c-113-3-212-87-231-197-3-17 0-26 2-40-2 11-3 14-4 34v1a240 240 0 0 0 477 40l1-9c5-41 0-84-15-121z' fill='url(%23ff-b)'/%3E%3Cpath d='M479 166c-11-25-32-52-49-60 14 26 22 53 25 72v1a207 207 0 0 1-206 279c-113-3-212-87-231-197-3-17 0-26 2-40-2 11-3 14-4 34v1a240 240 0 0 0 477 40l1-9c5-41 0-84-15-121z' fill='url(%23ff-c)'/%3E%3Cpath d='m362 195 1 1a130 130 0 0 0-22-29C266 92 322 5 331 0c-60 35-81 101-83 134l9-1c45 0 84 25 105 62z' fill='url(%23ff-d)'/%3E%3Cpath d='M257 210c-1 6-22 26-29 26-68 0-80 41-80 41 3 35 28 64 57 79l4 2 7 3a107 107 0 0 0 31 6c120 6 143-143 57-186 22-4 45 5 58 14-21-37-60-62-105-62l-9 1a120 120 0 0 0-66 25l17 16c16 16 58 33 58 35z' fill='url(%23ff-e)'/%3E%3Cpath d='M257 210c-1 6-22 26-29 26-68 0-80 41-80 41 3 35 28 64 57 79l4 2 7 3a107 107 0 0 0 31 6c120 6 143-143 57-186 22-4 45 5 58 14-21-37-60-62-105-62l-9 1a120 120 0 0 0-66 25l17 16c16 16 58 33 58 35z' fill='url(%23ff-f)'/%3E%3Cpath d='m171 151 5 3a111 111 0 0 1-1-58c-25 11-44 29-58 44 1 0 36 0 54 11z' fill='url(%23ff-g)'/%3E%3Cpath d='M18 261a242 242 0 0 0 231 197 207 207 0 0 0 206-279c8 56-20 110-64 146-86 71-169 43-186 31l-3-1c-50-24-71-70-67-110-42 0-57-35-57-35s38-28 89-4c46 22 90 4 90 4 0-2-42-19-58-35l-17-16a71 71 0 0 0-6-5l-5-3c-18-11-52-11-54-11-9-12-9-51-8-60l-8 4a175 175 0 0 0-24 21 210 210 0 0 0-22 26 203 203 0 0 0-32 73c0 1-9 38-5 57z' fill='url(%23ff-h)'/%3E%3Cpath d='M341 167a130 130 0 0 1 22 29 46 46 0 0 1 4 3c55 50 26 121 24 126 44-36 72-90 64-146-27-68-73-95-111-155a255 255 0 0 1-8-14 44 44 0 0 1-4-9 1 1 0 0 0 0-1 1 1 0 0 0-1 0c-9 5-65 92 10 167z' fill='url(%23ff-i)'/%3E%3Cpath d='M367 199a46 46 0 0 0-4-3l-1-1c-13-9-36-18-58-15 86 44 63 193-57 187a107 107 0 0 1-31-6 131 131 0 0 1-11-5c17 12 99 39 186-31 2-5 31-76-24-126z' fill='url(%23ff-j)'/%3E%3Cpath d='M148 277s12-41 80-41c7 0 28-20 29-26s-44 18-90-4c-51-24-89 4-89 4s15 35 57 35c-4 40 16 85 67 110l3 1c-29-15-54-44-57-79z' fill='url(%23ff-k)'/%3E%3Cpath d='M479 166c-11-25-32-52-49-60a249 249 0 0 1 25 73c-27-68-73-95-111-155a255 255 0 0 1-8-14 44 44 0 0 1-4-9 1 1 0 0 0 0-1 1 1 0 0 0-1 0c-60 35-81 101-83 134l9-1c45 0 84 25 105 62-13-9-36-18-58-14 86 43 63 192-57 186a107 107 0 0 1-31-6 131 131 0 0 1-11-5l-3-1 3 1c-29-15-54-44-57-79 0 0 12-41 80-41 7 0 28-20 29-26 0-2-42-19-58-35l-17-16a71 71 0 0 0-6-5 111 111 0 0 1-1-58c-25 11-44 29-58 44-9-12-9-52-8-60l-8 4a175 175 0 0 0-24 21 210 210 0 0 0-22 26 203 203 0 0 0-32 73l-1 2-2 15a279 279 0 0 0-4 34v1a240 240 0 0 0 477 40l1-9c5-41 0-84-15-121zm-24 13z' fill='url(%23ff-l)'/%3E%3C/svg%3E)
' xlink:href='%23s-b'%3E%3Cstop offset='0' stop-color='%2324a5f3' stop-opacity='0' /%3E%3Cstop offset='1' stop-color='%231e8ceb' /%3E%3C/radialGradient%3E%3CradialGradient id='s-j' cx='109.3' cy='13.8' r='93.1' gradientTransform='matrix(-.02 1.1 -1.04 -.02 137 -115)' xlink:href='%23s-b'%3E%3Cstop offset='0' stop-opacity='0' /%3E%3Cstop offset='1' stop-color='%235488d6' stop-opacity='0' /%3E%3Cstop offset='1' stop-color='%235d96eb' /%3E%3C/radialGradient%3E%3C/defs%3E%3Crect width='220' height='220' x='22' y='-107' fill='url(%23s-a)' ry='49' transform='matrix(.57 0 0 .57 187 256)' /%3E%3Cg transform='translate(194 190)'%3E%3Ccircle cx='67.8' cy='67.7' fill='url(%23s-c)' paint-order='stroke fill markers' r='54' /%3E%3Ccircle cx='-69.9' cy='69.3' fill='url(%23s-i)' transform='translate(138 -2)' r='54' /%3E%3C/g%3E%3Cellipse cx='120' cy='14.2' fill='url(%23s-j)' rx='93.1' ry='93.7' transform='matrix(.58 0 0 .58 192 250)' /%3E%3Cg transform='matrix(.58 0 0 .57 197 182)'%3E%3Cpath fill='%23cac7c8' d='M46 192h1l72-48-7-9-66 57Z' /%3E%3Cpath fill='%23fbfffc' d='M46 191v1l66-57-7-9-59 65Z' /%3E%3Cpath fill='url(%23s-d)' d='m119 144-7-9 66-57-59 66Z' /%3E%3Cpath fill='%23fb645c' d='m105 126 7 9 66-57-1-1-72 49Z' /%3E%3C/g%3E%3Cpath stroke='%23fff' stroke-linecap='round' stroke-miterlimit='1' stroke-width='1.3' d='m287 278 3-2m-12-17 8-2m-8-3h4m-4-13 8 2m-8 3h4m-1-13 7 3m-4-11 7 4m-2-11 6 6m0-12 6 7m1-11 4 6m4-10 3 7m5-9 2 7m15-7-1 7m10-5-3 7m11-4-4 7m11-2-5 6m16 7-7 4m10 4-7 3m10 6-8 1m8 16-8-2m5 10-7-3m4 11-7-4m2 11-6-5m0 11-5-6m-2 11-4-7m-4 11-3-8m-6 10-1-8m-16 8 2-8m-10 5 3-7m-11 4 4-7m-11 2 5-6m-8 3 3-3m4 8 2-3m5 8 2-4m6 7 1-4m8 5v-4m8 4v-4m9 3-1-4m9 1-2-4m9 0-2-4m9-2-3-3m8-4-3-2m8-5-4-2m7-6-4-1m5-8h-4m4-8h-4m3-9-4 1m1-9-4 2m-1-9-3 2m-2-9-3 3m-4-8-2 3m-5-8-2 4m-6-6-1 3m-8-5v4m-8-4v4m-9-2 1 3m-9 0 2 3m-9 1 2 3m-9 2 3 3m-8 4 3 2m-8 5 4 2m-7 6 4 1m-4 25 4-1m-2 5 7-3m-6 7 4-2m-2 6 7-4m-13-21h8m41-41v-8m0 99v-8m49-42h-8' transform='translate(-65 8)' /%3E%3C/svg%3E)
Clients.openWindow()
ServiceWorkerRegistration.getNotifications()
clients.matchAll()
자세한 내용은 이 서비스 워커 소개 게시물을 참고하세요.
다음에 수행할 작업
- 웹 푸시 알림 개요
- 푸시의 작동 방식
- 사용자 구독하기
- 권한 UX
- 웹 푸시 라이브러리로 메시지 전송
- 웹 푸시 프로토콜
- 푸시 이벤트 처리
- 알림 표시
- 알림 동작
- 일반적인 알림 패턴
- 푸시 알림 FAQ
- 일반적인 문제 및 버그 신고하기