

ここまでは、通知の外観を変更するオプションについて説明してきました。通知の動作を変更するオプションもあります。
デフォルトでは、視覚的なオプションのみを指定して showNotification() を呼び出すと、次の動作になります。
- 通知をクリックしても何も起きません。
- 新しい通知は順番に表示されます。ブラウザは通知を閉じません。
- プラットフォームによっては、デバイスで音が鳴ったり、バイブレーションがオンになったりすることがあります。
- プラットフォームによっては、通知はしばらくすると消えますが、ユーザーが操作しない限り通知が表示され続けるプラットフォームもあります。(たとえば、Android とパソコンの通知を比較します)。
このセクションでは、オプションのみを使用してこれらのデフォルトの動作を変更する方法について説明します。これらは比較的簡単に実装して活用できます。
通知のクリック イベント
ユーザーが通知をクリックしても、デフォルトでは何も起こりません。通知を閉じたり削除したりすることもできません。
通知のクリックでは、通常は通知を閉じて、他のロジック(ウィンドウを開く、アプリケーションへの API 呼び出しを行うなど)を実行します。
そのためには、サービス ワーカーに 'notificationclick' イベント リスナーを追加する必要があります。この関数は、通知がクリックされるたびに呼び出されます。
self.addEventListener('notificationclick', (>event) = {
  const clickedNotification = event.notification;
  clickedNotification.close();

  // Do something as the result of the notification click
  const promiseChain = doSomething();
  event.waitUntil(promiseChain);
});
この例では、クリックされた通知に event.notification としてアクセスできます。これにより、通知のプロパティとメソッドにアクセスできます。この場合は、その close() メソッドを呼び出して追加の処理を行います。
操作
アクションを使用すると、通知をクリックするだけでなく、ユーザーとのやり取りをさらに深めることができます。
ボタン
前のセクションでは、showNotification() を呼び出すときにアクション ボタンを定義する方法について説明しました。
const title = 'Actions Notification';

const options = {
  actions: [
    {
      action: 'coffee-action',
      title: 'Coffee',
      type: 'button',
      icon: '/images/demos/action-1-128x128.png',
    },
    {
      action: 'doughnut-action',
      type: 'button',
      title: 'Doughnut',
      icon: '/images/demos/action-2-128x128.png',
    },
    {
      action: 'gramophone-action',
      type: 'button',
      title: 'Gramophone',
      icon: '/images/demos/action-3-128x128.png',
    },
    {
      action: 'atom-action',
      type: 'button',
      title: 'Atom',
      icon: '/images/demos/action-4-128x128.png',
    },
  ],
};

registration.showNotification(title, options);
ユーザーがアクション ボタンをクリックした場合は、noticationclick イベントの event.action 値を確認して、どのアクション ボタンがクリックされたかを確認します。
event.action には、オプションで設定された action 値が含まれます。上記の例では、event.action の値は 'coffee-action'、'doughnut-action'、'gramophone-action'、'atom-action' のいずれかになります。
これにより、次のように通知のクリックやアクションのクリックを検出できます。
self.addEventListener('notificationclick', (>event) = {
  if (!event.action) {
    // Was a normal notification click
    console.log('Notification Click.');
    return;
  }

  switch (event.action) {
    case 'coffee-action':
      console.log("User ❤️️'s coffee.");
      break;
    case 'doughnut-action':
      console.log("User ❤️️'s doughnuts.");
      break;
    case 'gramophone-action':
      console.log("User ❤️️'s music.");
      break;
    case 'atom-action':
      console.log("User ❤️️'s science.");
      break;
    default:
      console.log(`Unknown action clicked: '${event.action}'`);
      break;
  }
});
インライン返信
また、前のセクションでは、通知にインライン返信を追加する方法を確認しました。
const title = 'Poll';

const options = {
  body: 'Do you like this photo?',
  image: '/images/demos/cat-image.jpg',
  icon: '/images/demos/icon-512x512.png',
  badge: '/images/demos/badge-128x128.png',
  actions: [
    {
      action: 'yes',
      type: 'button',
      title: '👍 Yes',
    },
    {
      action: 'no',
      type: 'text',
      title: '👎 No (explain why)',
      placeholder: 'Type your explanation here',
    },
  ],
};

registration.showNotification(title, options);
event.reply には、ユーザーが入力フィールドに入力した値が格納されます。
self.addEventListener('notificationclick', (>event) = {
  const reply = event.reply;

  // Do something with the user's reply
  const promiseChain = doSomething(reply);
  event.waitUntil(promiseChain);
});
タグ
tag オプションは、基本的に通知を「グループ化」する文字列 ID です。これにより、複数の通知をユーザーにどのように表示するかを簡単に決定できます。例で説明するのが最も簡単です。
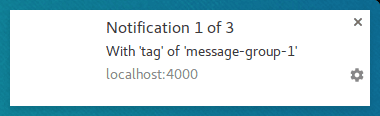
通知を表示し、タグ 'message-group-1' を設定しましょう。通知を表示するコードは次のとおりです。
const title = 'Notification 1 of 3';

const options = {
  body: "With 'tag' of 'message-group-1'",
  tag: 'message-group-1',
};

registration.showNotification(title, options);
最初の通知が表示されます。
次のように、新しいタグ 'message-group-2' を使用して 2 つ目の通知を表示しましょう。
const title = 'Notification 2 of 3';

const options = {
  body: "With 'tag' of 'message-group-2'",
  tag: 'message-group-2',
};

registration.showNotification(title, options);
2 つ目の通知がユーザーに表示されます。

3 つ目の通知を表示しますが、最初のタグ 'message-group-1' を再利用します。これにより、最初の通知が閉じられ、新しい通知に置き換えられます。
const title = 'Notification 3 of 3';

const options = {
  body: "With 'tag' of 'message-group-1'",
  tag: 'message-group-1',
};

registration.showNotification(title, options);
これで、showNotification() が 3 回呼び出されたにもかかわらず、2 件の通知が表示されます。
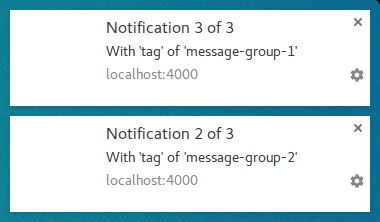
tag オプションは、メッセージをグループ化する方法にすぎません。これにより、新しい通知と同じタグを持つ現在表示されている古い通知は閉じられます。
tag を使用する際の注意点は、通知を置き換える際に音や振動が発生しないことです。
そこで役立つのが renotify オプションです。
再通知
これは、執筆時点では主にモバイル デバイスに適用されます。このオプションを設定すると、新しい通知がバイブレーションで通知され、システム音が鳴ります。
サイレント アップデートではなく、置き換え通知でユーザーに通知する必要があるシナリオもあります。チャット アプリケーションがその良い例です。この場合、tag と renotify を true に設定する必要があります。
const title = 'Notification 2 of 2';

const options = {
  tag: 'renotify',
  renotify: true,
};

registration.showNotification(title, options);
マナーモード
このオプションを選択すると、新しい通知を表示できますが、バイブレーション、音声、デバイスのディスプレイのオンなどのデフォルトの動作は行われなくなります。
通知にユーザーの即時対応が不要な場合に適しています。
const title = 'Silent Notification';

const options = {
  silent: true,
};

registration.showNotification(title, options);
操作が必要
デスクトップ版 Chrome では、通知は一定の時間が経過すると非表示になります。Android 版 Chrome では、この動作は発生しません。通知は、ユーザーが操作するまで表示されます。
ユーザーが操作するまで通知を強制的に表示するには、requireInteraction オプションを追加します。ユーザーが通知を閉じるかクリックするまで、通知が表示されます。
const title = 'Require Interaction Notification';

const options = {
  requireInteraction: true,
};

registration.showNotification(title, options);
このオプションは慎重に使用してください。通知を表示して、ユーザーが行っている操作を中断して通知を閉じるように強制すると、ユーザーの不満を招く可能性があります。
次のセクションでは、通知の管理や、通知のクリック時にページを開くなどのアクションの実行にウェブで使用される一般的なパターンについて説明します。
次のステップ
- ウェブプッシュ通知の概要
- プッシュの仕組み
- ユーザーを登録する
- 権限の UX
- ウェブプッシュ ライブラリを使用したメッセージの送信
- ウェブ プッシュ プロトコル
- プッシュ イベントの処理
- 通知の表示
- 通知の動作
- 一般的な通知パターン
- プッシュ通知に関するよくある質問
- 一般的な問題とバグの報告