
Passkeys make user accounts safer, simpler, easier to use.

Published: October 12, 2022, Last updated: April 09, 2026
Using passkeys enhances security, simplifies logins, and replaces passwords. Unlike regular passwords, which users must remember and enter manually, passkeys use device's screen lock mechanisms like biometrics or PINs and reduce phishing risks and credential theft.
Passkeys sync across devices using passkey providers like Google Password Manager and iCloud Keychain.
A passkey must be created, storing the private key securely to the passkey provider along with necessary metadata and its public key stored on your server for authentication. The private key issues a signature after user verification on the valid domain making passkeys phishing resistant. The public key verifies the signature without storing sensitive credentials, making passkeys resistant to credential theft.
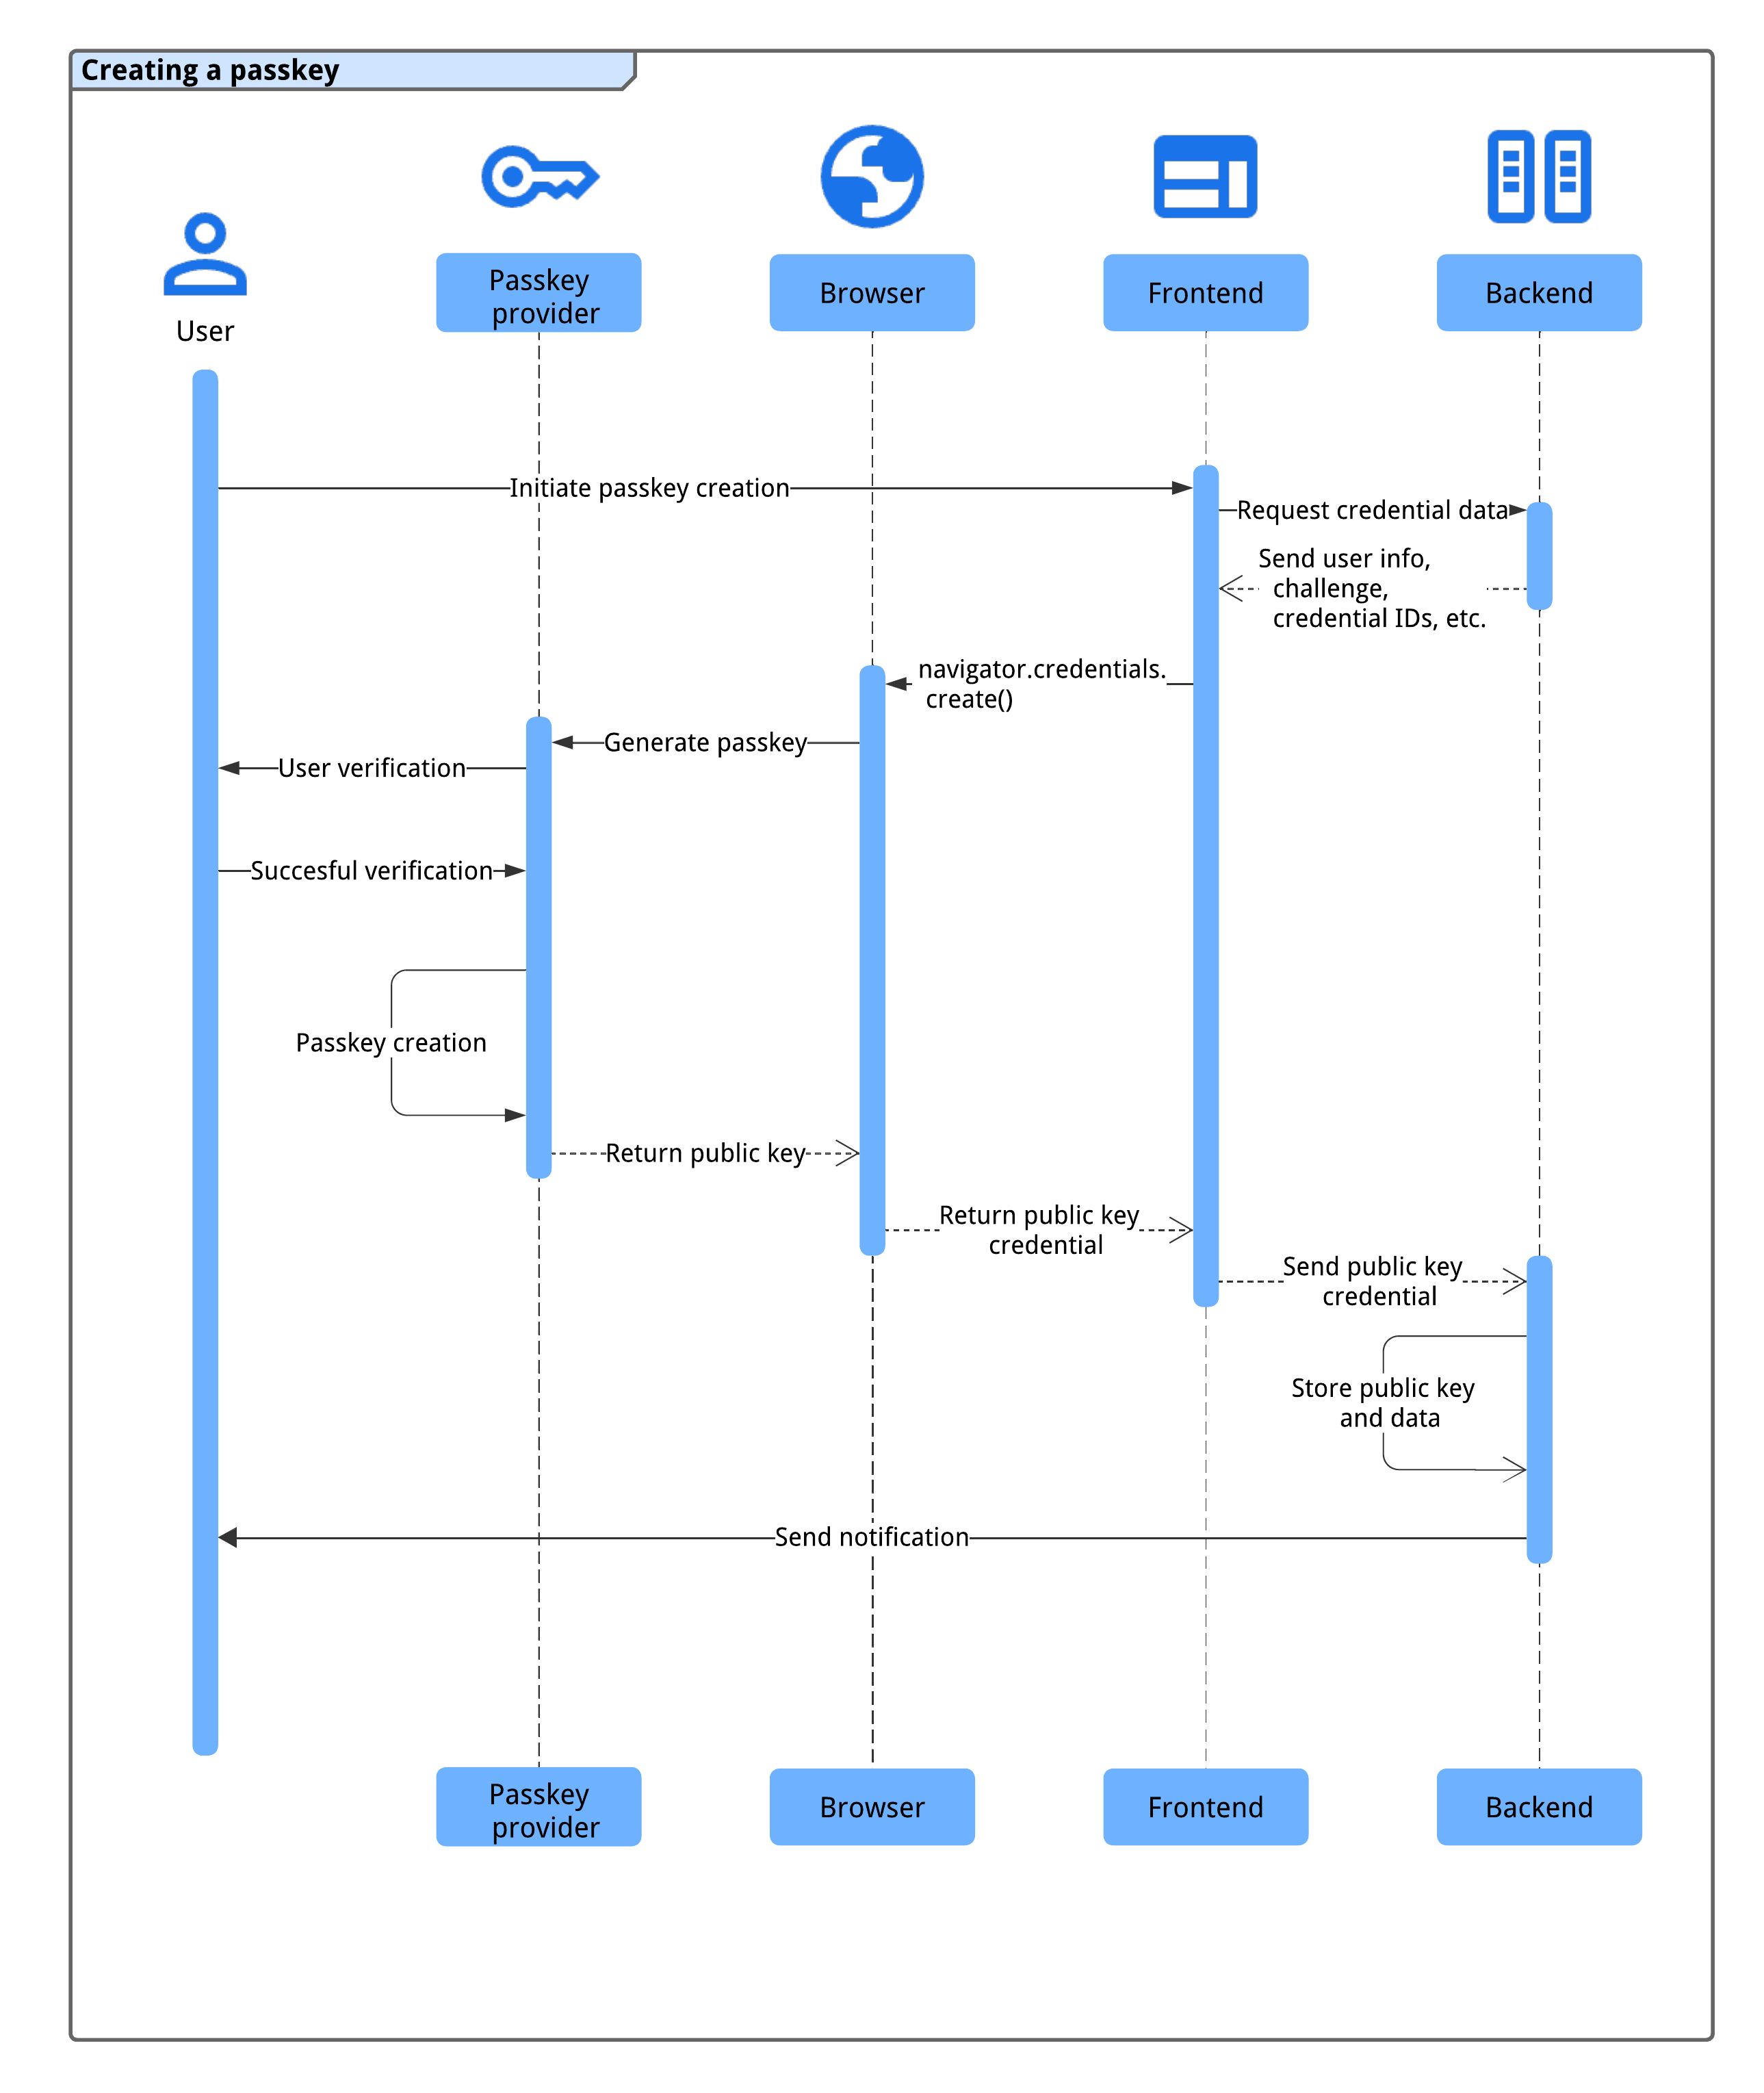
How creating a passkey works
Before a user can sign in with a passkey, you should create the passkey, associate it with a user account, and store its public key on your server.
You could ask users to create a passkey in one of the following situations:
- During or after sign up.
- After signing in.
- After signing in using a passkey from another device (that is, the
authenticatorAttachmentiscross-platform). - On a dedicated page where users can manage their passkeys.
To create a passkey, you use the WebAuthn API.
The four components of the passkey registration flow are:
- Backend: Stores user account details, including the public key.
- Frontend: Communicates with the browser and fetches necessary data from the backend.
- Browser: Runs your JavaScript and interacts with the WebAuthn API.
- Passkey provider: Creates and stores the passkey. This is typically a password manager such as Google Password Manager, or a security key.
Before creating a passkey, ensure that the system meets these prerequisites:
The user account is verified through a secure method (for example, email, phone verification, or identity federation) within a meaningfully short window.
The frontend and backend can communicate securely to exchange credential data.
The browser supports WebAuthn and passkey creation.
We can show you how to check most of them in the following sections.
Once the system meets this conditions, the following process happens to create a passkey:
- The system triggers the passkey creation process when the user initiates the action (for example, clicking a "Create a Passkey" button in their passkey management page or after finishing their registration).
- The frontend requests necessary credential data from the backend, including user information, a challenge, and credential IDs to prevent duplicates.
- The frontend calls
navigator.credentials.create()to prompt the device's passkey provider to generate a passkey using the information from the backend. Note that this call returns a promise. - The user's device authenticates the user using a biometric method, PIN, or pattern to create the passkey.
- The passkey provider creates a passkey and returns a public key credential to the frontend, resolving the promise.
- The frontend sends the generated public key credential to the backend.
- The backend stores the public key and other important data for future authentication,
- The backend notifies the user (for example, using email) to confirm the passkey creation and detect potential unauthorized access.
This process ensures a secure and seamless passkey registration process for users.
Compatibilities
Most browsers support WebAuthn, with some minor gaps. See passkeys.dev for browser and OS compatibility details.
Create a new passkey
To create a new passkey, this is the process the frontend should follow:
- Check for compatibility.
- Fetch information from the backend.
- Call WebAuth API to create a passkey.
- Send the returned public key to the backend.
- Save the credential.
The following sections show how you can do it.
Check for compatibility
Before displaying a "Create a new passkey" button, the frontend should check if:
- The browser supports WebAuthn with
PublicKeyCredential.
' d='M96 183a64 64 0 0 1-23-23L17 64a128 128 0 0 0 111 192l55-96a64 64 0 0 1-87 23Z'/%3E%3Cpath fill='url(%23b)' d='M192 128a64 64 0 0 1-9 32l-55 96A128 128 0 0 0 239 64H128a64 64 0 0 1 64 64Z'/%3E%3Ccircle cx='128' cy='128' r='52' fill='%231a73e8'/%3E%3Cpath fill='url(%23c)' d='M96 73a64 64 0 0 1 32-9h111a128 128 0 0 0-222 0l56 96a64 64 0 0 1 23-87Z'/%3E%3C/svg%3E)
' xlink:href='%23A'%3E%3Cstop offset='.76' stop-opacity='0'/%3E%3Cstop offset='.95' stop-opacity='.5'/%3E%3Cstop offset='1'/%3E%3C/radialGradient%3E%3CradialGradient id='F' cx='2523' cy='4680' r='20243' gradientTransform='matrix(-.03715 .99931 -2.12836 -.07913 13579 3530)' xlink:href='%23A'%3E%3Cstop offset='0' stop-color='%2335c1f1'/%3E%3Cstop offset='.11' stop-color='%2334c1ed'/%3E%3Cstop offset='.23' stop-color='%232fc2df'/%3E%3Cstop offset='.31' stop-color='%232bc3d2'/%3E%3Cstop offset='.67' stop-color='%2336c752'/%3E%3C/radialGradient%3E%3CradialGradient id='G' cx='24247' cy='7758' r='9734' gradientTransform='matrix(.28109 .95968 -.78353 .22949 24510 -16292)' xlink:href='%23A'%3E%3Cstop offset='0' stop-color='%2366eb6e'/%3E%3Cstop offset='1' stop-color='%2366eb6e' stop-opacity='0'/%3E%3C/radialGradient%3E%3Cpath id='H' d='M24105 20053a9345 9345 0 01-1053 472 10202 10202 0 01-3590 646c-4732 0-8855-3255-8855-7432 0-1175 680-2193 1643-2729-4280 180-5380 4640-5380 7253 0 7387 6810 8137 8276 8137 791 0 1984-230 2704-456l130-44a12834 12834 0 006660-5282c220-350-168-757-535-565z'/%3E%3Cpath id='I' d='M11571 25141a7913 7913 0 01-2273-2137 8145 8145 0 01-1514-4740 8093 8093 0 013093-6395 8082 8082 0 011373-859c312-148 846-414 1554-404a3236 3236 0 012569 1297 3184 3184 0 01636 1866c0-21 2446-7960-8005-7960-4390 0-8004 4166-8004 7820 0 2319 538 4170 1212 5604a12833 12833 0 007684 6757 12795 12795 0 003908 610c1414 0 2774-233 4045-656a7575 7575 0 01-6278-803z'/%3E%3Cpath id='J' d='M16231 15886c-80 105-330 250-330 566 0 260 170 512 472 723 1438 1003 4149 868 4156 868a5954 5954 0 003027-839 6147 6147 0 001133-850 6180 6180 0 001910-4437c26-2242-796-3732-1133-4392-2120-4141-6694-6525-11668-6525-7011 0-12703 5635-12798 12620 47-3654 3679-6605 7996-6605 350 0 2346 34 4200 1007 1634 858 2490 1894 3086 2921 618 1067 728 2415 728 2952s-271 1333-780 1990z'/%3E%3Cuse fill='url(%23B)' xlink:href='%23H'/%3E%3Cuse fill='url(%23D)' opacity='.35' xlink:href='%23H'/%3E%3Cuse fill='url(%23C)' xlink:href='%23I'/%3E%3Cuse fill='url(%23E)' opacity='.4' xlink:href='%23I'/%3E%3Cuse fill='url(%23F)' xlink:href='%23J'/%3E%3Cuse fill='url(%23G)' xlink:href='%23J'/%3E%3C/svg%3E)
' gradientUnits='userSpaceOnUse'%3E%3Cstop offset='.2' stop-color='%239059ff' stop-opacity='0'/%3E%3Cstop offset='.3' stop-color='%238c4ff3' stop-opacity='.1'/%3E%3Cstop offset='.8' stop-color='%237716a8' stop-opacity='.5'/%3E%3Cstop offset='1' stop-color='%236e008b' stop-opacity='.6'/%3E%3C/radialGradient%3E%3CradialGradient id='ff-g' cx='239.1' cy='34.6' r='171.6' gradientUnits='userSpaceOnUse'%3E%3Cstop offset='0' stop-color='%23ffe226'/%3E%3Cstop offset='.1' stop-color='%23ffdb27'/%3E%3Cstop offset='.3' stop-color='%23ffc82a'/%3E%3Cstop offset='.5' stop-color='%23ffa930'/%3E%3Cstop offset='.7' stop-color='%23ff7e37'/%3E%3Cstop offset='.8' stop-color='%23ff7139'/%3E%3C/radialGradient%3E%3CradialGradient id='ff-h' cx='374' cy='-74.3' r='732.2' gradientUnits='userSpaceOnUse'%3E%3Cstop offset='.1' stop-color='%23fff44f'/%3E%3Cstop offset='.5' stop-color='%23ff980e'/%3E%3Cstop offset='.6' stop-color='%23ff5634'/%3E%3Cstop offset='.7' stop-color='%23ff3647'/%3E%3Cstop offset='.9' stop-color='%23e31587'/%3E%3C/radialGradient%3E%3CradialGradient id='ff-i' cx='304.6' cy='7.1' r='536.4' gradientTransform='rotate(84 303 4)' gradientUnits='userSpaceOnUse'%3E%3Cstop offset='0' stop-color='%23fff44f'/%3E%3Cstop offset='.1' stop-color='%23ffe847'/%3E%3Cstop offset='.2' stop-color='%23ffc830'/%3E%3Cstop offset='.3' stop-color='%23ff980e'/%3E%3Cstop offset='.4' stop-color='%23ff8b16'/%3E%3Cstop offset='.5' stop-color='%23ff672a'/%3E%3Cstop offset='.6' stop-color='%23ff3647'/%3E%3Cstop offset='.7' stop-color='%23e31587'/%3E%3C/radialGradient%3E%3CradialGradient id='ff-j' cx='235' cy='98.1' r='457.1' gradientUnits='userSpaceOnUse'%3E%3Cstop offset='.1' stop-color='%23fff44f'/%3E%3Cstop offset='.5' stop-color='%23ff980e'/%3E%3Cstop offset='.6' stop-color='%23ff5634'/%3E%3Cstop offset='.7' stop-color='%23ff3647'/%3E%3Cstop offset='.9' stop-color='%23e31587'/%3E%3C/radialGradient%3E%3CradialGradient id='ff-k' cx='355.7' cy='124.9' r='500.3' gradientUnits='userSpaceOnUse'%3E%3Cstop offset='.1' stop-color='%23fff44f'/%3E%3Cstop offset='.2' stop-color='%23ffe141'/%3E%3Cstop offset='.5' stop-color='%23ffaf1e'/%3E%3Cstop offset='.6' stop-color='%23ff980e'/%3E%3C/radialGradient%3E%3ClinearGradient id='ff-a' x1='446.9' y1='76.8' x2='47.9' y2='461.8' gradientUnits='userSpaceOnUse'%3E%3Cstop offset='.1' stop-color='%23fff44f'/%3E%3Cstop offset='.1' stop-color='%23ffe847'/%3E%3Cstop offset='.2' stop-color='%23ffc830'/%3E%3Cstop offset='.4' stop-color='%23ff980e'/%3E%3Cstop offset='.4' stop-color='%23ff8b16'/%3E%3Cstop offset='.5' stop-color='%23ff672a'/%3E%3Cstop offset='.5' stop-color='%23ff3647'/%3E%3Cstop offset='.7' stop-color='%23e31587'/%3E%3C/linearGradient%3E%3ClinearGradient id='ff-l' x1='442.1' y1='74.8' x2='102.6' y2='414.3' gradientUnits='userSpaceOnUse'%3E%3Cstop offset='.2' stop-color='%23fff44f' stop-opacity='.8'/%3E%3Cstop offset='.3' stop-color='%23fff44f' stop-opacity='.6'/%3E%3Cstop offset='.5' stop-color='%23fff44f' stop-opacity='.2'/%3E%3Cstop offset='.6' stop-color='%23fff44f' stop-opacity='0'/%3E%3C/linearGradient%3E%3C/defs%3E%3Cpath d='M479 166c-11-25-32-52-49-60a249 249 0 0 1 25 73c-27-68-73-95-111-155a255 255 0 0 1-8-14 44 44 0 0 1-4-9 1 1 0 0 0 0-1 1 1 0 0 0-1 0c-60 35-81 101-83 134a120 120 0 0 0-66 25 71 71 0 0 0-6-5 111 111 0 0 1-1-58c-25 11-44 29-58 44-9-12-9-52-8-60l-8 4a175 175 0 0 0-24 21 210 210 0 0 0-22 26 203 203 0 0 0-32 73l-1 2-2 15a229 229 0 0 0-4 34v1a240 240 0 0 0 477 40l1-9c5-41 0-84-15-121zM202 355l3 1-3-1zm55-145zm198-31z' fill='url(%23ff-a)'/%3E%3Cpath d='M479 166c-11-25-32-52-49-60 14 26 22 53 25 72v1a207 207 0 0 1-206 279c-113-3-212-87-231-197-3-17 0-26 2-40-2 11-3 14-4 34v1a240 240 0 0 0 477 40l1-9c5-41 0-84-15-121z' fill='url(%23ff-b)'/%3E%3Cpath d='M479 166c-11-25-32-52-49-60 14 26 22 53 25 72v1a207 207 0 0 1-206 279c-113-3-212-87-231-197-3-17 0-26 2-40-2 11-3 14-4 34v1a240 240 0 0 0 477 40l1-9c5-41 0-84-15-121z' fill='url(%23ff-c)'/%3E%3Cpath d='m362 195 1 1a130 130 0 0 0-22-29C266 92 322 5 331 0c-60 35-81 101-83 134l9-1c45 0 84 25 105 62z' fill='url(%23ff-d)'/%3E%3Cpath d='M257 210c-1 6-22 26-29 26-68 0-80 41-80 41 3 35 28 64 57 79l4 2 7 3a107 107 0 0 0 31 6c120 6 143-143 57-186 22-4 45 5 58 14-21-37-60-62-105-62l-9 1a120 120 0 0 0-66 25l17 16c16 16 58 33 58 35z' fill='url(%23ff-e)'/%3E%3Cpath d='M257 210c-1 6-22 26-29 26-68 0-80 41-80 41 3 35 28 64 57 79l4 2 7 3a107 107 0 0 0 31 6c120 6 143-143 57-186 22-4 45 5 58 14-21-37-60-62-105-62l-9 1a120 120 0 0 0-66 25l17 16c16 16 58 33 58 35z' fill='url(%23ff-f)'/%3E%3Cpath d='m171 151 5 3a111 111 0 0 1-1-58c-25 11-44 29-58 44 1 0 36 0 54 11z' fill='url(%23ff-g)'/%3E%3Cpath d='M18 261a242 242 0 0 0 231 197 207 207 0 0 0 206-279c8 56-20 110-64 146-86 71-169 43-186 31l-3-1c-50-24-71-70-67-110-42 0-57-35-57-35s38-28 89-4c46 22 90 4 90 4 0-2-42-19-58-35l-17-16a71 71 0 0 0-6-5l-5-3c-18-11-52-11-54-11-9-12-9-51-8-60l-8 4a175 175 0 0 0-24 21 210 210 0 0 0-22 26 203 203 0 0 0-32 73c0 1-9 38-5 57z' fill='url(%23ff-h)'/%3E%3Cpath d='M341 167a130 130 0 0 1 22 29 46 46 0 0 1 4 3c55 50 26 121 24 126 44-36 72-90 64-146-27-68-73-95-111-155a255 255 0 0 1-8-14 44 44 0 0 1-4-9 1 1 0 0 0 0-1 1 1 0 0 0-1 0c-9 5-65 92 10 167z' fill='url(%23ff-i)'/%3E%3Cpath d='M367 199a46 46 0 0 0-4-3l-1-1c-13-9-36-18-58-15 86 44 63 193-57 187a107 107 0 0 1-31-6 131 131 0 0 1-11-5c17 12 99 39 186-31 2-5 31-76-24-126z' fill='url(%23ff-j)'/%3E%3Cpath d='M148 277s12-41 80-41c7 0 28-20 29-26s-44 18-90-4c-51-24-89 4-89 4s15 35 57 35c-4 40 16 85 67 110l3 1c-29-15-54-44-57-79z' fill='url(%23ff-k)'/%3E%3Cpath d='M479 166c-11-25-32-52-49-60a249 249 0 0 1 25 73c-27-68-73-95-111-155a255 255 0 0 1-8-14 44 44 0 0 1-4-9 1 1 0 0 0 0-1 1 1 0 0 0-1 0c-60 35-81 101-83 134l9-1c45 0 84 25 105 62-13-9-36-18-58-14 86 43 63 192-57 186a107 107 0 0 1-31-6 131 131 0 0 1-11-5l-3-1 3 1c-29-15-54-44-57-79 0 0 12-41 80-41 7 0 28-20 29-26 0-2-42-19-58-35l-17-16a71 71 0 0 0-6-5 111 111 0 0 1-1-58c-25 11-44 29-58 44-9-12-9-52-8-60l-8 4a175 175 0 0 0-24 21 210 210 0 0 0-22 26 203 203 0 0 0-32 73l-1 2-2 15a279 279 0 0 0-4 34v1a240 240 0 0 0 477 40l1-9c5-41 0-84-15-121zm-24 13z' fill='url(%23ff-l)'/%3E%3C/svg%3E)
' xlink:href='%23s-b'%3E%3Cstop offset='0' stop-color='%2324a5f3' stop-opacity='0' /%3E%3Cstop offset='1' stop-color='%231e8ceb' /%3E%3C/radialGradient%3E%3CradialGradient id='s-j' cx='109.3' cy='13.8' r='93.1' gradientTransform='matrix(-.02 1.1 -1.04 -.02 137 -115)' xlink:href='%23s-b'%3E%3Cstop offset='0' stop-opacity='0' /%3E%3Cstop offset='1' stop-color='%235488d6' stop-opacity='0' /%3E%3Cstop offset='1' stop-color='%235d96eb' /%3E%3C/radialGradient%3E%3C/defs%3E%3Crect width='220' height='220' x='22' y='-107' fill='url(%23s-a)' ry='49' transform='matrix(.57 0 0 .57 187 256)' /%3E%3Cg transform='translate(194 190)'%3E%3Ccircle cx='67.8' cy='67.7' fill='url(%23s-c)' paint-order='stroke fill markers' r='54' /%3E%3Ccircle cx='-69.9' cy='69.3' fill='url(%23s-i)' transform='translate(138 -2)' r='54' /%3E%3C/g%3E%3Cellipse cx='120' cy='14.2' fill='url(%23s-j)' rx='93.1' ry='93.7' transform='matrix(.58 0 0 .58 192 250)' /%3E%3Cg transform='matrix(.58 0 0 .57 197 182)'%3E%3Cpath fill='%23cac7c8' d='M46 192h1l72-48-7-9-66 57Z' /%3E%3Cpath fill='%23fbfffc' d='M46 191v1l66-57-7-9-59 65Z' /%3E%3Cpath fill='url(%23s-d)' d='m119 144-7-9 66-57-59 66Z' /%3E%3Cpath fill='%23fb645c' d='m105 126 7 9 66-57-1-1-72 49Z' /%3E%3C/g%3E%3Cpath stroke='%23fff' stroke-linecap='round' stroke-miterlimit='1' stroke-width='1.3' d='m287 278 3-2m-12-17 8-2m-8-3h4m-4-13 8 2m-8 3h4m-1-13 7 3m-4-11 7 4m-2-11 6 6m0-12 6 7m1-11 4 6m4-10 3 7m5-9 2 7m15-7-1 7m10-5-3 7m11-4-4 7m11-2-5 6m16 7-7 4m10 4-7 3m10 6-8 1m8 16-8-2m5 10-7-3m4 11-7-4m2 11-6-5m0 11-5-6m-2 11-4-7m-4 11-3-8m-6 10-1-8m-16 8 2-8m-10 5 3-7m-11 4 4-7m-11 2 5-6m-8 3 3-3m4 8 2-3m5 8 2-4m6 7 1-4m8 5v-4m8 4v-4m9 3-1-4m9 1-2-4m9 0-2-4m9-2-3-3m8-4-3-2m8-5-4-2m7-6-4-1m5-8h-4m4-8h-4m3-9-4 1m1-9-4 2m-1-9-3 2m-2-9-3 3m-4-8-2 3m-5-8-2 4m-6-6-1 3m-8-5v4m-8-4v4m-9-2 1 3m-9 0 2 3m-9 1 2 3m-9 2 3 3m-8 4 3 2m-8 5 4 2m-7 6 4 1m-4 25 4-1m-2 5 7-3m-6 7 4-2m-2 6 7-4m-13-21h8m41-41v-8m0 99v-8m49-42h-8' transform='translate(-65 8)' /%3E%3C/svg%3E)
- The browser supports capability
detection with
PublicKeyCredential.getClientCapabilities().
The browser supports WebAuthn conditional UI with
conditionalGet.The device supports a platform authenticator (can create a passkey and authenticate on the device) with
passkeyPlatformAuthenticator.
The following code snippet shows how you can check for compatibility before displaying the passkey-related options.
if (window.PublicKeyCredential && PublicKeyCredential.getClientCapabilities) {
  const capabilities = await PublicKeyCredential.getClientCapabilities();
  if (capabilities.conditionalGet === true &&
      capabilities.passkeyPlatformAuthenticator === true) {
    // The browser supports passkeys and the conditional UI.
  }
}
In this example, the Create a new passkey button should only be displayed if all the conditions are met.
Fetch information from the backend
When the user clicks the button, fetch the required information from the
backend to call navigator.credentials.create().
The following code snippet shows a JSON object with the required information to
call navigator.credentials.create():
// Example `PublicKeyCredentialCreationOptions` contents
{
  challenge: *****,
  rp: {
    name: "Example",
    id: "example.com",
  },
  user: {
    id: *****,
    name: "john78",
    displayName: "John",
  },
  pubKeyCredParams: [{
    alg: -7, type: "public-key"
  },{
    alg: -257, type: "public-key"
  }],
  excludeCredentials: [{
    id: *****,
    type: 'public-key',
    transports: ['internal'],
  }],
  authenticatorSelection: {
    authenticatorAttachment: "platform",
    requireResidentKey: true,
  }
}
The key-value pairs in the object hold the following information:
challenge: A server-generated challenge in ArrayBuffer for this registration.rp.id: An RP ID (Relying Party ID), a domain and a website can specify either its domain or a registrable suffix. For example, if an RP's origin ishttps://login.example.com:1337, the RP ID can be eitherlogin.example.comorexample.com. If the RP ID is specified asexample.com, the user can authenticate onlogin.example.comor on any subdomains onexample.com. See, Allow passkey reuse across your sites with Related Origin Requests for more information on this.rp.name: The RP's (Relying Party) name. This is deprecated in WebAuthn L3 but included for compatibility reasons.user.id: A unique user ID in ArrayBuffer, generated upon account creation. It should be permanent, unlike a username that may be editable. The user ID identifies an account, but should not contain any personally identifiable information (PII). You likely already have a user ID in your system, but if needed, create one specifically for passkeys to keep it free of any PII.user.name: A unique identifier for the account that the user will recognise, like their email address or username. This will be displayed in the account selector.user.displayName: A required, more user-friendly name for the account. It need not be unique and could be the user's chosen name. If your site does not have a suitable value to include here, pass an empty string. This may be displayed on the account selector depending on the browser.pubKeyCredParams: Specifies the RP (relying party) supported public-key algorithms. We recommend setting it to[{alg: -7, type: "public-key"},{alg: -257, type: "public-key"}]. This specifies support for ECDSA with P-256 and RSA PKCS#1 and supporting these gives complete coverage.excludeCredentials: A list of already registered credential IDs. Prevents registering the same device twice by providing a list of already registered credential IDs. Thetransportsmember, if provided, should contain the result of callinggetTransports()during the registration of each credential.authenticatorSelection.authenticatorAttachment: Set this to"platform"along withhint: ['client-device']if this passkey creation is an upgrade from a password for example in a promotion after a sign-in."platform"indicates that the RP wants a platform authenticator (an authenticator embedded to the platform device) which does not prompt, for example, to insert a USB security key. The user has a simpler option to create a passkey.authenticatorSelection.requireResidentKey: Set it to a booleantrue. A discoverable credential (resident key) stores user information to the passkey and lets users select the account upon authentication.authenticatorSelection.userVerification: Indicates whether a user verification using the device screen lock is"required","preferred"or"discouraged". The default is"preferred", which means the authenticator may skip user verification. Set this to"preferred"or omit the property.
We recommend constructing the object on the server, encoding the ArrayBuffer
with Base64URL and fetching it from the frontend. This way, you can decode the
payload using PublicKeyCredential.parseCreationOptionsFromJSON() and pass it
directly to navigator.credentials.create().
The following code snippet shows how you can fetch and decode the information needed to create the passkey.
// Fetch an encoded `PubicKeyCredentialCreationOptions` from the server.
const _options = await fetch('/webauthn/registerRequest');

// Deserialize and decode the `PublicKeyCredentialCreationOptions`.
const decoded_options = JSON.parse(_options);
const options = PublicKeyCredential.parseCreationOptionsFromJSON(decoded_options);
...
Call WebAuthn API to create a passkey
Call navigator.credentials.create() to create a new passkey. The API returns
a promise, waiting for the user's interaction displaying a modal dialog.
// Invoke WebAuthn to create a passkey.
const credential = await navigator.credentials.create({
  publicKey: options
});
Send the returned public key credential to the backend
After the user is verified using the device's screen lock, a passkey is created and the promise is resolved returning a PublicKeyCredential object to the frontend.
The promise can be rejected for different reasons. You can handle these errors
by checking the Error object's name property:
InvalidStateError: A passkey already exists on the device. No error dialog will be shown to the user. The site shouldn't treat this as an error. The user wanted the local device registered and it is.NotAllowedError: The user has canceled the operation.AbortError: The operation has been aborted.- Other exceptions: Something unexpected happened. The browser shows an error dialog to the user.
The public key credential object contains the following properties:
id: A Base64URL encoded ID of the created passkey. This ID helps the browser to determine whether a matching passkey is in the device upon authentication. This value must be stored in the database on the backend.rawId: An ArrayBuffer version of the credential ID.response.clientDataJSON: An ArrayBuffer encoded client data.response.attestationObject: An ArrayBuffer encoded attestation object. This contains important information such as an RP ID, flags and a public key.authenticatorAttachment: Returns"platform"when this credential is created on a passkey capable device.type: This field is always set to"public-key".
Encode the object with the
.toJSON()
method, serialize it with JSON.stringify() then send it to the server.
...

// Encode and serialize the `PublicKeyCredential`.
const _result = credential.toJSON();
const result = JSON.stringify(_result);

// Encode and send the credential to the server for verification.
const response = await fetch('/webauthn/registerResponse', {
  method: 'post',
  credentials: 'same-origin',
  body: result
});
...
Save the credential
After receiving the public key credential on the backend, we recommend using a server-side library or a solution instead of writing your own code to process a public-key credential.
You can then store the information retrieved from the credential to the database for future use.
The following list includes recommended properties to save:
- Credential ID: The credential ID returned with the public key credential.
- Credential name: The name of the credential. Name it after the passkey provider it's created by which can be identified based on the AAGUID.
- User ID: The user ID used to create the passkey.
- Public key: The public key returned with the public key credential. This is required to verify a passkey assertion.
- Creation date and time: Record the date and time of the passkey creation. This is useful to identify the passkey.
- Last used date and time: Records the last date and time when the user used the passkey to sign in. This is useful to determine which passkey the user has used (or not used).
- AAGUID: A unique identifier of the passkey provider.
- Backup Eligibility flag: true if the device is eligible for passkey synchronization. This information helps users identify syncable passkeys and device-bound (not syncable) passkeys on the passkey management page.
Follow more detailed instructions at Server-side passkey registration
Signal if the registration fails
If a passkey registration fails, it may cause confusion to the user. If there's a passkey in the passkey provider and available for the user, but the associated public key isn't stored to the server side, sign-in attempts using the passkey will never succeed and it's hard to troubleshoot. Make sure to let the user know if that is the case.
To prevent such a condition, you can
signal an unknown passkey to the passkey provider using the Signal API.
By calling PublicKeyCredential.signalUnknownCredential() with an RP ID and a
credential ID, the RP can inform the passkey provider that the specified
credential has been removed or does not exist. It's up to the passkey provider
how to deal with this signal, but if supported, the associated passkey is
expected to be removed.
// Detect authentication failure due to lack of the credential
if (response.status === 404) {
  // Feature detection
  if (PublicKeyCredential.signalUnknownCredential) {
    await PublicKeyCredential.signalUnknownCredential({
      rpId: "example.com",
      credentialId: "vI0qOggiE3OT01ZRWBYz5l4MEgU0c7PmAA" // base64url encoded credential ID
    });
  } else {
    // Encourage the user to delete the passkey from the password manager nevertheless.
    ...
  }
}
To learn more about the Signal API, read Keep passkeys consistent with credentials on your server with the Signal API.
Send a notification to the user
Sending a notification (such as an email) when a passkey is registered helps users detect unauthorized account access. If an attacker creates a passkey without the user's knowledge, the passkey remains available for future abuse, even after the password is changed. The notification alerts the user and helps prevent this.
Checklist
- Verify the user (preferably using email or a secure method) before allowing them to create a passkey.
- Prevent creating duplicate passkeys for the same passkey provider using
excludeCredentials. - Save the AAGUID to identify the passkey provider and to name the credential for the user.
- Signal if an attempt to register a passkey fails with
PublicKeyCredential.signalUnknownCredential(). - Send a notification to the user after creating and registering a passkey for their account.
Resources
- Server-side passkey registration
- Apple document: Authenticating a User Through a Web Service
- Google document: Passwordless login with passkeys
Next step: Sign in with a passkey through form autofill.