
Introduction
Parallax sites have been all the rage recently, just take a look at these:
- Old Pulteney Row to the Pole
- Adidas Snowboarding
- BBC News - James Bond: Cars, catchphrases and kisses
If you’re not familiar with them, they’re the sites where the visual structure of the page changes as you scroll. Normally elements within the page scale, rotate or move proportionally to the scroll position on the page.
Whether or not you like parallaxing sites is one thing, but what you can say pretty confidently is that they’re a black hole of performance. The reason for this is that browsers tend to be optimized for the case where new content appears at the top or bottom of the screen when you scroll (depending on your scroll direction) and, in general terms, the browsers work best when very little changes visually during a scroll. For a parallax site that’s rarely the case since many times large visual elements all over the page change, causing the browser to do a repaint of the whole page.
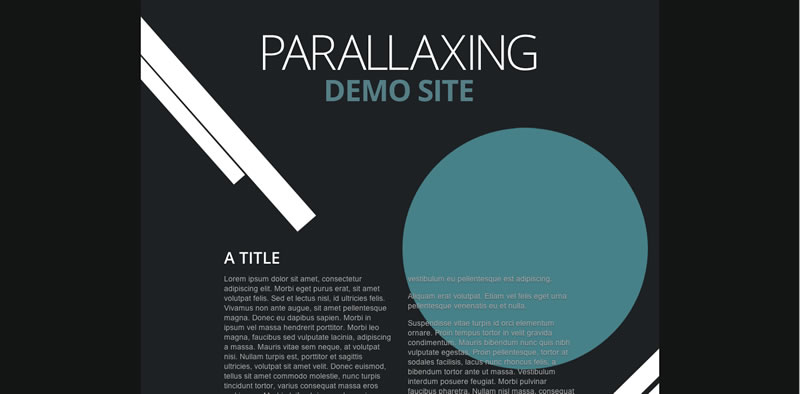
It is reasonable to generalize a parallaxing site like this:
- Background elements which, as you scroll up and down, change their position, rotation and scale.
- Page content, such as text or smaller images, which scrolls in the typical top-to-bottom fashion.
We previously covered scrolling performance and the ways in which you can look to improve your app’s responsiveness, and this article builds on that foundation so it may be worth reading that if you’ve not done so already.
So the question is if you’re building a parallax scrolling site are you locked into expensive repaints or are there alternative approaches you can take to maximise performance? Let’s take a look at our options.
Option 1: Use DOM elements and absolute positions
This appears to be the default approach that most people take. There are a bunch of elements within the page, and whenever a scroll event is fired a bunch of visual updates are done to transform them.
If you start the DevTools Timeline in frame mode and scroll around you’ll notice that there are expensive full-screen paint operations, and if you scroll a lot you may see several scroll events inside a single frame, each of which is going to trigger layout work.
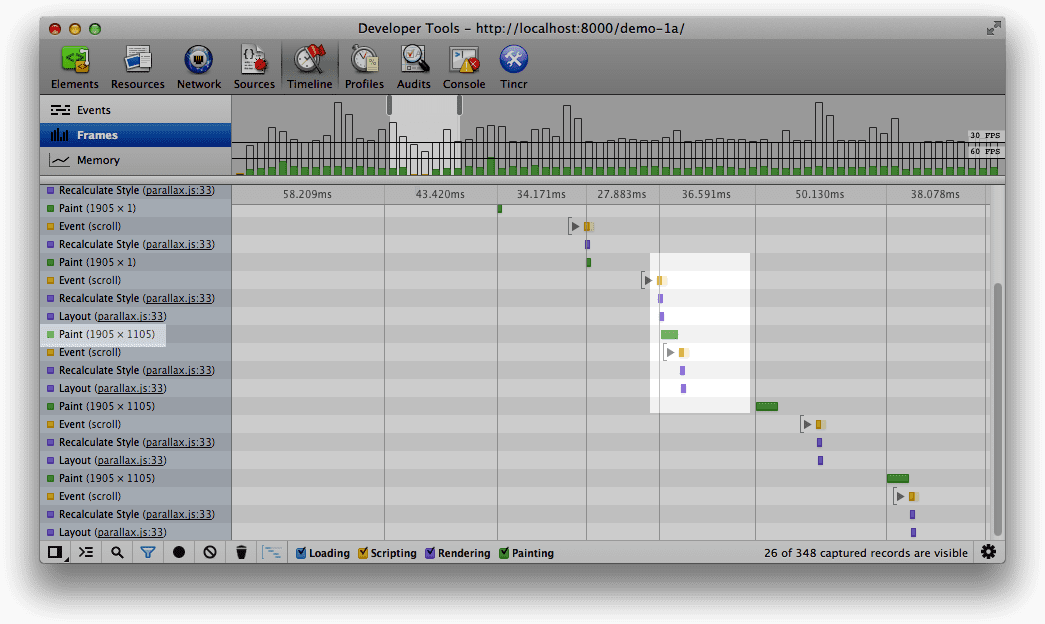
The important thing to bear in mind is that to hit 60fps (matching the typical monitor refresh rate of 60Hz) we have just over 16ms to get everything done. In this first version we’re performing our visual updates every time we get a scroll event, but as we’ve discussed in previous articles on leaner, meaner animations with requestAnimationFrame and scrolling performance, this doesn’t coincide with the browser’s update schedule, and so we either miss frames or do too much work inside each one. That could easily result in a janky and unnatural feel to your site, which leads to disappointed users and unhappy kittens.
Let’s move the update code out from the scroll event to a requestAnimationFrame callback and simply capture the scroll value in the scroll event’s callback.
If you repeat the scrolling test you’ll possibly notice a slight improvement, although not much. The reason is that the layout operation that we trigger by scrolling isn’t all that expensive, but in other use-cases it really could be. Now at least we are only performing one layout operation in each frame.
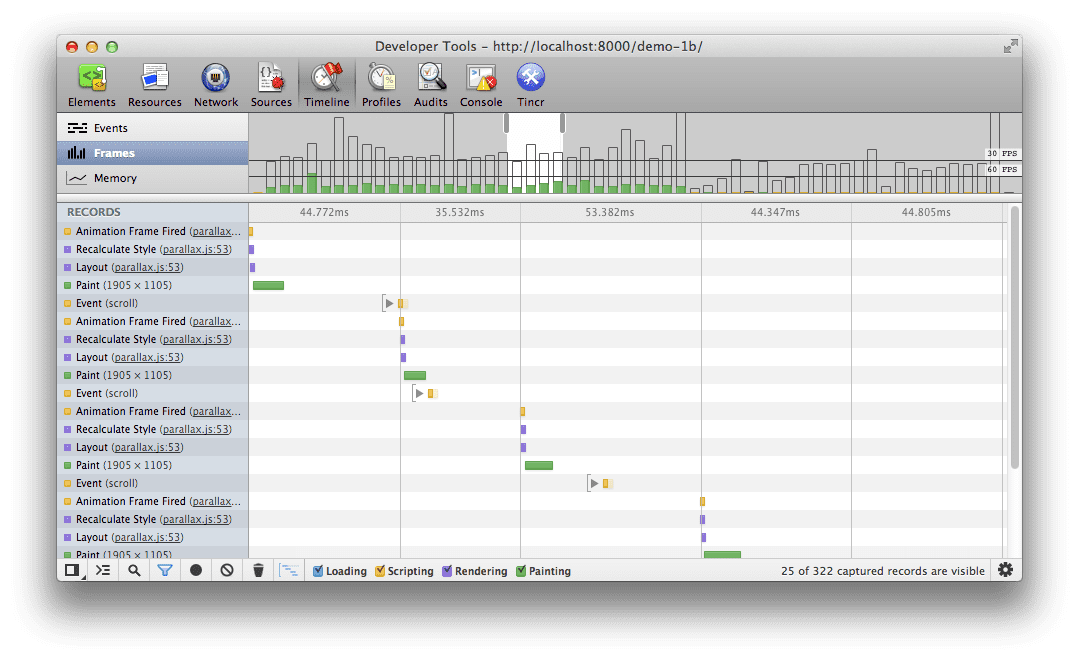
We can now handle one or one hundred scroll events per frame but crucially we only store the most recent value for use whenever the requestAnimationFrame callback runs and performs our visual updates. The point is you’ve moved from attempting to force visual updates every time you receive a scroll event to requesting that the browser give you an appropriate window in which to do them. Aren’t you sweet?
The main problem with this approach, requestAnimationFrame or not, is that we essentially have one layer for the whole page, and by moving these visual elements around we require large (and expensive) repaints. Typically speaking the painting is a blocking operation (although that is changing), meaning that the browser can’t do any other work and we often run way over our frame’s budget of 16ms and things remain janky.
Option 2: Use DOM elements and 3D transforms
Instead of using absolute positions another approach we can take it is to apply 3D transforms to the elements. In this situation we see that the elements with the 3D transforms applied are given a new layer per element and, in WebKit browsers, it often also causes a switch over to the hardware compositor. In Option 1, by contrast, we had one large layer for the page that needed to be repainted when anything changed and all the painting and compositing was handled by the CPU.
That means with this option, things are different: we potentially have one layer for any element to which we apply a 3D transform. If all we do from this point is more transformations on the elements we won’t need to repaint the layer, and the GPU can deal with moving the elements around and compositing the final page together.
Many times people just use the -webkit-transform: translateZ(0); hack and see magical performance improvements, and while this works today there are problems:
- It’s not cross-browser compatible.
- It forces the browser’s hand by creating a new layer for every transformed element. Lots of layers can bring other performance bottlenecks, so use sparingly!
- It’s been disabled for some WebKit ports (fourth bullet from the bottom!).
If you go down the 3D translation route be cautious, it’s a temporary solution to your problem! Ideally speaking we would see similar rendering characteristics from 2D transforms as we do with 3D. Browsers are progressing at a phenomenal rate, so hopefully before that's what we'll see.
Finally, you should aim to avoid paints wherever you can and simply move existing elements around the page. By way of example, it is a typical approach in parallax sites to use fixed height divs and change their background position to provide the effect. Unfortunately that means that the element needs to be repainted on every pass, which can cost you in terms of performance. Instead you should, if you can, create the element (wrap it inside an div with overflow: hidden if necessary) and simply translate it instead.
Option 3: Use a fixed position canvas or WebGL
The final option we’re going to consider is to use a fixed position canvas at the back of the page into which we will draw our transformed images. At first glance that might not seem like the most performant solution, but there are actually a few benefits to this approach:
- We no longer require as much compositor work due to only having one element, the canvas.
- We’re effectively dealing with a single hardware accelerated bitmap.
- The Canvas2D API is a great fit for the kind of transformations we’re looking to perform, meaning development and maintenance is more manageable.
Using a canvas element gives us a new layer, but it’s just one layer, whereas in Option 2 we were actually given a new layer for every element with a 3D transform applied, so we have an increased workload compositing all those layers together. This is also the most compatible solution today in light of the differing cross-browser implementations of transforms.
/**
 * Updates and draws in the underlying visual elements to the canvas.
 */
function updateElements () {

  var relativeY = lastScrollY / h;

  // Fill the canvas up
  context.fillStyle = "#1e2124";
  context.fillRect(0, 0, canvas.width, canvas.height);

  // Draw the background
  context.drawImage(bg, 0, pos(0, -3600, relativeY, 0));

  // Draw each of the blobs in turn
  context.drawImage(blob1, 484, pos(254, -4400, relativeY, 0));
  context.drawImage(blob2, 84, pos(954, -5400, relativeY, 0));
  context.drawImage(blob3, 584, pos(1054, -3900, relativeY, 0));
  context.drawImage(blob4, 44, pos(1400, -6900, relativeY, 0));
  context.drawImage(blob5, -40, pos(1730, -5900, relativeY, 0));
  context.drawImage(blob6, 325, pos(2860, -7900, relativeY, 0));
  context.drawImage(blob7, 725, pos(2550, -4900, relativeY, 0));
  context.drawImage(blob8, 570, pos(2300, -3700, relativeY, 0));
  context.drawImage(blob9, 640, pos(3700, -9000, relativeY, 0));

  // Allow another rAF call to be scheduled
  ticking = false;
}

/**
 * Calculates a relative disposition given the page's scroll
 * range normalized from 0 to 1
 * @param {number} base The starting value.
 * @param {number} range The amount of pixels it can move.
 * @param {number} relY The normalized scroll value.
 * @param {number} offset A base normalized value from which to start the scroll behavior.
 * @returns {number} The updated position value.
 */
function pos(base, range, relY, offset) {
  return base + limit(0, 1, relY - offset) * range;
}

/**
 * Clamps a number to a range.
 * @param {number} min The minimum value.
 * @param {number} max The maximum value.
 * @param {number} value The value to limit.
 * @returns {number} The clamped value.
 */
function limit(min, max, value) {
  return Math.max(min, Math.min(max, value));
}
This approach really works where you’re dealing with large images (or other elements that can be easily written into a canvas), and certainly dealing with large blocks of text would be more challenging, but depending on your site it may prove to be the most appropriate solution. If you do have to deal with text in the canvas you would have to use the fillText API method, but it’s at the cost of accessibility (you just rasterized the text into a bitmap!) and you will now have to deal with line wrapping and a whole heap of other issues. If you can avoid it, you really should, and you'd likely be better served using the transforms approach above.
Seeing as we’re taking this as far as possible, there’s no reason to presume that the parallax work should be done inside a canvas element. If the browser supports it we could use WebGL. The key here is that WebGL has the most direct route of all APIs to the graphics card and, as such, is your most likely candidate for achieving 60fps, especially if the site’s effects are complex.
Your immediate reaction might be that WebGL is overkill, or that it isn’t ubiquitous in terms of support, but if you use something like Three.js then you can always fall back to using a canvas element and your code is abstracted in a consistent and friendly manner. All we need to do is use Modernizr to check for the appropriate API support:
// check for WebGL support, otherwise switch to canvas
if (Modernizr.webgl) {
  renderer = new THREE.WebGLRenderer();
} else if (Modernizr.canvas) {
  renderer = new THREE.CanvasRenderer();
}
As a final thought on this approach, if you’re not a big fan of adding extra elements to the page you can always use a canvas as a background element in both Firefox and WebKit-based browsers. That’s not ubiquitous, obviously, so as usual you should treat it with caution.
The choice is yours
The main reason developers default to absolutely positioned elements rather than any of the other options may simply be the ubiquity of support. This is, to some degree, illusory, since the older browsers that are being targeted are likely to provide an extremely poor rendering experience. Even in today’s modern browsers using absolutely positioned elements doesn’t necessarily result in good performance!
Transforms, certainly the 3D kind, offer you the ability to work directly with DOM elements and achieve a solid frame rate. The key to success here is to avoid painting wherever you can and simply try and move elements around. Do bear in mind that the way that WebKit browsers create layers doesn't necessarily correlate to other browser engines, so be sure to test it before committing yourself to that solution.
If you're aiming just for the top tier of browsers, and are able to render the site using canvases, that might the best option for you. Certainly if you were to use Three.js you should be able to swap and change between renderers very easily depending on the support you require.
Conclusion
We’ve assessed a few approaches to dealing with parallax sites, from absolutely positioned elements to using a fixed position canvas. The implementation you take will, of course, depends on what you’re trying to achieve and the specific design you’re working with, but it’s always good to know you have options.
And as always, whichever approach you try: don’t guess it, test it.