Published: November 20, 2024
Ecommerce success hinges on a seamless checkout process. Forms are crucial for conversions. To optimize user experience, it's essential to understand how users interact with your forms. Autofill plays a significant role in this process.

A smooth autofill experience can lead to increased conversions, faster form submissions, reduced form abandonment, and improved user satisfaction.
But do you have visibility into autofill usage and friction on your site?
This guide explains how to collect and analyze data on how users use autofill in your forms.
Here's how you can use these autofill insights:
- Align your testing approach with real user workflows. If autofill usage insights signal that your users heavily rely on autofill, you know it's crucial to incorporate autofill testing into your workflows.
- Identify regressions. Compare autofill usage signals on individual fields between deployments that affect form UX. Large variations may mean that an autofill behavior has regressed.
- Ensure your autofill-friendly implementation works as expected. Detect trends where users seem to manually fill fields you'd prefer them to use autofill on.
Demo and code
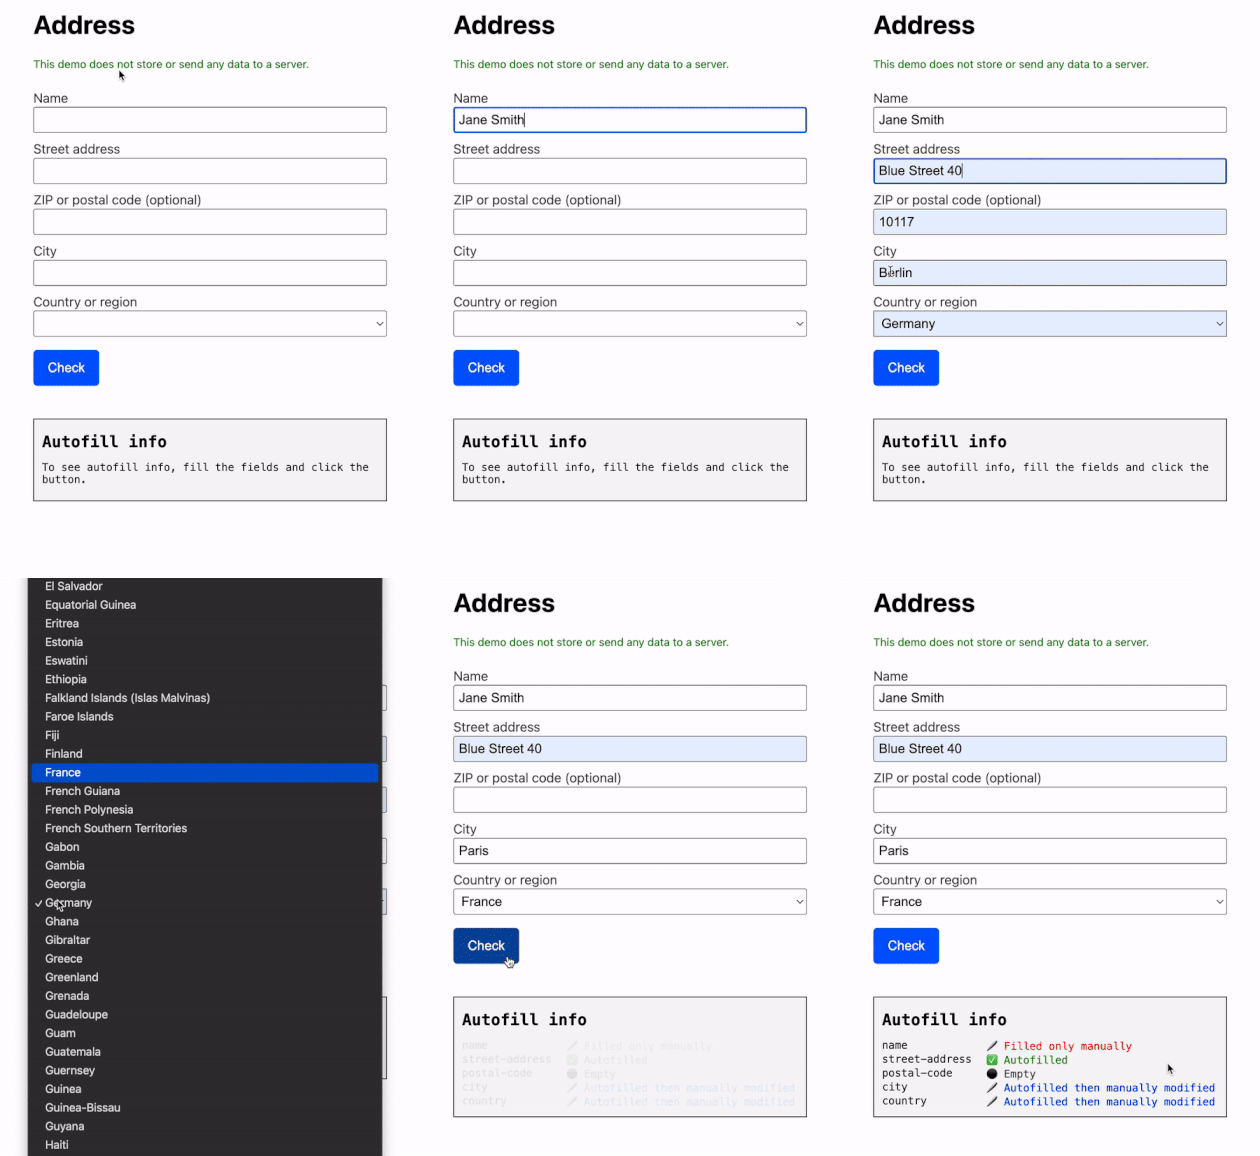
Play around with our demo and investigate the code on GitHub.

Things to try:
- Autofill all fields.
- Autofill a field, then empty it manually.
- Autofill a field, then modify it manually.
- Fill in a field completely manually.
- Leave a field blank.
Browser support
The demo works across the latest devices and browser versions. It relies on detecting the :autofill CSS pseudo-class, which is well-supported across browsers.
Step 1: Collect autofill data
Define autofill statuses
First, define possible autofill field statuses you're interested in:
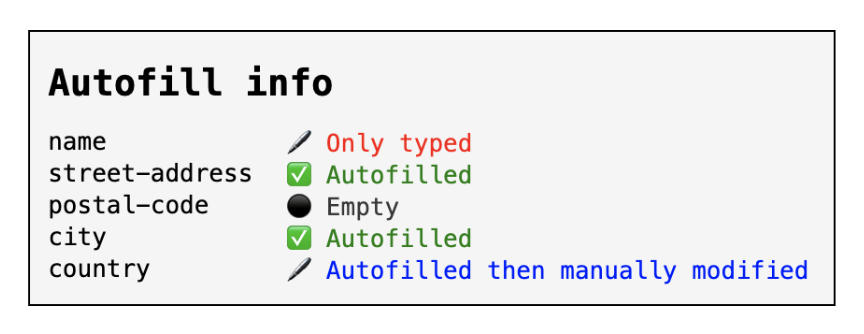
EMPTY: The user leaves the field empty.AUTOFILLED: The user fills the field using autofill only.AUTOFILLED_THEN_MODIFIED: The user first fills the field using autofill, and then manually edits the autofilled value. For example, the user autofills their address and contact details, but manually enters a different phone number.ONLY_MANUAL: The user fills the field completely manually.
// Possible values for autofill statuses
const EMPTY = 'empty';
const AUTOFILLED = 'autofilled';
const AUTOFILLED_THEN_MODIFIED = 'autofilled-then-modified';
const ONLY_MANUAL = 'only-manual';
Implement utility functions
Now it's time to implement the core functionality of this code: checking if a field has just been autofilled. Under the hood, this uses two functions:
getAllAutofilledFieldslooks at all<input>and<select>elements within a given form, and checks for the presence of the:autofillCSS pseudo-class. It outputs a list of elements that have been autofilled.checkIsAutofilledthen checks if a particular element is part of this list.
// Get all elements that are autofilled, using the :autofill pseudo-class
function getAllAutofilledFields(formElement) {
  return formElement.querySelectorAll(':autofill');
}

// Check if the passed element is in the list of autofilled fields
function checkIsAutofilled(allAutofilledFields, fieldElement) {
  return Array.from(allAutofilledFields).includes(fieldElement);
}

// Usage
const allAutofilledFields = getAllAutofilledFields(formElement);
const isAutofilled = checkIsAutofilled(allAutofilledFields, fieldElement);
Additionally, you need a utility function to check if a field is empty.
// Check if the value of the element is empty
function checkIsEmpty(fieldElement) {
  const value = fieldElement.value.trim();
  // value is a string, even for a type = number field
  const isEmpty = value === '';
  return isEmpty;
}
Initialize autofill status
Create a global object, autofillStatuses, to store the autofill status of
each field.
Collect all field ids from the form, and initialize each field's status to
EMPTY.
// Global variable storing autofill statuses for each field
const autofillStatuses = {};
// Example: {
//     "name": "autofilled",
//     "street-address": "autofilled-then-modified",
//     "country": "only-manual"
// }

// Initialize autofill status for all fields
function initializeAutofillStatuses(formElement) {
  const allFieldsAsArray = getAllFieldsAsArray(formElement);
  allFieldsAsArray.forEach((fieldElement) => {
    autofillStatuses[fieldElement.id] = EMPTY;
  });
}

initializeAutofillStatuses(document.getElementById('form'));
To collect all the field elements you're interested in,
initializeAutofillStatuses uses a utility function:
// Collect all field elements for a given form
function getAllFieldsAsArray(formElement) {
  return Array.from(formElement.querySelectorAll('input, select'));
}
Observe changes
Now everything is ready to observe autofill behavior.
Attach a change event listener to each form element. When a change occurs, it
checks if the element is currently being autofilled using the
checkIsAutofilled utility function. Then the element's autofill status is
updated in the autofillStatuses object, based on the current and previous
states.
For example, if the previous status was AUTOFILLED and the field now hasn't
been autofilled (that is, it doesn't have the :autofill class), it means the
field was updated manually after autofill. So the state is updated to
AUTOFILLED_THEN_MODIFIED.
// Add event listener to all fields to update autofill status
function initializeChangeObserver(formElement) {
  const allFieldsAsArray = getAllFieldsAsArray(formElement);
  allFieldsAsArray.forEach((fieldElement) => {
    fieldElement.addEventListener('change', () => {
      updateAutofillStatus(formElement, fieldElement);
    });
  });
}

// Update autofill status
function updateAutofillStatus(formElement, fieldElement) {
  const isEmpty = checkIsEmpty(fieldElement);
  const allAutofilledFields = getAllAutofilledFields(formElement);
  const isAutofilled = checkIsAutofilled(allAutofilledFields, fieldElement);
  const previousAutofillStatus = autofillStatuses[fieldElement.id];
  if (isEmpty) {
    autofillStatuses[fieldElement.id] = EMPTY;
    // NOTE: if (previousAutofillStatus === AUTOFILLED), the field has just been emptied manually. Autofill can't empty fields.
  } else {
    if (isAutofilled) {
      autofillStatuses[fieldElement.id] = AUTOFILLED;
    } else {
      if (
        previousAutofillStatus === ONLY_MANUAL ||
        previousAutofillStatus === EMPTY
      ) {
        // NOTE: ONLY_MANUAL is only used for fields where autofilled was *never* used. A field where autofilled was used will be AUTOFILLED_THEN_MODIFIED, even if the user has completely retyped the whole value
        autofillStatuses[fieldElement.id] = ONLY_MANUAL;
      } else if (
        previousAutofillStatus === AUTOFILLED ||
        previousAutofillStatus === AUTOFILLED_THEN_MODIFIED
      ) {
        autofillStatuses[fieldElement.id] = AUTOFILLED_THEN_MODIFIED;
      }
    }
  }
}

initializeChangeObserver(document.getElementById('form'));
Send the results to your server
Upon form submission, send your autofillStatuses object to the server. For
example, for an address form, you would receive the following data on the
server:
{
    "name": "only-manual",
    "street-address": "only-manual",
    "postal-code": "autofilled-then-modified",
    "city": "autofilled",
    "country": "autofilled"
}

Step 2: Analyze the results
Aggregate the autofillStatuses objects you receive across many users and
analyze trends in the data.
First, look at insights on overall autofill usage: which percentage of your users use browser autofill to fill at least one field?
Then, you can dive into individual fields. For example, you observe that a significant portion of users are not autofilling certain fields that should be autofill-compatible. You can now investigate potential reasons.
- Are the field
<label>s unclear? Are there any hints or placeholders that might be misleading? - Have you used the correct syntax for the
autocomplete
value? A common issue is
<input autocomplete="first-name">, which browsers don't fill because the proper value is"given-name".
Conclusion
By understanding and leveraging autofill behavior, you can enhance the user experience on your website. Implement the techniques outlined in this guide to gain valuable insights into how users interact with your forms and identify areas for improvement.
Remember, autofill is a powerful tool to streamline the user journey. Optimizing your forms for autofill can create a more user-friendly experience for your visitors.
Review all our autofill resources.

