

Katie Hempenius
系統已為您安裝 webp 指令列工具,因此您可以開始使用。這個工具可將 JPG、PNG 和 TIFF 圖片轉換為 WebP。
將圖片轉換為 WebP 檔
- 按一下「Remix to Edit」,即可編輯專案。
- 按一下「Terminal」 (注意:如果沒有顯示「Terminal」按鈕,您可能需要使用「Fullscreen」選項)。
- 輸入以下指令:
cwebp -q 50 images/flower1.jpg -o images/flower1.webp
這個指令會以 50 的品質 (0 為最差,100 為最佳) 轉換 images/flower1.jpg 檔案,並儲存為 images/flower1.webp。
完成這項操作後,控制台中應會顯示類似以下的內容:
Saving file 'images/flower1.webp'
File:      images/flower1.jpg
Dimension: 504 x 378
Output:    29538 bytes Y-U-V-All-PSNR 34.57 36.57 36.12   35.09 dB
           (1.24 bpp)
block count:  intra4:        750  (97.66%)
              intra16:        18  (2.34%)
              skipped:         0  (0.00%)
bytes used:  header:            116  (0.4%)
             mode-partition:   4014  (13.6%)
 Residuals bytes  |segment 1|segment 2|segment 3|segment 4|  total
    macroblocks:  |      22%|      26%|      36%|      17%|     768
      quantizer:  |      52 |      42 |      33 |      24 |
   filter level:  |      16 |       9 |       6 |      26 |
您已成功將圖片轉換為 WebP 檔案。
不過,如果每次只執行一張圖片的 cwebp 指令,轉換大量圖片可能會花費很長的時間。如果需要這樣做,可以改用指令碼。
- 在控制台中執行這個指令碼 (別忘了反引號):
`for file in images/*; do cwebp -q 50 "$file" -o "${file%.*}.webp"; done`
這個指令碼會以 50 的品質轉換 images/ 目錄中的所有檔案,並將檔案儲存為同一個目錄中的新檔案 (檔案名稱相同,但檔案副檔名為 .webp)。
✔︎ 簽到
images/ 目錄現在應有 6 個檔案:
flower1.jpg
flower1.webp
flower2.jpg
flower2.webp
flower3.png
flower3.webp
接下來,請更新這個 Glitch,為支援 WebP 的瀏覽器提供 WebP 圖片。
使用 <picture> 標記新增 WebP 圖片
<picture> 標記可讓您向新版瀏覽器提供 WebP,同時維持對舊版瀏覽器的支援。
- 在
index.html中,將<img src="images/flower1.jpg"/>替換為以下 HTML:
<picture>
  <source type="image/webp" srcset="images/flower1.webp">
  <source type="image/jpeg" srcset="images/flower1.jpg">
  <img src="images/flower1.jpg">
</picture>
- 接著,請將
flower2.jpg和flower3.png的<img>標記替換為<picture>標記。
✔︎ 簽到
完成後,index.html 中的 <picture> 標記應如下所示:
<picture>
  <source type="image/webp" srcset="images/flower1.webp">
  <source type="image/jpeg" srcset="images/flower1.jpg">
  <img src="images/flower1.jpg">
</picture>
<picture>
  <source type="image/webp" srcset="images/flower2.webp">
  <source type="image/jpeg" srcset="images/flower2.jpg">
  <img src="images/flower2.jpg">
</picture>
<picture>
  <source type="image/webp" srcset="images/flower3.webp">
  <source type="image/png" srcset="images/flower3.png">
  <img src="images/flower3.png">
</picture>
接下來,請使用 Lighthouse 驗證您是否已在網站上正確導入 WebP 圖片。
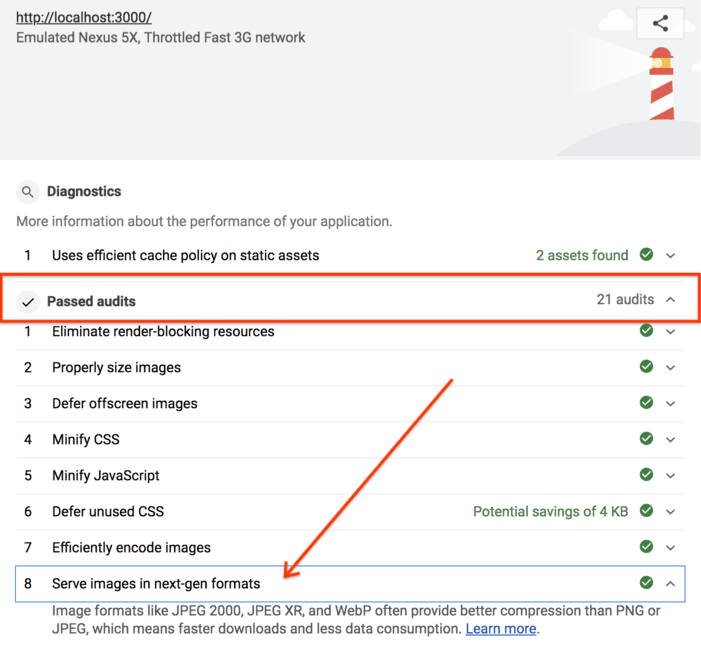
使用 Lighthouse 驗證 WebP 用量
Lighthouse 的「以新一代格式提供圖片」成效審查可讓您瞭解網站上的所有圖片是否使用 WebP 等新一代格式。
- 如要預覽網站,請按下「View App」。然後按下「Fullscreen」圖示
 。
。 - 按下 `Control + Shift + J` 鍵 (在 Mac 上為 `Command + Option + J` 鍵) 開啟開發人員工具。
- 按一下「Lighthouse」分頁標籤。
- 確認已在「Categories」清單中勾選「Performance」核取方塊。
- 按一下「產生報表」按鈕。
- 確認「以新一代格式提供圖片」稽核項目已通過。
大功告成!您現在可以在網站上放送 WebP 圖片。