

소개
미디어 소스 확장 프로그램 (MSE)
은 HTML5 <audio> 및
<video> 요소에 확장된 버퍼링 및 재생 제어를 제공합니다. 원래는
HTTP 동적 적응형 스트리밍 (DASH)
기반 동영상 플레이어를 지원하기 위해 개발되었지만, 아래에서는 오디오, 특히
끊김 없는 재생에 사용할 수 있는 방법을 살펴보겠습니다.
트랙 간에 노래가 끊김 없이 흐르는 음악 앨범을 들어본 적이 있을 것입니다. 지금 듣고 있을 수도 있습니다. 아티스트는 오디오가 하나의 연속 스트림으로 작성된 레코드판과 CD의 아티팩트뿐만 아니라 예술적 선택으로 이러한 끊김 없는 재생 환경을 만듭니다. 안타깝게도 MP3 및 AAC와 같은 최신 오디오 코덱의 작동 방식 때문에 오늘날에는 이러한 끊김 없는 청각적 경험이 종종 사라집니다.
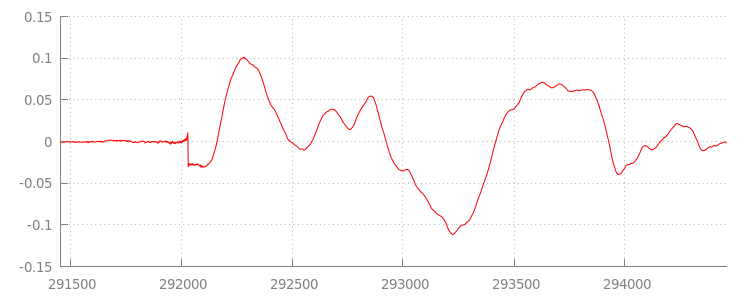
아래에서 그 이유를 자세히 살펴보겠지만, 지금은 데모부터 시작해 보겠습니다. 아래는 훌륭한 Sintel의 처음 30초를 5개의 개별 MP3 파일로 잘라내고 MSE를 사용하여 다시 조립한 것입니다. 빨간색 선은 각 MP3의 생성 (인코딩) 중에 도입된 간격을 나타냅니다. 이러한 지점에서 글리치가 들립니다.
이런! 좋은 경험은 아닙니다. 더 잘할 수 있습니다. 위 데모에서와 똑같은 MP3 파일을 사용하여 약간 더 작업하면 MSE를 사용하여 이러한 성가신 간격을 삭제할 수 있습니다. 다음 데모의 녹색 선은 파일이 결합되고 간격이 삭제된 위치를 나타냅니다. Chrome 38 이상에서는 끊김 없이 재생됩니다.
끊김 없는 콘텐츠를 만드는 방법에는 여러 가지가 있습니다. 이 데모에서는 일반 사용자가 가지고 있을 수 있는 파일 유형에 중점을 두겠습니다. 각 파일은 앞뒤 오디오 세그먼트를 고려하지 않고 별도로 인코딩되었습니다.
기본 설정
먼저 MediaSource 인스턴스의 기본 설정을 되돌아보고 살펴보겠습니다.
미디어 소스 확장 프로그램은 이름에서 알 수 있듯이 기존 미디어 요소의 확장 프로그램일 뿐입니다. 아래에서는 표준 URL을 설정하는 것과 마찬가지로 MediaSource 인스턴스를 나타내는
Object URL을 오디오
요소의 소스 속성에 할당합니다.
var audio = document.createElement('audio');
var mediaSource = new MediaSource();
var SEGMENTS = 5;

mediaSource.addEventListener('sourceopen', function () {
  var sourceBuffer = mediaSource.addSourceBuffer('audio/mpeg');

  function onAudioLoaded(data, index) {
    // Append the ArrayBuffer data into our new SourceBuffer.
    sourceBuffer.appendBuffer(data);
  }

  // Retrieve an audio segment via XHR.  For simplicity, we're retrieving the
  // entire segment at once, but we could also retrieve it in chunks and append
  // each chunk separately.  MSE will take care of assembling the pieces.
  GET('sintel/sintel_0.mp3', function (data) {
    onAudioLoaded(data, 0);
  });
});

audio.src = URL.createObjectURL(mediaSource);
MediaSource 객체가 연결되면 초기화를 실행하고
결국 sourceopen 이벤트를 발생시킵니다. 이때
SourceBuffer를 만들 수 있습니다. 위의 예에서는 MP3 세그먼트를 파싱하고
디코딩할 수 있는 audio/mpeg를 만듭니다. 다른 여러
유형도 사용할 수 있습니다.
비정상적인 파형
잠시 후에 코드로 돌아가겠지만, 이제 방금 추가한 파일, 특히 파일의 끝부분을 자세히 살펴보겠습니다. 아래는 sintel_0.mp3 트랙의 두 채널에서 평균을 낸 마지막 3, 000개 샘플의 그래프입니다. 빨간색 선의 각 픽셀은
부동 소수점 샘플
[-1.0, 1.0] 범위에 있습니다.

이러한 모든 0 (무음) 샘플은 무엇일까요? 실제로 인코딩 중에 도입된 압축 아티팩트 때문입니다. 거의 모든 인코더는 일종의 패딩을 도입합니다. 이 경우 LAME은 파일 끝에 정확히 576개의 패딩 샘플을 추가했습니다.
끝의 패딩 외에도 각 파일의 시작 부분에 패딩이 추가되었습니다. sintel_1.mp3 트랙을 미리 살펴보면 앞에 576개의 패딩 샘플이 더 있음을 알 수 있습니다. 패딩의 양은 인코더와 콘텐츠에 따라 다르지만 각 파일에 포함된
metadata를 기반으로 정확한 값을 알 수 있습니다.
각 파일의 시작과 끝에 있는 무음 섹션은 이전 데모에서 세그먼트 간에 글리치 를 일으키는 원인입니다. 끊김 없는 재생을 구현하려면 이러한 무음 섹션을 삭제해야 합니다. 다행히도 MediaSource를 사용하면 쉽게 할 수 있습니다. 아래에서는 추가 창과 타임스탬프 오프셋을 사용하여 이 무음을 삭제하도록 onAudioLoaded() 메서드를 수정합니다.
예시 코드
function onAudioLoaded(data, index) {
  // Parsing gapless metadata is unfortunately non trivial and a bit messy, so
  // we'll glaze over it here; see the appendix for details.
  // ParseGaplessData() will return a dictionary with two elements:
  //
  //    audioDuration: Duration in seconds of all non-padding audio.
  //    frontPaddingDuration: Duration in seconds of the front padding.
  //
  var gaplessMetadata = ParseGaplessData(data);

  // Each appended segment must be appended relative to the next.  To avoid any
  // overlaps, we'll use the end timestamp of the last append as the starting
  // point for our next append or zero if we haven't appended anything yet.
  var appendTime = index > 0 ? sourceBuffer.buffered.end(0) : 0;

  // Simply put, an append window allows you to trim off audio (or video) frames
  // which fall outside of a specified time range.  Here, we'll use the end of
  // our last append as the start of our append window and the end of the real
  // audio data for this segment as the end of our append window.
  sourceBuffer.appendWindowStart = appendTime;
  sourceBuffer.appendWindowEnd = appendTime + gaplessMetadata.audioDuration;

  // The timestampOffset field essentially tells MediaSource where in the media
  // timeline the data given to appendBuffer() should be placed.  I.e., if the
  // timestampOffset is 1 second, the appended data will start 1 second into
  // playback.
  //
  // MediaSource requires that the media timeline starts from time zero, so we
  // need to ensure that the data left after filtering by the append window
  // starts at time zero.  We'll do this by shifting all of the padding we want
  // to discard before our append time (and thus, before our append window).
  sourceBuffer.timestampOffset =
    appendTime - gaplessMetadata.frontPaddingDuration;

  // When appendBuffer() completes, it will fire an updateend event signaling
  // that it's okay to append another segment of media.  Here, we'll chain the
  // append for the next segment to the completion of our current append.
  if (index == 0) {
    sourceBuffer.addEventListener('updateend', function () {
      if (++index < SEGMENTS) {
        GET('sintel/sintel_' + index + '.mp3', function (data) {
          onAudioLoaded(data, index);
        });
      } else {
        // We've loaded all available segments, so tell MediaSource there are no
        // more buffers which will be appended.
        mediaSource.endOfStream();
        URL.revokeObjectURL(audio.src);
      }
    });
  }

  // appendBuffer() will now use the timestamp offset and append window settings
  // to filter and timestamp the data we're appending.
  //
  // Note: While this demo uses very little memory, more complex use cases need
  // to be careful about memory usage or garbage collection may remove ranges of
  // media in unexpected places.
  sourceBuffer.appendBuffer(data);
}
끊김 없는 파형
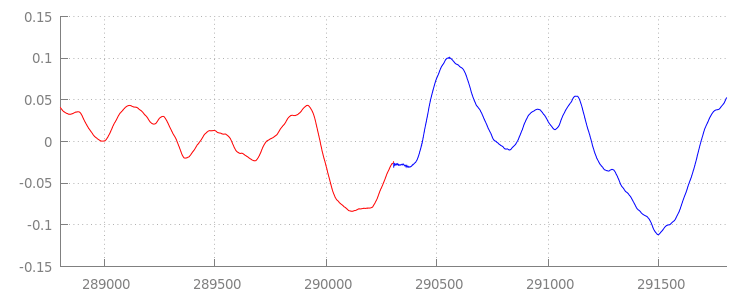
추가 창을 적용한 후 파형을 다시 살펴보면서 새로운 코드가 무엇을 달성했는지 살펴보겠습니다. 아래에서 sintel_0.mp3의 끝에 있는 무음 섹션(빨간색)과 sintel_1.mp3의 시작 부분에 있는 무음 섹션(파란색)이 삭제되어 세그먼트 간에 끊김 없는 전환이 이루어진 것을 확인할 수 있습니다.
결론
이로써 5개의 세그먼트를 모두 하나로 끊김 없이 연결하고 데모를 마쳤습니다. 계속하기 전에 onAudioLoaded() 메서드에는 컨테이너나 코덱이 고려되지 않는다는 점을 알 수 있습니다.
즉, 이러한 모든 기술은 컨테이너 또는 코덱 유형과 관계없이 작동합니다. 아래에서 MP3 대신 원본 데모 DASH 지원 분할 MP4를 재생할 수 있습니다.
자세한 내용은 아래 부록에서 끊김 없는 콘텐츠 제작 및 메타데이터 파싱을 자세히 살펴보세요. 이 데모를 지원하는 코드를 자세히 살펴보려면
gapless.js 코드를 자세히 살펴볼 수도 있습니다.
읽어주셔서 감사합니다.
부록 A: 끊김 없는 콘텐츠 만들기
끊김 없는 콘텐츠를 올바르게 만드는 것은 어려울 수 있습니다. 아래에서는 이 데모에 사용된 Sintel 미디어의 제작 과정을 안내합니다. 시작하려면 Sintel의 무손실 FLAC 사운드트랙 사본이 필요합니다. 후대를 위해 SHA1이 아래에 포함되어 있습니다. 도구의 경우 FFmpeg, MP4Box, LAME, afconvert가 설치된 OSX가 필요합니다.
    unzip Jan_Morgenstern-Sintel-FLAC.zip
    sha1sum 1-Snow_Fight.flac
    # 0535ca207ccba70d538f7324916a3f1a3d550194  1-Snow_Fight.flac
먼저 1-Snow_Fight.flac 트랙의 처음 31.5초를 분할합니다. 재생이 완료된 후 클릭을 방지하기 위해 28초부터 2.5초 페이드 아웃을 추가하려고 합니다. 아래의 FFmpeg 명령줄을 사용하면 이 모든 작업을 수행하고 결과를 sintel.flac에 넣을 수 있습니다.
ffmpeg -i 1-Snow_Fight.flac -t 31.5 -af "afade=t=out:st=28:d=2.5" sintel.flac
다음으로 파일을 각각 6.5초의 5개 웨이브
파일로 분할합니다. 거의 모든 인코더가 웨이브의 수집을 지원하므로 웨이브를 사용하는 것이 가장 쉽습니다. 다시 말하지만 FFmpeg를 사용하여 정확하게 이 작업을 수행할 수 있습니다. 그러면 sintel_0.wav, sintel_1.wav, sintel_2.wav, sintel_3.wav, sintel_4.wav가 생성됩니다.
    ffmpeg -i sintel.flac -acodec pcm_f32le -map 0 -f segment \
           -segment_list out.list -segment_time 6.5 sintel_%d.wav
다음으로 MP3 파일을 만들어 보겠습니다. LAME에는 끊김 없는 콘텐츠를 만드는 여러 옵션이 있습니다. 콘텐츠를 제어하는 경우 세그먼트 간의 패딩을 완전히 방지하기 위해 모든 파일의 일괄 인코딩에 --nogap을 사용하는 것이 좋습니다.
하지만 이 데모에서는 패딩이 필요하므로 웨이브 파일의 표준 고품질 VBR 인코딩을 사용합니다.
    lame -V=2 sintel_0.wav sintel_0.mp3
    lame -V=2 sintel_1.wav sintel_1.mp3
    lame -V=2 sintel_2.wav sintel_2.mp3
    lame -V=2 sintel_3.wav sintel_3.mp3
    lame -V=2 sintel_4.wav sintel_4.mp3
MP3 파일을 만드는 데 필요한 것은 이게 전부입니다. 이제 분할된 MP4 파일의 생성을 살펴보겠습니다. iTunes에 마스터된 미디어를 만드는 Apple의 안내를 따릅니다. 아래에서는 권장 매개변수를 사용하여 MP4 컨테이너에서 AAC로 인코딩하기 전에 안내에 따라 웨이브 파일을 중간 CAF 파일로 변환합니다.
    afconvert sintel_0.wav sintel_0_intermediate.caf -d 0 -f caff \
              --soundcheck-generate
    afconvert sintel_1.wav sintel_1_intermediate.caf -d 0 -f caff \
              --soundcheck-generate
    afconvert sintel_2.wav sintel_2_intermediate.caf -d 0 -f caff \
              --soundcheck-generate
    afconvert sintel_3.wav sintel_3_intermediate.caf -d 0 -f caff \
              --soundcheck-generate
    afconvert sintel_4.wav sintel_4_intermediate.caf -d 0 -f caff \
              --soundcheck-generate
    afconvert sintel_0_intermediate.caf -d aac -f m4af -u pgcm 2 --soundcheck-read \
              -b 256000 -q 127 -s 2 sintel_0.m4a
    afconvert sintel_1_intermediate.caf -d aac -f m4af -u pgcm 2 --soundcheck-read \
              -b 256000 -q 127 -s 2 sintel_1.m4a
    afconvert sintel_2_intermediate.caf -d aac -f m4af -u pgcm 2 --soundcheck-read \
              -b 256000 -q 127 -s 2 sintel_2.m4a
    afconvert sintel_3_intermediate.caf -d aac -f m4af -u pgcm 2 --soundcheck-read \
              -b 256000 -q 127 -s 2 sintel_3.m4a
    afconvert sintel_4_intermediate.caf -d aac -f m4af -u pgcm 2 --soundcheck-read \
              -b 256000 -q 127 -s 2 sintel_4.m4a
이제
분할
하기 전에
MediaSource와 함께 사용할 수 있는 여러 M4A 파일이 있습니다. 이 데모에서는 1초의 프래그먼트 크기를 사용합니다. MP4Box는 각 분할된 MP4를 sintel_#_dashinit.mp4로 작성하고 삭제할 수 있는 MPEG-DASH 매니페스트 (sintel_#_dash.mpd)를 함께 작성합니다.
    MP4Box -dash 1000 sintel_0.m4a && mv sintel_0_dashinit.mp4 sintel_0.mp4
    MP4Box -dash 1000 sintel_1.m4a && mv sintel_1_dashinit.mp4 sintel_1.mp4
    MP4Box -dash 1000 sintel_2.m4a && mv sintel_2_dashinit.mp4 sintel_2.mp4
    MP4Box -dash 1000 sintel_3.m4a && mv sintel_3_dashinit.mp4 sintel_3.mp4
    MP4Box -dash 1000 sintel_4.m4a && mv sintel_4_dashinit.mp4 sintel_4.mp4
    rm sintel_{0,1,2,3,4}_dash.mpd
작업이 끝났습니다. 이제 끊김 없는 재생에 필요한 올바른 메타데이터가 포함된 분할된 MP4 및 MP3 파일이 있습니다. 메타데이터의 모양에 관한 자세한 내용은 부록 B를 참고하세요.
부록 B: 끊김 없는 메타데이터 파싱
끊김 없는 콘텐츠를 만드는 것과 마찬가지로 끊김 없는 메타데이터를 파싱하는 것은 저장 표준 방법이 없으므로 까다로울 수 있습니다. 아래에서는 가장 일반적인 두 인코더인 LAME과 iTunes가 끊김 없는 메타데이터를 저장하는 방법을 설명합니다. 먼저 몇 가지 도우미 메서드와 위에 사용된 ParseGaplessData()의 개요를 설정해 보겠습니다.
    // Since most MP3 encoders store the gapless metadata in binary, we'll need a
    // method for turning bytes into integers.  Note: This doesn't work for values
    // larger than 2^30 since we'll overflow the signed integer type when shifting.
    function ReadInt(buffer) {
      var result = buffer.charCodeAt(0);
      for (var i = 1; i < buffer.length; ++i) {
        result <<= 8;
        result += buffer.charCodeAt(i);
      }
      return result;
    }

    function ParseGaplessData(arrayBuffer) {
      // Gapless data is generally within the first 512 bytes, so limit parsing.
      var byteStr = new TextDecoder().decode(arrayBuffer.slice(0, 512));

      var frontPadding = 0, endPadding = 0, realSamples = 0;

      // ... we'll fill this in as we go below.
파싱하고 설명하기 가장 쉬운 Apple의 iTunes 메타데이터 형식부터 살펴보겠습니다. MP3 및 M4A 파일 내에서 iTunes (및 afconvert)는 다음과 같이 ASCII로 짧은 섹션을 작성합니다.
iTunSMPB[ 26 bytes ]0000000 00000840 000001C0 0000000000046E00
이는 MP3 컨테이너 내의 ID3 태그와 MP4 컨테이너 내의 메타데이터 원자 내에 작성됩니다. 이 데모에서는 첫 번째 0000000 토큰을 무시할 수 있습니다. 다음 세 토큰은 전면 패딩, 끝 패딩, 총 비패딩 샘플 수입니다. 각각을 오디오의 샘플링 레이트로 나누면 각 오디오의 재생 시간이 나옵니다.
// iTunes encodes the gapless data as hex strings like so:
//
//    'iTunSMPB[ 26 bytes ]0000000 00000840 000001C0 0000000000046E00'
//    'iTunSMPB[ 26 bytes ]####### frontpad  endpad    real samples'
//
// The approach here elides the complexity of actually parsing MP4 atoms. It
// may not work for all files without some tweaks.
var iTunesDataIndex = byteStr.indexOf('iTunSMPB');
if (iTunesDataIndex != -1) {
  var frontPaddingIndex = iTunesDataIndex + 34;
  frontPadding = parseInt(byteStr.substr(frontPaddingIndex, 8), 16);

  var endPaddingIndex = frontPaddingIndex + 9;
  endPadding = parseInt(byteStr.substr(endPaddingIndex, 8), 16);

  var sampleCountIndex = endPaddingIndex + 9;
  realSamples = parseInt(byteStr.substr(sampleCountIndex, 16), 16);
}
반대로 대부분의 오픈소스 MP3 인코더는 무음 MPEG 프레임 내에 배치된 특수 Xing 헤더 내에 끊김 없는 메타데이터를 저장합니다 (무음이므로 Xing 헤더를 이해하지 못하는 디코더는 무음을 재생합니다). 안타깝게도 이 태그는 항상 존재하는 것은 아니며 여러 선택적 필드가 있습니다. 이 데모에서는 미디어를 제어할 수 있지만 실제로 끊김 없는 메타데이터를 사용할 수 있는 시점을 파악하려면 몇 가지 추가적인 감도 검사가 필요합니다.
먼저 총 샘플 수를 파싱합니다. 간단히 하기 위해
Xing 헤더에서 이를 읽지만 일반
MPEG 오디오 헤더에서 구성할 수도 있습니다.
Xing 헤더는 Xing 또는 Info 태그로 표시할 수 있습니다. 이 태그 후 정확히 4바이트에는 파일의 총 프레임 수를 나타내는 32비트가 있습니다. 이 값에 프레임당 샘플 수를 곱하면 파일의 총 샘플 수가 나옵니다.
    // Xing padding is encoded as 24bits within the header.  Note: This code will
    // only work for Layer3 Version 1 and Layer2 MP3 files with XING frame counts
    // and gapless information.  See the following document for more details:
    // http://www.codeproject.com/Articles/8295/MPEG-Audio-Frame-Header
    var xingDataIndex = byteStr.indexOf('Xing');
    if (xingDataIndex == -1) xingDataIndex = byteStr.indexOf('Info');
    if (xingDataIndex != -1) {
      // See section 2.3.1 in the link above for the specifics on parsing the Xing
      // frame count.
      var frameCountIndex = xingDataIndex + 8;
      var frameCount = ReadInt(byteStr.substr(frameCountIndex, 4));

      // For Layer3 Version 1 and Layer2 there are 1152 samples per frame.  See
      // section 2.1.5 in the link above for more details.
      var paddedSamples = frameCount * 1152;

      // ... we'll cover this below.
이제 총 샘플 수가 있으므로 패딩 샘플 수를 읽는 것으로 넘어갈 수 있습니다. 인코더에 따라 Xing 헤더에 중첩된 LAME 또는 Lavf 태그 아래에 작성될 수 있습니다. 이 헤더 후 정확히 17바이트에는 각각 12비트로 전면 및 끝 패딩을 나타내는 3바이트가 있습니다.
        xingDataIndex = byteStr.indexOf('LAME');
        if (xingDataIndex == -1) xingDataIndex = byteStr.indexOf('Lavf');
        if (xingDataIndex != -1) {
          // See http://gabriel.mp3-tech.org/mp3infotag.html#delays for details of
          // how this information is encoded and parsed.
          var gaplessDataIndex = xingDataIndex + 21;
          var gaplessBits = ReadInt(byteStr.substr(gaplessDataIndex, 3));

          // Upper 12 bits are the front padding, lower are the end padding.
          frontPadding = gaplessBits >> 12;
          endPadding = gaplessBits & 0xFFF;
        }

        realSamples = paddedSamples - (frontPadding + endPadding);
      }

      return {
        audioDuration: realSamples * SECONDS_PER_SAMPLE,
        frontPaddingDuration: frontPadding * SECONDS_PER_SAMPLE
      };
    }
이로써 대부분의 끊김 없는 콘텐츠를 파싱하는 완전한 함수가 있습니다. 하지만 엣지 케이스가 많이 있으므로 프로덕션에서 유사한 코드를 사용하기 전에 주의하는 것이 좋습니다.
부록 C: 가비지 컬렉션
SourceBuffer 인스턴스에 속하는 메모리는 콘텐츠 유형, 플랫폼별 제한, 현재 재생 위치에 따라 적극적으로
가비지 수집됩니다. Chrome에서는 이미 재생된 버퍼에서 먼저 메모리가 회수됩니다.
하지만 메모리 사용량이 플랫폼별 제한을 초과하면 재생되지 않은 버퍼에서 메모리가 삭제됩니다.
재생이 회수된 메모리로 인해 타임라인에 간격에 도달하면 간격이 충분히 작으면 글리치가 발생하거나 간격이 너무 크면 완전히 멈출 수 있습니다. 둘 다 좋은 사용자 환경은 아니므로 한 번에 너무 많은 데이터를 추가하지 않고 더 이상 필요하지 않은 미디어 타임라인에서 범위를 수동으로 삭제하는 것이 중요합니다.
범위는 각 SourceBuffer의
remove()
메서드를 통해 삭제할 수 있습니다. 이 메서드는 초 단위의 [start, end] 범위를 가져옵니다.
appendBuffer()와 마찬가지로 각 remove()는 완료되면 updateend 이벤트를 발생시킵니다. 이벤트가 발생할 때까지 다른 삭제 또는 추가를 실행해서는 안 됩니다.
데스크톱 Chrome에서는 오디오 콘텐츠 약 12MB와 동영상 콘텐츠 150MB를 한 번에 메모리에 보관할 수 있습니다. 브라우저나 플랫폼 간에 이러한 값에 의존해서는 안 됩니다. 예를 들어 모바일 기기를 대표하는 것은 아닙니다.
가비지 컬렉션은 SourceBuffers에 추가된 데이터에만 영향을 미칩니다. JavaScript 변수에 버퍼링할 수 있는 데이터의 양에는 제한이 없습니다. 필요한 경우 동일한 위치에 동일한 데이터를 다시 추가할 수도 있습니다.