
文件系统标准引入了源私有文件系统 (OPFS),作为页面源私有的存储端点,用户无法看到该端点,但可以选择性地访问一种经过高度优化的特殊文件,以实现高性能。

浏览器支持
源私有文件系统受现代浏览器支持,并已由 Web 超文本应用技术工作组 (WHATWG) 在文件系统实时标准中标准化。
' d='M96 183a64 64 0 0 1-23-23L17 64a128 128 0 0 0 111 192l55-96a64 64 0 0 1-87 23Z'/%3E%3Cpath fill='url(%23b)' d='M192 128a64 64 0 0 1-9 32l-55 96A128 128 0 0 0 239 64H128a64 64 0 0 1 64 64Z'/%3E%3Ccircle cx='128' cy='128' r='52' fill='%231a73e8'/%3E%3Cpath fill='url(%23c)' d='M96 73a64 64 0 0 1 32-9h111a128 128 0 0 0-222 0l56 96a64 64 0 0 1 23-87Z'/%3E%3C/svg%3E)
' xlink:href='%23A'%3E%3Cstop offset='.76' stop-opacity='0'/%3E%3Cstop offset='.95' stop-opacity='.5'/%3E%3Cstop offset='1'/%3E%3C/radialGradient%3E%3CradialGradient id='F' cx='2523' cy='4680' r='20243' gradientTransform='matrix(-.03715 .99931 -2.12836 -.07913 13579 3530)' xlink:href='%23A'%3E%3Cstop offset='0' stop-color='%2335c1f1'/%3E%3Cstop offset='.11' stop-color='%2334c1ed'/%3E%3Cstop offset='.23' stop-color='%232fc2df'/%3E%3Cstop offset='.31' stop-color='%232bc3d2'/%3E%3Cstop offset='.67' stop-color='%2336c752'/%3E%3C/radialGradient%3E%3CradialGradient id='G' cx='24247' cy='7758' r='9734' gradientTransform='matrix(.28109 .95968 -.78353 .22949 24510 -16292)' xlink:href='%23A'%3E%3Cstop offset='0' stop-color='%2366eb6e'/%3E%3Cstop offset='1' stop-color='%2366eb6e' stop-opacity='0'/%3E%3C/radialGradient%3E%3Cpath id='H' d='M24105 20053a9345 9345 0 01-1053 472 10202 10202 0 01-3590 646c-4732 0-8855-3255-8855-7432 0-1175 680-2193 1643-2729-4280 180-5380 4640-5380 7253 0 7387 6810 8137 8276 8137 791 0 1984-230 2704-456l130-44a12834 12834 0 006660-5282c220-350-168-757-535-565z'/%3E%3Cpath id='I' d='M11571 25141a7913 7913 0 01-2273-2137 8145 8145 0 01-1514-4740 8093 8093 0 013093-6395 8082 8082 0 011373-859c312-148 846-414 1554-404a3236 3236 0 012569 1297 3184 3184 0 01636 1866c0-21 2446-7960-8005-7960-4390 0-8004 4166-8004 7820 0 2319 538 4170 1212 5604a12833 12833 0 007684 6757 12795 12795 0 003908 610c1414 0 2774-233 4045-656a7575 7575 0 01-6278-803z'/%3E%3Cpath id='J' d='M16231 15886c-80 105-330 250-330 566 0 260 170 512 472 723 1438 1003 4149 868 4156 868a5954 5954 0 003027-839 6147 6147 0 001133-850 6180 6180 0 001910-4437c26-2242-796-3732-1133-4392-2120-4141-6694-6525-11668-6525-7011 0-12703 5635-12798 12620 47-3654 3679-6605 7996-6605 350 0 2346 34 4200 1007 1634 858 2490 1894 3086 2921 618 1067 728 2415 728 2952s-271 1333-780 1990z'/%3E%3Cuse fill='url(%23B)' xlink:href='%23H'/%3E%3Cuse fill='url(%23D)' opacity='.35' xlink:href='%23H'/%3E%3Cuse fill='url(%23C)' xlink:href='%23I'/%3E%3Cuse fill='url(%23E)' opacity='.4' xlink:href='%23I'/%3E%3Cuse fill='url(%23F)' xlink:href='%23J'/%3E%3Cuse fill='url(%23G)' xlink:href='%23J'/%3E%3C/svg%3E)
' gradientUnits='userSpaceOnUse'%3E%3Cstop offset='.2' stop-color='%239059ff' stop-opacity='0'/%3E%3Cstop offset='.3' stop-color='%238c4ff3' stop-opacity='.1'/%3E%3Cstop offset='.8' stop-color='%237716a8' stop-opacity='.5'/%3E%3Cstop offset='1' stop-color='%236e008b' stop-opacity='.6'/%3E%3C/radialGradient%3E%3CradialGradient id='ff-g' cx='239.1' cy='34.6' r='171.6' gradientUnits='userSpaceOnUse'%3E%3Cstop offset='0' stop-color='%23ffe226'/%3E%3Cstop offset='.1' stop-color='%23ffdb27'/%3E%3Cstop offset='.3' stop-color='%23ffc82a'/%3E%3Cstop offset='.5' stop-color='%23ffa930'/%3E%3Cstop offset='.7' stop-color='%23ff7e37'/%3E%3Cstop offset='.8' stop-color='%23ff7139'/%3E%3C/radialGradient%3E%3CradialGradient id='ff-h' cx='374' cy='-74.3' r='732.2' gradientUnits='userSpaceOnUse'%3E%3Cstop offset='.1' stop-color='%23fff44f'/%3E%3Cstop offset='.5' stop-color='%23ff980e'/%3E%3Cstop offset='.6' stop-color='%23ff5634'/%3E%3Cstop offset='.7' stop-color='%23ff3647'/%3E%3Cstop offset='.9' stop-color='%23e31587'/%3E%3C/radialGradient%3E%3CradialGradient id='ff-i' cx='304.6' cy='7.1' r='536.4' gradientTransform='rotate(84 303 4)' gradientUnits='userSpaceOnUse'%3E%3Cstop offset='0' stop-color='%23fff44f'/%3E%3Cstop offset='.1' stop-color='%23ffe847'/%3E%3Cstop offset='.2' stop-color='%23ffc830'/%3E%3Cstop offset='.3' stop-color='%23ff980e'/%3E%3Cstop offset='.4' stop-color='%23ff8b16'/%3E%3Cstop offset='.5' stop-color='%23ff672a'/%3E%3Cstop offset='.6' stop-color='%23ff3647'/%3E%3Cstop offset='.7' stop-color='%23e31587'/%3E%3C/radialGradient%3E%3CradialGradient id='ff-j' cx='235' cy='98.1' r='457.1' gradientUnits='userSpaceOnUse'%3E%3Cstop offset='.1' stop-color='%23fff44f'/%3E%3Cstop offset='.5' stop-color='%23ff980e'/%3E%3Cstop offset='.6' stop-color='%23ff5634'/%3E%3Cstop offset='.7' stop-color='%23ff3647'/%3E%3Cstop offset='.9' stop-color='%23e31587'/%3E%3C/radialGradient%3E%3CradialGradient id='ff-k' cx='355.7' cy='124.9' r='500.3' gradientUnits='userSpaceOnUse'%3E%3Cstop offset='.1' stop-color='%23fff44f'/%3E%3Cstop offset='.2' stop-color='%23ffe141'/%3E%3Cstop offset='.5' stop-color='%23ffaf1e'/%3E%3Cstop offset='.6' stop-color='%23ff980e'/%3E%3C/radialGradient%3E%3ClinearGradient id='ff-a' x1='446.9' y1='76.8' x2='47.9' y2='461.8' gradientUnits='userSpaceOnUse'%3E%3Cstop offset='.1' stop-color='%23fff44f'/%3E%3Cstop offset='.1' stop-color='%23ffe847'/%3E%3Cstop offset='.2' stop-color='%23ffc830'/%3E%3Cstop offset='.4' stop-color='%23ff980e'/%3E%3Cstop offset='.4' stop-color='%23ff8b16'/%3E%3Cstop offset='.5' stop-color='%23ff672a'/%3E%3Cstop offset='.5' stop-color='%23ff3647'/%3E%3Cstop offset='.7' stop-color='%23e31587'/%3E%3C/linearGradient%3E%3ClinearGradient id='ff-l' x1='442.1' y1='74.8' x2='102.6' y2='414.3' gradientUnits='userSpaceOnUse'%3E%3Cstop offset='.2' stop-color='%23fff44f' stop-opacity='.8'/%3E%3Cstop offset='.3' stop-color='%23fff44f' stop-opacity='.6'/%3E%3Cstop offset='.5' stop-color='%23fff44f' stop-opacity='.2'/%3E%3Cstop offset='.6' stop-color='%23fff44f' stop-opacity='0'/%3E%3C/linearGradient%3E%3C/defs%3E%3Cpath d='M479 166c-11-25-32-52-49-60a249 249 0 0 1 25 73c-27-68-73-95-111-155a255 255 0 0 1-8-14 44 44 0 0 1-4-9 1 1 0 0 0 0-1 1 1 0 0 0-1 0c-60 35-81 101-83 134a120 120 0 0 0-66 25 71 71 0 0 0-6-5 111 111 0 0 1-1-58c-25 11-44 29-58 44-9-12-9-52-8-60l-8 4a175 175 0 0 0-24 21 210 210 0 0 0-22 26 203 203 0 0 0-32 73l-1 2-2 15a229 229 0 0 0-4 34v1a240 240 0 0 0 477 40l1-9c5-41 0-84-15-121zM202 355l3 1-3-1zm55-145zm198-31z' fill='url(%23ff-a)'/%3E%3Cpath d='M479 166c-11-25-32-52-49-60 14 26 22 53 25 72v1a207 207 0 0 1-206 279c-113-3-212-87-231-197-3-17 0-26 2-40-2 11-3 14-4 34v1a240 240 0 0 0 477 40l1-9c5-41 0-84-15-121z' fill='url(%23ff-b)'/%3E%3Cpath d='M479 166c-11-25-32-52-49-60 14 26 22 53 25 72v1a207 207 0 0 1-206 279c-113-3-212-87-231-197-3-17 0-26 2-40-2 11-3 14-4 34v1a240 240 0 0 0 477 40l1-9c5-41 0-84-15-121z' fill='url(%23ff-c)'/%3E%3Cpath d='m362 195 1 1a130 130 0 0 0-22-29C266 92 322 5 331 0c-60 35-81 101-83 134l9-1c45 0 84 25 105 62z' fill='url(%23ff-d)'/%3E%3Cpath d='M257 210c-1 6-22 26-29 26-68 0-80 41-80 41 3 35 28 64 57 79l4 2 7 3a107 107 0 0 0 31 6c120 6 143-143 57-186 22-4 45 5 58 14-21-37-60-62-105-62l-9 1a120 120 0 0 0-66 25l17 16c16 16 58 33 58 35z' fill='url(%23ff-e)'/%3E%3Cpath d='M257 210c-1 6-22 26-29 26-68 0-80 41-80 41 3 35 28 64 57 79l4 2 7 3a107 107 0 0 0 31 6c120 6 143-143 57-186 22-4 45 5 58 14-21-37-60-62-105-62l-9 1a120 120 0 0 0-66 25l17 16c16 16 58 33 58 35z' fill='url(%23ff-f)'/%3E%3Cpath d='m171 151 5 3a111 111 0 0 1-1-58c-25 11-44 29-58 44 1 0 36 0 54 11z' fill='url(%23ff-g)'/%3E%3Cpath d='M18 261a242 242 0 0 0 231 197 207 207 0 0 0 206-279c8 56-20 110-64 146-86 71-169 43-186 31l-3-1c-50-24-71-70-67-110-42 0-57-35-57-35s38-28 89-4c46 22 90 4 90 4 0-2-42-19-58-35l-17-16a71 71 0 0 0-6-5l-5-3c-18-11-52-11-54-11-9-12-9-51-8-60l-8 4a175 175 0 0 0-24 21 210 210 0 0 0-22 26 203 203 0 0 0-32 73c0 1-9 38-5 57z' fill='url(%23ff-h)'/%3E%3Cpath d='M341 167a130 130 0 0 1 22 29 46 46 0 0 1 4 3c55 50 26 121 24 126 44-36 72-90 64-146-27-68-73-95-111-155a255 255 0 0 1-8-14 44 44 0 0 1-4-9 1 1 0 0 0 0-1 1 1 0 0 0-1 0c-9 5-65 92 10 167z' fill='url(%23ff-i)'/%3E%3Cpath d='M367 199a46 46 0 0 0-4-3l-1-1c-13-9-36-18-58-15 86 44 63 193-57 187a107 107 0 0 1-31-6 131 131 0 0 1-11-5c17 12 99 39 186-31 2-5 31-76-24-126z' fill='url(%23ff-j)'/%3E%3Cpath d='M148 277s12-41 80-41c7 0 28-20 29-26s-44 18-90-4c-51-24-89 4-89 4s15 35 57 35c-4 40 16 85 67 110l3 1c-29-15-54-44-57-79z' fill='url(%23ff-k)'/%3E%3Cpath d='M479 166c-11-25-32-52-49-60a249 249 0 0 1 25 73c-27-68-73-95-111-155a255 255 0 0 1-8-14 44 44 0 0 1-4-9 1 1 0 0 0 0-1 1 1 0 0 0-1 0c-60 35-81 101-83 134l9-1c45 0 84 25 105 62-13-9-36-18-58-14 86 43 63 192-57 186a107 107 0 0 1-31-6 131 131 0 0 1-11-5l-3-1 3 1c-29-15-54-44-57-79 0 0 12-41 80-41 7 0 28-20 29-26 0-2-42-19-58-35l-17-16a71 71 0 0 0-6-5 111 111 0 0 1-1-58c-25 11-44 29-58 44-9-12-9-52-8-60l-8 4a175 175 0 0 0-24 21 210 210 0 0 0-22 26 203 203 0 0 0-32 73l-1 2-2 15a279 279 0 0 0-4 34v1a240 240 0 0 0 477 40l1-9c5-41 0-84-15-121zm-24 13z' fill='url(%23ff-l)'/%3E%3C/svg%3E)
' xlink:href='%23s-b'%3E%3Cstop offset='0' stop-color='%2324a5f3' stop-opacity='0' /%3E%3Cstop offset='1' stop-color='%231e8ceb' /%3E%3C/radialGradient%3E%3CradialGradient id='s-j' cx='109.3' cy='13.8' r='93.1' gradientTransform='matrix(-.02 1.1 -1.04 -.02 137 -115)' xlink:href='%23s-b'%3E%3Cstop offset='0' stop-opacity='0' /%3E%3Cstop offset='1' stop-color='%235488d6' stop-opacity='0' /%3E%3Cstop offset='1' stop-color='%235d96eb' /%3E%3C/radialGradient%3E%3C/defs%3E%3Crect width='220' height='220' x='22' y='-107' fill='url(%23s-a)' ry='49' transform='matrix(.57 0 0 .57 187 256)' /%3E%3Cg transform='translate(194 190)'%3E%3Ccircle cx='67.8' cy='67.7' fill='url(%23s-c)' paint-order='stroke fill markers' r='54' /%3E%3Ccircle cx='-69.9' cy='69.3' fill='url(%23s-i)' transform='translate(138 -2)' r='54' /%3E%3C/g%3E%3Cellipse cx='120' cy='14.2' fill='url(%23s-j)' rx='93.1' ry='93.7' transform='matrix(.58 0 0 .58 192 250)' /%3E%3Cg transform='matrix(.58 0 0 .57 197 182)'%3E%3Cpath fill='%23cac7c8' d='M46 192h1l72-48-7-9-66 57Z' /%3E%3Cpath fill='%23fbfffc' d='M46 191v1l66-57-7-9-59 65Z' /%3E%3Cpath fill='url(%23s-d)' d='m119 144-7-9 66-57-59 66Z' /%3E%3Cpath fill='%23fb645c' d='m105 126 7 9 66-57-1-1-72 49Z' /%3E%3C/g%3E%3Cpath stroke='%23fff' stroke-linecap='round' stroke-miterlimit='1' stroke-width='1.3' d='m287 278 3-2m-12-17 8-2m-8-3h4m-4-13 8 2m-8 3h4m-1-13 7 3m-4-11 7 4m-2-11 6 6m0-12 6 7m1-11 4 6m4-10 3 7m5-9 2 7m15-7-1 7m10-5-3 7m11-4-4 7m11-2-5 6m16 7-7 4m10 4-7 3m10 6-8 1m8 16-8-2m5 10-7-3m4 11-7-4m2 11-6-5m0 11-5-6m-2 11-4-7m-4 11-3-8m-6 10-1-8m-16 8 2-8m-10 5 3-7m-11 4 4-7m-11 2 5-6m-8 3 3-3m4 8 2-3m5 8 2-4m6 7 1-4m8 5v-4m8 4v-4m9 3-1-4m9 1-2-4m9 0-2-4m9-2-3-3m8-4-3-2m8-5-4-2m7-6-4-1m5-8h-4m4-8h-4m3-9-4 1m1-9-4 2m-1-9-3 2m-2-9-3 3m-4-8-2 3m-5-8-2 4m-6-6-1 3m-8-5v4m-8-4v4m-9-2 1 3m-9 0 2 3m-9 1 2 3m-9 2 3 3m-8 4 3 2m-8 5 4 2m-7 6 4 1m-4 25 4-1m-2 5 7-3m-6 7 4-2m-2 6 7-4m-13-21h8m41-41v-8m0 99v-8m49-42h-8' transform='translate(-65 8)' /%3E%3C/svg%3E)
设计初衷
想到计算机上的文件时,您可能会想到文件层次结构:文件整理在文件夹中,您可以使用操作系统的文件资源管理器来浏览这些文件夹。例如,在 Windows 上,对于名为 Tom 的用户,其待办事项列表可能位于 C:\Users\Tom\Documents\ToDo.txt 中。在此示例中,ToDo.txt 是文件名,Users、Tom 和 Documents 是文件夹名称。Windows 上的 `C:` 表示驱动器的根目录。
在网络上处理文件的传统方式
如需在 Web 应用中修改待办事项列表,通常需要执行以下流程:
- 用户将文件上传到服务器,或在客户端上使用
<input type="file">打开该文件。 - 用户进行更改,然后下载包含通过 JavaScript 以编程方式注入的
click()的结果文件。<a download="ToDo.txt> - 对于打开文件夹,您可以使用
<input type="file" webkitdirectory>中的一个特殊属性,尽管该属性的名称是专有的,但实际上几乎所有浏览器都支持它。
在网络上处理文件的现代方式
此流程无法代表用户对编辑文件的想法,这意味着用户最终会获得输入文件的下载副本。因此,File System Access API 引入了三个选择器方法:showOpenFilePicker()、showSaveFilePicker() 和 showDirectoryPicker(),它们的作用正如其名称所暗示的那样。它们可实现以下流程:
- 使用
showOpenFilePicker()打开ToDo.txt,并获取FileSystemFileHandle对象。 - 通过调用文件句柄的
getFile()方法,从FileSystemFileHandle对象中获取File。 - 修改文件,然后对句柄调用
requestPermission({mode: 'readwrite'})。 - 如果用户接受权限请求,请将更改保存回原始文件。
- 或者,调用
showSaveFilePicker()并让用户选择新文件。(如果用户选择之前打开过的文件,该文件的内容将被覆盖。)对于重复保存,您可以保留文件句柄,这样就不必再次显示文件保存对话框。
在网页上处理文件的限制
可通过这些方法访问的文件和文件夹位于所谓的用户可见的文件系统中。从网络保存的文件(尤其是可执行文件)会带有 mark of the web,因此在执行可能存在危险的文件之前,操作系统可以显示额外的警告。作为一项额外的安全功能,从网络获取的文件也会受到安全浏览的保护。为简单起见,并在此文章的上下文中,您可以将安全浏览视为基于云的病毒扫描。使用 File System Access API 将数据写入文件时,写入操作不是就地执行,而是使用临时文件。除非文件通过所有这些安全检查,否则不会修改文件本身。可以想象,尽管我们尽可能地进行了改进(例如在 macOS 上),但这项工作仍会导致文件操作相对缓慢。不过,每次 write() 调用都是自包含的,因此在底层,它会打开文件、寻找到给定的偏移量,最后写入数据。
文件作为处理的基础
同时,文件也是记录数据的绝佳方式。例如,SQLite 将整个数据库存储在一个文件中。另一个示例是图片处理中使用的 mipmap。mipmap 是预先计算的优化图像序列,每个图像都是前一个图像的低分辨率版本,这使得许多操作(例如缩放)更快。那么,Web 应用如何才能获得文件的优势,同时避免基于 Web 的文件处理带来的性能损失?答案是源私有文件系统。
用户可见的文件系统与源私有文件系统
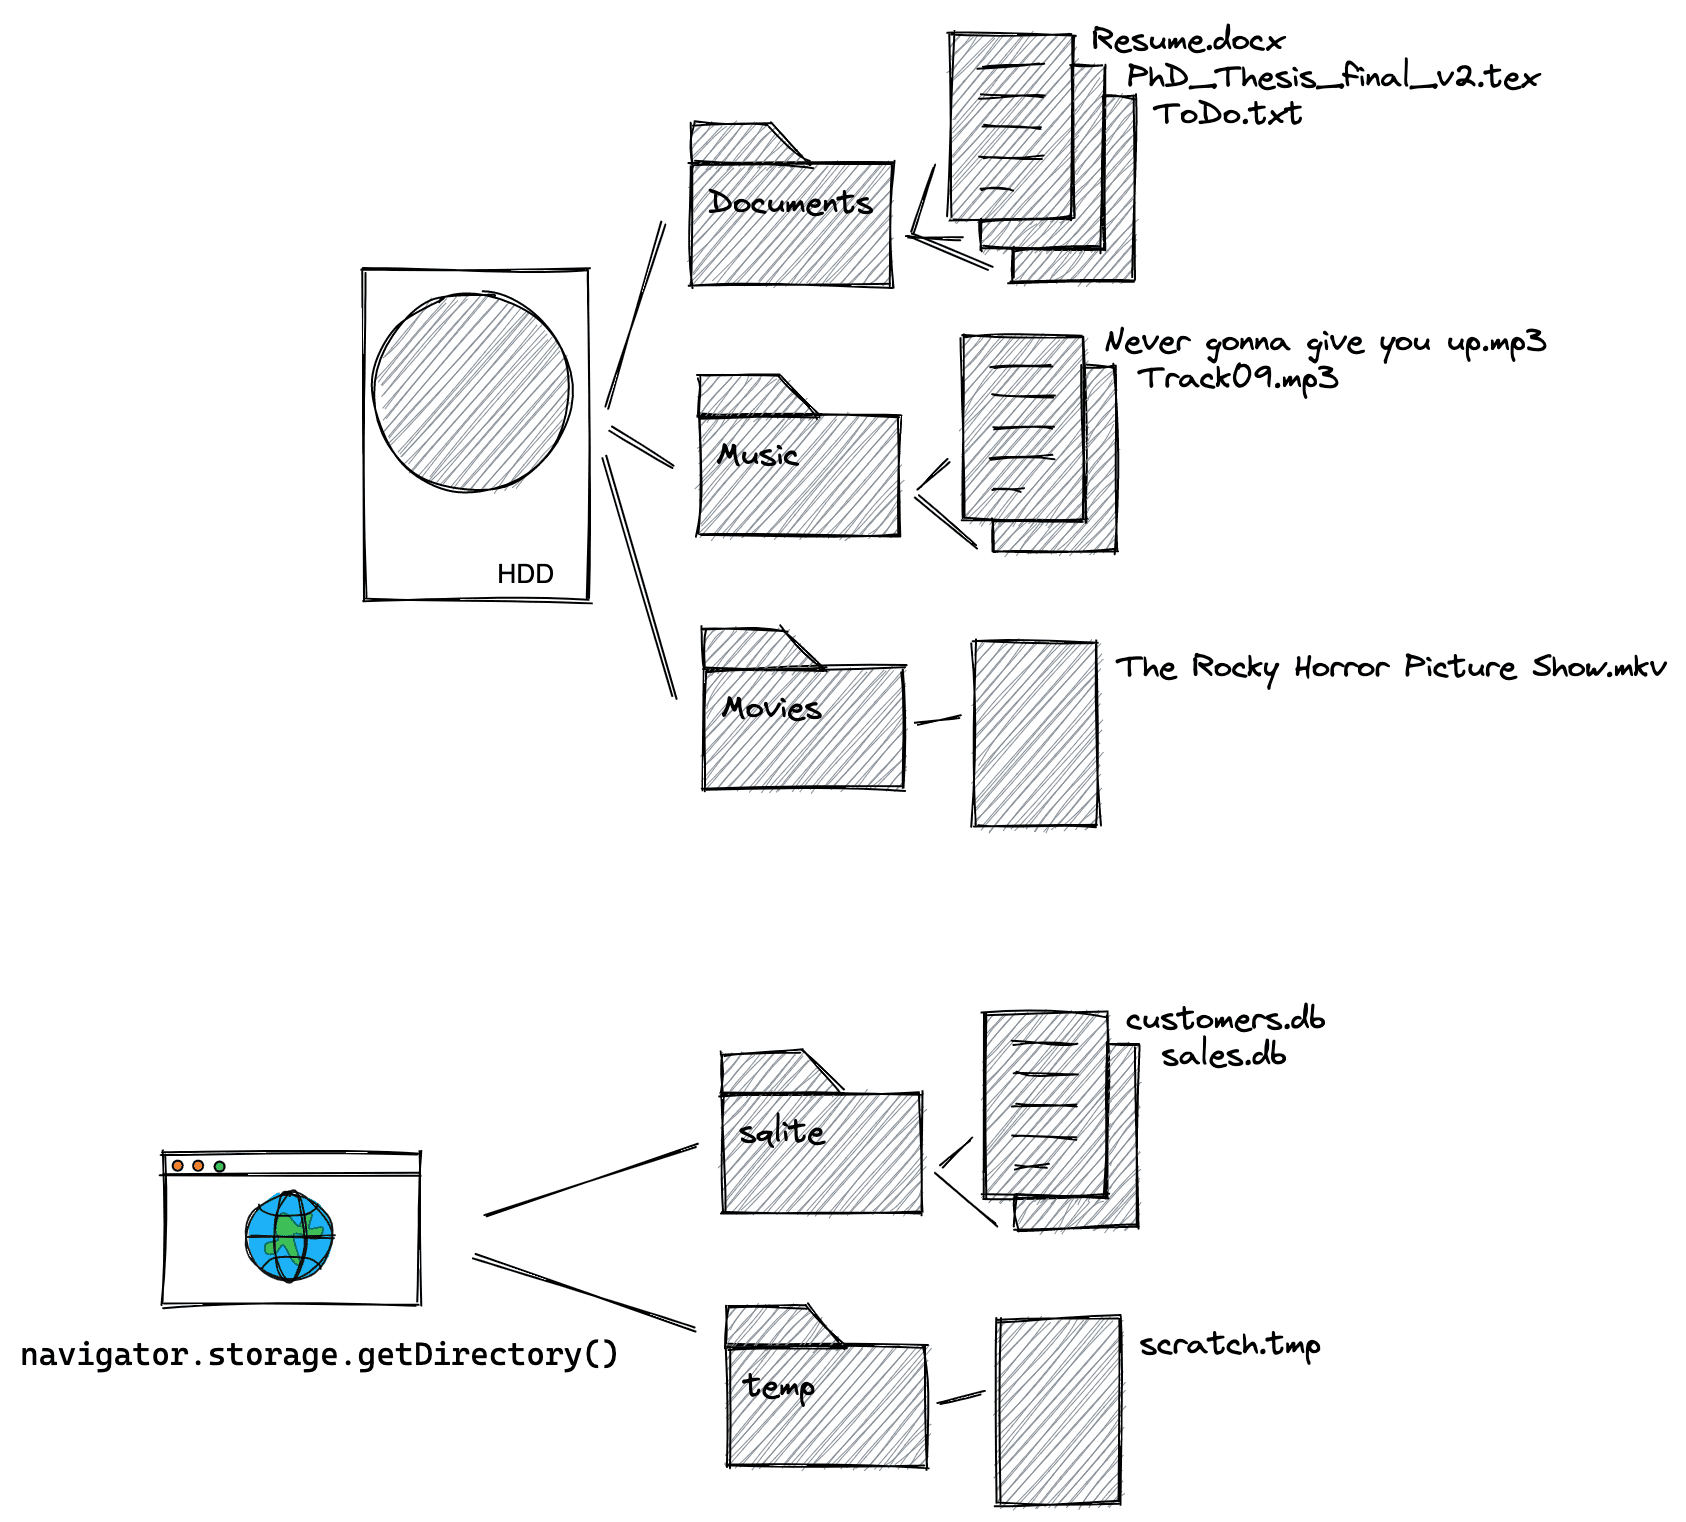
与使用操作系统文件浏览器浏览的用户可见文件系统(其中包含您可以读取、写入、移动和重命名的文件和文件夹)不同,源私有文件系统不适合供用户查看。源站专用文件系统中的文件和文件夹顾名思义是私有的,更具体地说,是网站的源站私有的。在开发者工具控制台中输入 location.origin,即可发现网页的来源。例如,网页 https://developer.chrome.com/articles/ 的源是 https://developer.chrome.com(即 /articles 部分不属于源)。如需详细了解来源理论,请参阅了解“同网站”和“同来源”。共享同一来源的所有网页都可以看到相同的来源专用文件系统数据,因此 https://developer.chrome.com/docs/extensions/mv3/getstarted/extensions-101/ 可以看到与上一个示例相同的详细信息。每个来源都有自己的独立源私有文件系统,这意味着 https://developer.chrome.com 的源私有文件系统与 https://web.dev 的源私有文件系统完全不同。在 Windows 上,用户可见文件系统的根目录为 C:\\。对于源站专用文件系统,其等效项是每个源站一个最初为空的根目录,可通过调用异步方法 navigator.storage.getDirectory() 来访问该根目录。如需比较面向用户的文件系统和源私有文件系统,请参阅下图。该图显示,除了根目录之外,其他所有内容在概念上都是相同的,即通过文件和文件夹的层次结构来根据数据和存储需求整理和安排内容。
源私有文件系统的具体细节
与浏览器中的其他存储机制(例如 localStorage 或 IndexedDB)一样,源私有文件系统也受浏览器配额限制。当用户清除所有浏览数据或所有网站数据时,来源专用文件系统也会被删除。调用 navigator.storage.estimate(),然后在生成的响应对象中查看 usage 条目,了解您的应用已消耗多少存储空间,该条目会按存储机制在 usageDetails 对象中进行细分,您需要重点查看 fileSystem 条目。由于源私有文件系统对用户不可见,因此不会显示权限提示,也不会进行安全浏览检查。
获取对根目录的访问权限
如需获取对根目录的访问权限,请运行以下命令。最终得到一个空的目录句柄,更具体地说,是一个 FileSystemDirectoryHandle。
const opfsRoot = await navigator.storage.getDirectory();
// A FileSystemDirectoryHandle whose type is "directory"
// and whose name is "".
console.log(opfsRoot);
主线程或 Web Worker
您可以通过两种方式使用源专用文件系统:在主线程中或在 Web Worker 中。Web Worker 无法阻塞主线程,这意味着在此上下文中,API 可以是同步的,而这种模式通常在主线程上是不允许的。同步 API 的速度可能更快,因为它们无需处理 promise,并且文件操作在可编译为 WebAssembly 的 C 等语言中通常是同步的。
// This is synchronous C code.
FILE *f;
f = fopen("example.txt", "w+");
fputs("Some text\n", f);
fclose(f);
如果您需要尽可能快速的文件操作,或者您要处理 WebAssembly,请跳至在 Web Worker 中使用源私有文件系统。否则,您可以继续阅读。
在主线程上使用源私有文件系统
创建新文件和文件夹
获得根文件夹后,请分别使用 getFileHandle() 和 getDirectoryHandle() 方法创建文件和文件夹。通过传递 {create: true},如果文件或文件夹不存在,系统将创建相应的文件或文件夹。通过使用新创建的目录作为起点来调用这些函数,从而构建文件层次结构。
const fileHandle = await opfsRoot
    .getFileHandle('my first file', {create: true});
const directoryHandle = await opfsRoot
    .getDirectoryHandle('my first folder', {create: true});
const nestedFileHandle = await directoryHandle
    .getFileHandle('my first nested file', {create: true});
const nestedDirectoryHandle = await directoryHandle
    .getDirectoryHandle('my first nested folder', {create: true});
访问现有文件和文件夹
如果您知道文件和文件夹的名称,可以通过调用 getFileHandle() 或 getDirectoryHandle() 方法并传入文件或文件夹的名称来访问之前创建的文件和文件夹。
const existingFileHandle = await opfsRoot.getFileHandle('my first file');
const existingDirectoryHandle = await opfsRoot
    .getDirectoryHandle('my first folder');
获取与文件句柄关联的文件以进行读取
FileSystemFileHandle 表示文件系统中的文件。如需获取关联的 File,请使用 getFile() 方法。File 对象是一种特殊的 Blob,可在任何可以使用 Blob 的情境中使用。具体来说,FileReader、URL.createObjectURL()、createImageBitmap() 和 XMLHttpRequest.send() 同时接受 Blobs 和 Files。如果需要,从 FileSystemFileHandle 获取 File 会“释放”数据,以便您可以访问该数据并将其提供给用户可见的文件系统。
const file = await fileHandle.getFile();
console.log(await file.text());
通过流式传输写入文件
通过调用 createWritable() 将数据流式传输到文件中,该调用会创建一个 FileSystemWritableFileStream,然后您可以使用 write() 将内容写入该文件。最后,您需要 close() 该数据流。
const contents = 'Some text';
// Get a writable stream.
const writable = await fileHandle.createWritable();
// Write the contents of the file to the stream.
await writable.write(contents);
// Close the stream, which persists the contents.
await writable.close();
删除文件和文件夹
通过调用文件或目录句柄的特定 remove() 方法来删除文件和文件夹。如需删除文件夹(包括所有子文件夹),请传递 {recursive: true} 选项。
await fileHandle.remove();
await directoryHandle.remove({recursive: true});
或者,如果您知道要删除的目录中文件或文件夹的名称,请使用 removeEntry() 方法。
directoryHandle.removeEntry('my first nested file');
移动和重命名文件和文件夹
使用 move() 方法重命名和移动文件及文件夹。移动和重命名可以同时进行,也可以单独进行。
// Rename a file.
await fileHandle.move('my first renamed file');
// Move a file to another directory.
await fileHandle.move(nestedDirectoryHandle);
// Move a file to another directory and rename it.
await fileHandle
    .move(nestedDirectoryHandle, 'my first renamed and now nested file');
解析文件或文件夹的路径
如需了解指定文件或文件夹相对于参考目录的位置,请使用 resolve() 方法,并向其传递 FileSystemHandle 作为实参。如需获取源私有文件系统中文件或文件夹的完整路径,请使用通过 navigator.storage.getDirectory() 获取的根目录作为参考目录。
const relativePath = await opfsRoot.resolve(nestedDirectoryHandle);
// `relativePath` is `['my first folder', 'my first nested folder']`.
检查两个文件或文件夹句柄是否指向同一文件或文件夹
有时,您有两个句柄,但不知道它们是否指向同一文件或文件夹。如需检查是否属于这种情况,请使用 isSameEntry() 方法。
fileHandle.isSameEntry(nestedFileHandle);
// Returns `false`.
列出文件夹的内容
FileSystemDirectoryHandle 是一个异步迭代器,您可以使用 for await…of 循环对其进行迭代。作为异步迭代器,它还支持 entries()、values() 和 keys() 方法,您可以根据需要的信息选择相应的方法:
for await (let [name, handle] of directoryHandle) {}
for await (let [name, handle] of directoryHandle.entries()) {}
for await (let handle of directoryHandle.values()) {}
for await (let name of directoryHandle.keys()) {}
以递归方式列出文件夹及其所有子文件夹的内容
处理与递归配对的异步循环和函数很容易出错。以下函数可作为列出文件夹及其所有子文件夹(包括所有文件及其大小)内容的起点。如果您不需要文件大小,可以简化该函数,方法是:在显示 directoryEntryPromises.push 的位置,不推送 handle.getFile() promise,而是直接推送 handle。
  const getDirectoryEntriesRecursive = async (
    directoryHandle,
    relativePath = '.',
  ) => {
    const fileHandles = [];
    const directoryHandles = [];
    const entries = {};
    // Get an iterator of the files and folders in the directory.
    const directoryIterator = directoryHandle.values();
    const directoryEntryPromises = [];
    for await (const handle of directoryIterator) {
      const nestedPath = `${relativePath}/${handle.name}`;
      if (handle.kind === 'file') {
        fileHandles.push({ handle, nestedPath });
        directoryEntryPromises.push(
          handle.getFile().then((file) => {
            return {
              name: handle.name,
              kind: handle.kind,
              size: file.size,
              type: file.type,
              lastModified: file.lastModified,
              relativePath: nestedPath,
              handle
            };
          }),
        );
      } else if (handle.kind === 'directory') {
        directoryHandles.push({ handle, nestedPath });
        directoryEntryPromises.push(
          (async () => {
            return {
              name: handle.name,
              kind: handle.kind,
              relativePath: nestedPath,
              entries:
                  await getDirectoryEntriesRecursive(handle, nestedPath),
              handle,
            };
          })(),
        );
      }
    }
    const directoryEntries = await Promise.all(directoryEntryPromises);
    directoryEntries.forEach((directoryEntry) => {
      entries[directoryEntry.name] = directoryEntry;
    });
    return entries;
  };
在 Web Worker 中使用源私有文件系统
如前所述,Web Worker 无法阻塞主线程,因此在此上下文中允许使用同步方法。
获取同步访问句柄
最快的文件操作的入口点是 FileSystemSyncAccessHandle,通过调用 createSyncAccessHandle() 从常规 FileSystemFileHandle 获取。
const fileHandle = await opfsRoot
    .getFileHandle('my highspeed file.txt', {create: true});
const syncAccessHandle = await fileHandle.createSyncAccessHandle();
同步就地文件方法
获得同步访问句柄后,您就可以访问快速的原位文件方法,这些方法都是同步的。
getSize():返回文件的大小(以字节为单位)。write():将缓冲区的内容写入文件(可以选择指定偏移量),并返回写入的字节数。通过检查返回的写入字节数,调用方可以检测并处理错误和部分写入。read():将文件内容读入缓冲区,可选择是否从给定偏移量开始读取。truncate():将文件调整为指定大小。flush():确保文件内容包含通过write()进行的所有修改。close():关闭访问句柄。
以下示例使用了上述所有方法。
const opfsRoot = await navigator.storage.getDirectory();
const fileHandle = await opfsRoot.getFileHandle('fast', {create: true});
const accessHandle = await fileHandle.createSyncAccessHandle();

const textEncoder = new TextEncoder();
const textDecoder = new TextDecoder();

// Initialize this variable for the size of the file.
let size;
// The current size of the file, initially `0`.
size = accessHandle.getSize();
// Encode content to write to the file.
const content = textEncoder.encode('Some text');
// Write the content at the beginning of the file.
accessHandle.write(content, {at: size});
// Flush the changes.
accessHandle.flush();
// The current size of the file, now `9` (the length of "Some text").
size = accessHandle.getSize();

// Encode more content to write to the file.
const moreContent = textEncoder.encode('More content');
// Write the content at the end of the file.
accessHandle.write(moreContent, {at: size});
// Flush the changes.
accessHandle.flush();
// The current size of the file, now `21` (the length of
// "Some textMore content").
size = accessHandle.getSize();

// Prepare a data view of the length of the file.
const dataView = new DataView(new ArrayBuffer(size));

// Read the entire file into the data view.
accessHandle.read(dataView);
// Logs `"Some textMore content"`.
console.log(textDecoder.decode(dataView));

// Read starting at offset 9 into the data view.
accessHandle.read(dataView, {at: 9});
// Logs `"More content"`.
console.log(textDecoder.decode(dataView));

// Truncate the file after 4 bytes.
accessHandle.truncate(4);
将文件从源私有文件系统复制到用户可见的文件系统
如上所述,无法将文件从源私有文件系统移动到用户可见的文件系统,但可以复制文件。由于 showSaveFilePicker() 仅在主线程上公开,但在工作器线程中不公开,因此请务必在主线程中运行代码。
// On the main thread, not in the Worker. This assumes
// `fileHandle` is the `FileSystemFileHandle` you obtained
// the `FileSystemSyncAccessHandle` from in the Worker
// thread. Be sure to close the file in the Worker thread first.
const fileHandle = await opfsRoot.getFileHandle('fast');
try {
  // Obtain a file handle to a new file in the user-visible file system
  // with the same name as the file in the origin private file system.
  const saveHandle = await showSaveFilePicker({
    suggestedName: fileHandle.name || ''
  });
  const writable = await saveHandle.createWritable();
  await writable.write(await fileHandle.getFile());
  await writable.close();
} catch (err) {
  console.error(err.name, err.message);
}
调试源私有文件系统
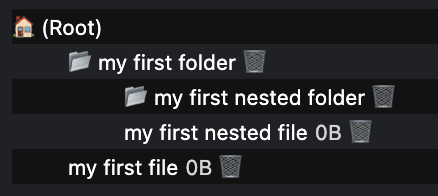
在添加内置开发者工具支持之前(请参阅 crbug/1284595),请使用 OPFS Explorer Chrome 扩展程序调试源私有文件系统。上方的屏幕截图来自创建新文件和文件夹部分,顺便说一下,它是直接从扩展程序中截取的。

安装扩展程序后,打开 Chrome 开发者工具,选择 OPFS 浏览器标签页,然后即可检查文件层次结构。点击文件名可将文件从源私有文件系统保存到用户可见的文件系统,点击回收站图标可删除文件和文件夹。
演示
在演示中查看源站专用文件系统的实际应用(如果您安装了 OPFS Explorer 扩展程序),该演示使用源站专用文件系统作为编译为 WebAssembly 的 SQLite 数据库的后端。请务必查看 GitHub 上的源代码。请注意,下面的嵌入式版本未使用源专用文件系统后端(因为 iframe 是跨源的),但当您在单独的标签页中打开演示时,它会使用。
总结
WHATWG 规定的源私有文件系统改变了我们在 Web 上使用和互动文件的方式。它实现了以前在用户可见的文件系统中无法实现的新用例。所有主要浏览器供应商(Apple、Mozilla 和 Google)都已加入,并拥有共同的愿景。源私有文件系统的开发是一项协作性很强的工作,开发者和用户的反馈对于其进展至关重要。我们会继续完善和改进该标准,欢迎您以问题或拉取请求的形式在 whatwg/fs 代码库中提供反馈。
相关链接
- 文件系统标准规范
- 文件系统标准代码库
- The File System API with Origin Private File System WebKit post
- OPFS Explorer 扩展程序
致谢
本文由 Austin Sully、Etienne Noël 和 Rachel Andrew 审核。主打图片由 Christina Rumpf 拍摄,选自 Unsplash。