
In the last couple of modules, you discovered concepts such as deferring the
loading of JavaScript and lazy loading images and <iframe> elements.
Deferring resource loading decreases network and CPU usage during the initial
page load by downloading resources at the point in which they are needed,
rather than loading them up front, where they could potentially go unused.
This can improve initial page load times, but subsequent interactions may incur
a delay if the resources needed to power them aren't already loaded at the time
they occur.
For example, if a page contains a custom date picker, you can defer the date picker's resources until the user interacts with the element. However, loading the date picker's resources on demand can result in a delay—perhaps slight, but perhaps not, depending on the user's network connection, device capabilities, or both—until the resources are downloaded, parsed, and available for execution.
It's a bit of a tricky balance—you don't want to waste bandwidth by loading resources that can go unused, but delaying interactions and subsequent page loads may not be ideal either. Thankfully, there are a number of tools you can use to strike a better balance between these two extremes—and this module covers some techniques you can use to get there, such as prefetching resources, prerendering entire pages, and precaching resources using a service worker.
Prefetch resources needed in the near future at low priority
It's possible to preemptively fetch resources—including images, stylesheets,
or JavaScript resources—by using the <link rel="prefetch"> resource hint. The
prefetch hint informs the browser that a resource is likely to be required in
the near future.
When a prefetch hint is specified, the browser may then initiate a request
for that resource at lowest priority to avoid contending with resources
required for the current page.
Prefetching resources can improve the user experience, as the user is not required to wait for resources needed in the near future to be downloaded, as they can be instantly retrieved from the disk cache at the time of need.
<head>
  <!-- ... -->
  <link rel="prefetch" as="script" href="/date-picker.js">
  <link rel="prefetch" as="style" href="/date-picker.css">
  <!-- ... -->
</head>
The preceding HTML snippet informs the browser that it can prefetch
date-picker.js and date-picker.css once it is idle. It's is possible to also
prefetch resources dynamically as the user interacts with the page in
JavaScript.
prefetch is supported on all modern browsers except Safari—where it is
available behind a flag. If you have a strong need to preemptively load
resources for your website in a way that works in all browsers—and you're using
a service worker—then read the later section in this module about precaching
resources using a service worker.
Prefetch pages to speed up future navigations
It's also possible to prefetch a page and all its subresources by specifying the
as="document" attribute when pointing to an HTML document:
<link rel="prefetch" href="/page" as="document">
When the browser is idle, it may initiate a low priority request for /page.
In Chromium-based browsers, you can prefetch documents using the Speculation Rules API. The Speculation Rules are defined as a JSON object included in the page's HTML, or added dynamically through JavaScript:
<script type="speculationrules">
{
  "prefetch": [{
    "source": "list",
    "urls": ["/page-a", "/page-b"]
  }]
}
</script>
The JSON object describes one or more actions—currently supporting only
prefetch and prerender—and a list of URLs associated with that action. In
the preceding HTML snippet, the browser is instructed to prefetch /page-a
and /page-b. Similarly to <link rel="prefetch">, speculation rules are a
hint that the browser may ignore under certain circumstances.
Libraries such as Quicklink improve page navigations by dynamically prefetching or prerendering links to pages once they are visible within the user's viewport. This increases the likelihood that the user eventually navigates to that page—compared with prefetching all links on the page.
Prerender pages
In addition to prefetching resources, it is also possible to hint to the browser to prerender a page before the user navigates to it. This can deliver nearly instant page loads, as the page and its resources are fetched and processed in the background. Once the user navigates to the page, the page is placed in the foreground.
Prerendering is supported through the Speculation Rules API:
<script type="speculationrules">
{
  "prerender": [
    {
      "source": "list",
      "urls": ["/page-a", "page-b"]
    }
  ]
}
</script>
Prefetch and prerender demos
Service worker precaching
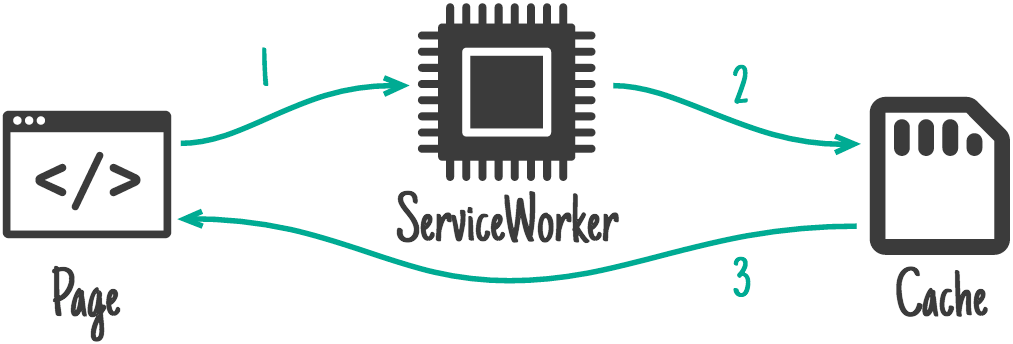
It's also possible to speculatively prefetch resources using a service worker.
Service worker precaching can fetch and save resources using the Cache API,
allowing the browser to serve the request using the Cache API without going to
the network. Service worker precaching uses a very effective service worker
caching strategy, known as the cache-only strategy. This pattern is highly
effective because, once resources are placed in the service worker cache, they
are fetched almost instantly upon request.
To precache resources using a service worker, you can use Workbox. If you prefer, however, you can write your own code to cache a predetermined set of files. Either way you decide to go about using a service worker to precache resources, it's important to know that precaching happens when the service worker is installed. After installation, the precached resources are then available for retrieval on any page the service worker controls on your website.
Workbox uses a precache manifest to determine which resources should be precached. A precache manifest is a list of files and versioning information that serves as the "source of truth" for the resources to be precached.
[{
    url: 'script.ffaa4455.js',
    revision: null
}, {
    url: '/index.html',
    revision: '518747aa'
}]
The preceding code is an example manifest which includes two files:
script.ffaa4455.js and /index.html. If a resource contains version
information in the file itself (known as a file hash), then the revision
property can be left as null, as the file is already versioned (for example,
ffaa4455 for the script.ffaa4455.js resource in the preceding code). For
unversioned resources, a revision can be generated for them at build time.
Once set up, a service worker can be used to precache static pages or their subresources to speed up subsequent page navigations.
workbox.precaching.precacheAndRoute([
  '/styles/product-page.ac29.css',
  '/styles/product-page.39a1.js',
]);
For example, on an ecommerce product listing page, a service worker can be used
to precache the CSS and JavaScript required to render the product detail page,
making the navigation to the product detail page feel much faster. In the
preceding example, product-page.ac29.css and product-page.39a1.js are
precached. The precacheAndRoute method available in workbox-precaching
automatically registers the handlers needed to ensure the precached resources
are fetched from the service worker API whenever necessary.
Since service workers are widely supported, you can use service worker precaching on any modern browser where the situation calls for it.
Test your knowledge
At what priority does a prefetch hint occur?
What is the difference between prefetching and prerendering a page?
The service worker cache and the HTTP cache are the same.
Up next: An overview of web workers
Now that you know how prefetching, prerendering, and service worker precaching can be beneficial can be when it comes to speeding up navigations to future pages, you're in a position to make some educated decisions on how this can be beneficial for your website and its user.
Next up, an overview of web workers is given, and how they can take expensive work off of the main thread and give the main thread more breathing room for user interactions. If you've ever wondered what you could do to give the main thread more breathing room, then the next two modules are worth your time!