
在最後一個單元中,我們概略介紹了 Web Worker。您可以將 JavaScript 從主執行緒移至獨立的 Web Worker 執行緒,藉此改善輸入內容的回應速度,進而提升網站的「與下一次算繪的互動 (INP)」指標。如果工作不需要直接存取主執行緒,Web Worker 就很實用。不過,光是概覽還不夠,本單元將提供網頁工作站的具體用途。
舉例來說,網站可能需要從圖片中移除 Exif 中繼資料,這並非天方夜譚。事實上,Flickr 等網站會提供 Exif 中繼資料供使用者查看,瞭解所託管圖片的技術詳細資料,例如色深、相機廠牌和型號,以及其他資料。
不過,如果完全在主執行緒上執行,擷取圖片、將圖片轉換為 ArrayBuffer,以及擷取 Exif 中繼資料的邏輯可能會相當耗費資源。幸好,網頁工作人員範圍允許這項工作在主執行緒外完成。接著,透過 Web Worker 的訊息傳輸管道,Exif 中繼資料會以 HTML 字串的形式傳輸回主執行緒,並顯示給使用者。
沒有網頁工作站時的主執行緒
首先,請觀察在沒有網頁工作人員的情況下執行這項工作時,主執行緒的樣貌。如要這樣做,請按照下列步驟操作:
- 在 Chrome 中開啟新分頁,並開啟開發人員工具。
- 開啟效能面板。
- 前往 https://chrome.dev/learn-performance-exif-worker/without-worker.html。
- 在效能面板中,按一下開發人員工具窗格右上角的「記錄」。
- 將這個圖片連結 (或您選擇的其他含有 Exif 中繼資料的連結) 貼到欄位中,然後按一下「Get that JPEG!」(取得該 JPEG!) 按鈕。
- 介面填入 Exif 中繼資料後,請再次點選「記錄」停止記錄。
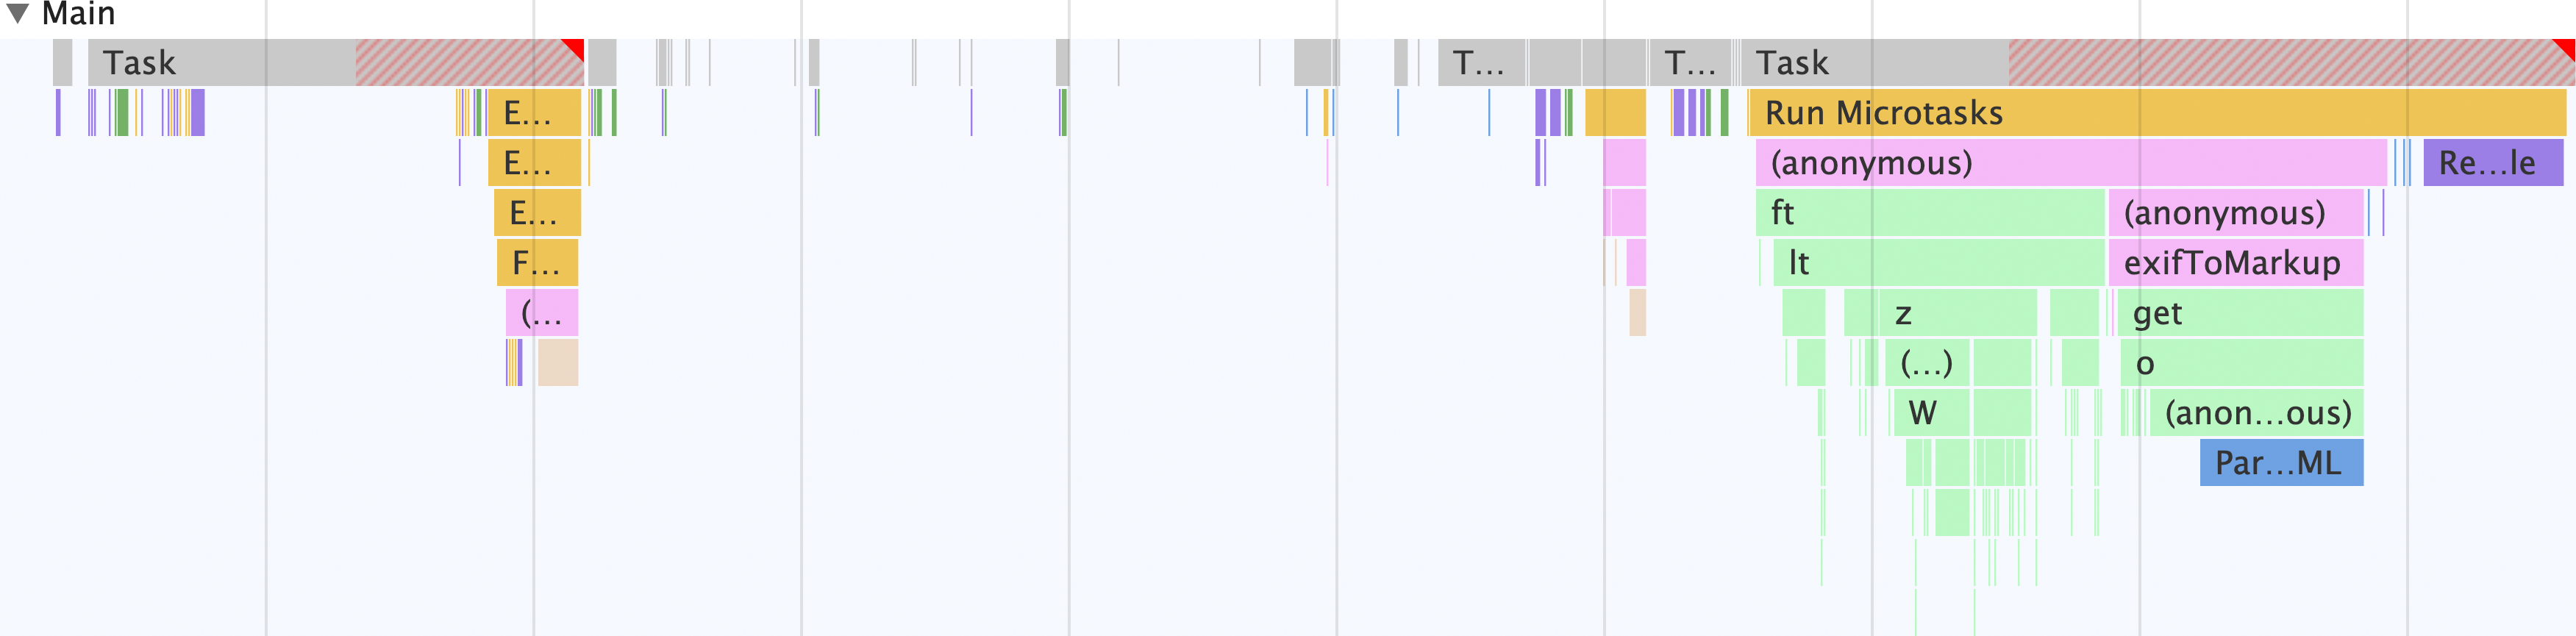
請注意,除了可能存在的其他執行緒 (例如點陣化執行緒等),應用程式中的所有項目都會在主執行緒上發生。在主要執行緒中,會發生下列情況:
- 表單會接收輸入內容,並傳送
fetch要求,取得含有 Exif 中繼資料的圖片初始部分。 - 圖片資料會轉換為
ArrayBuffer。 exif-reader指令碼用於從圖片擷取 Exif 中繼資料。- 系統會擷取中繼資料來建構 HTML 字串,然後填入中繼資料檢視器。
現在,請比較相同行為的實作方式,但使用 Web Worker!
主執行緒搭配網頁工作站的樣子
現在您已瞭解如何從主要執行緒的 JPEG 檔案中擷取 Exif 中繼資料,接下來請看看加入網頁工作人員後的情況:
- 在 Chrome 中開啟另一個分頁,然後開啟該分頁的開發人員工具。
- 開啟效能面板。
- 前往 https://chrome.dev/learn-performance-exif-worker/with-worker.html。
- 在「成效」面板中,按一下開發人員工具窗格右上角的錄製按鈕。
- 將這個圖片連結貼到欄位中,然後按一下「Get that JPEG!」按鈕。
- 介面填入 Exif 中繼資料後,請再次點選錄製按鈕停止錄製。
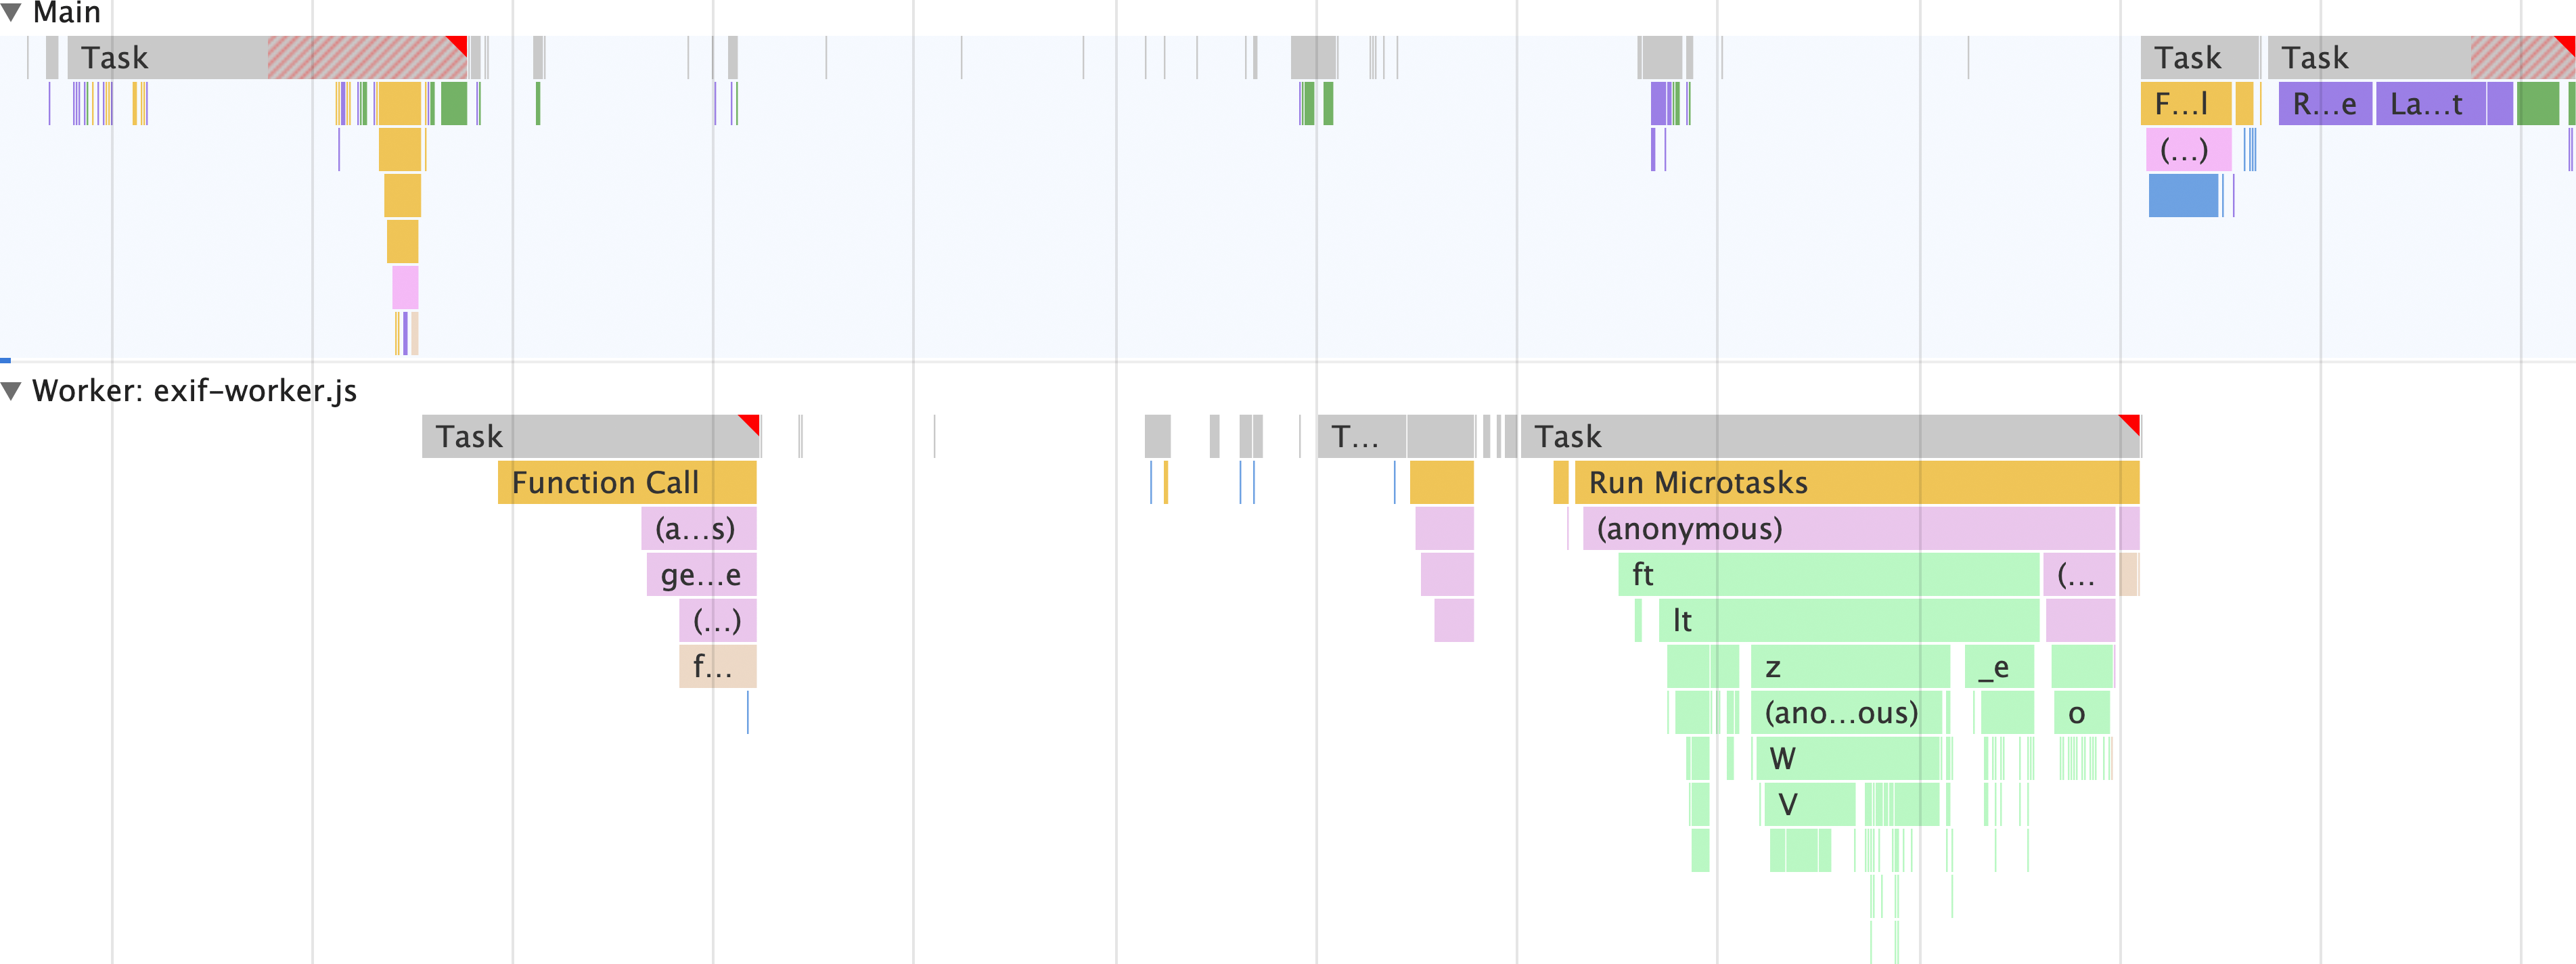
這就是 Web Worker 的強大之處。與其在主執行緒上執行所有作業,不如在獨立執行緒上執行所有作業,但使用 HTML 填入中繼資料檢視器除外。這表示主執行緒已釋出,可執行其他工作。
與未使用 Web Worker 的應用程式版本不同,exif-reader 指令碼不會載入主執行緒,而是載入 Web Worker 執行緒,這或許是最大的優點。也就是說,下載、剖析及編譯 exif-reader 指令碼的成本不會計入主執行緒。
現在來深入瞭解網路工作人員程式碼,瞭解如何實現這一切!
查看 Web Worker 程式碼
光是瞭解網頁工作人員帶來的差異還不夠,至少在這個案例中,您也需要瞭解程式碼的樣貌,才能知道網頁工作人員範圍內有哪些可能性。
首先,請使用必須在網頁背景工作進入畫面之前發生的主執行緒程式碼:
// scripts.js

// Register the Exif reader web worker:
const exifWorker = new Worker('/js/with-worker/exif-worker.js');

// We have to send image requests through this proxy due to CORS limitations:
const imageFetchPrefix = 'https://res.cloudinary.com/demo/image/fetch/';

// Necessary elements we need to select:
const imageFetchPanel = document.getElementById('image-fetch');
const imageExifDataPanel = document.getElementById('image-exif-data');
const exifDataPanel = document.getElementById('exif-data');
const imageInput = document.getElementById('image-url');

// What to do when the form is submitted.
document.getElementById('image-form').addEventListener('submit', event => {
  // Don't let the form submit by default:
  event.preventDefault();

  // Send the image URL to the web worker on submit:
  exifWorker.postMessage(`${imageFetchPrefix}${imageInput.value}`);
});

// This listens for the Exif metadata to come back from the web worker:
exifWorker.addEventListener('message', ({ data }) => {
  // This populates the Exif metadata viewer:
  exifDataPanel.innerHTML = data.message;
  imageFetchPanel.style.display = 'none';
  imageExifDataPanel.style.display = 'block';
});
這段程式碼會在主執行緒上執行,並設定表單,將圖片網址傳送至 Web Worker。從這裡開始,Web Worker 程式碼會先使用 importScripts 陳述式載入外部 exif-reader 指令碼,然後設定與主執行緒的訊息傳輸管道:
// exif-worker.js

// Import the exif-reader script:
importScripts('/js/with-worker/exifreader.js');

// Set up a messaging pipeline to send the Exif data to the `window`:
self.addEventListener('message', ({ data }) => {
  getExifDataFromImage(data).then(status => {
    self.postMessage(status);
  });
});
這段 JavaScript 會設定訊息管道,因此當使用者提交表單並附上 JPEG 檔案的網址時,該網址就會傳送至 Web Worker。接下來,這段程式碼會從 JPEG 檔案中擷取 Exif 中繼資料、建構 HTML 字串,並將該 HTML 傳回 window,最終顯示給使用者:
// Takes a blob to transform the image data into an `ArrayBuffer`:
// NOTE: these promises are simplified for readability, and don't include
// rejections on failures. Check out the complete web worker code:
// https://chrome.dev/learn-performance-exif-worker/js/with-worker/exif-worker.js
const readBlobAsArrayBuffer = blob => new Promise(resolve => {
  const reader = new FileReader();

  reader.onload = () => {
    resolve(reader.result);
  };

  reader.readAsArrayBuffer(blob);
});

// Takes the Exif metadata and converts it to a markup string to
// display in the Exif metadata viewer in the DOM:
const exifToMarkup = exif => Object.entries(exif).map(([exifNode, exifData]) => {
  return `
    <details>
      <summary>
        <h2>${exifNode}</h2>
      </summary>
      <p>${exifNode === 'base64' ? `<img src="data:image/jpeg;base64,${exifData}">` : typeof exifData.value === 'undefined' ? exifData : exifData.description || exifData.value}</p>
    </details>
  `;
}).join('');

// Fetches a partial image and gets its Exif data
const getExifDataFromImage = imageUrl => new Promise(resolve => {
  fetch(imageUrl, {
    headers: {
      // Use a range request to only download the first 64 KiB of an image.
      // This ensures bandwidth isn't wasted by downloading what may be a huge
      // JPEG file when all that's needed is the metadata.
      'Range': `bytes=0-${2 ** 10 * 64}`
    }
  }).then(response => {
    if (response.ok) {
      return response.clone().blob();
    }
  }).then(responseBlob => {
    readBlobAsArrayBuffer(responseBlob).then(arrayBuffer => {
      const tags = ExifReader.load(arrayBuffer, {
        expanded: true
      });

      resolve({
        status: true,
        message: Object.values(tags).map(tag => exifToMarkup(tag)).join('')
      });
    });
  });
});
這份文件內容較多,但這也是網頁工作站相當複雜的用途。不過,這些結果值得付出努力,而且不只適用於這個用途。您可以將網頁工作人員用於各種用途,例如隔離 fetch 呼叫和處理回應、處理大量資料而不封鎖主要執行緒,這只是其中一小部分。
改善網頁應用程式效能時,請先思考網頁工作人員環境中可合理執行的任何作業。這項改善可能帶來顯著效益,並提升網站的整體使用者體驗。