

檔案系統標準引進了來源私有檔案系統 (OPFS),做為頁面來源專用的儲存端點,使用者無法查看,但可選擇存取經過高度效能最佳化的特殊檔案。

瀏覽器支援
新式瀏覽器支援原始私有檔案系統,且 Web 超文字應用程式技術工作組 (WHATWG) 已在檔案系統即時標準中將其標準化。
' d='M96 183a64 64 0 0 1-23-23L17 64a128 128 0 0 0 111 192l55-96a64 64 0 0 1-87 23Z'/%3E%3Cpath fill='url(%23b)' d='M192 128a64 64 0 0 1-9 32l-55 96A128 128 0 0 0 239 64H128a64 64 0 0 1 64 64Z'/%3E%3Ccircle cx='128' cy='128' r='52' fill='%231a73e8'/%3E%3Cpath fill='url(%23c)' d='M96 73a64 64 0 0 1 32-9h111a128 128 0 0 0-222 0l56 96a64 64 0 0 1 23-87Z'/%3E%3C/svg%3E)
' xlink:href='%23A'%3E%3Cstop offset='.76' stop-opacity='0'/%3E%3Cstop offset='.95' stop-opacity='.5'/%3E%3Cstop offset='1'/%3E%3C/radialGradient%3E%3CradialGradient id='F' cx='2523' cy='4680' r='20243' gradientTransform='matrix(-.03715 .99931 -2.12836 -.07913 13579 3530)' xlink:href='%23A'%3E%3Cstop offset='0' stop-color='%2335c1f1'/%3E%3Cstop offset='.11' stop-color='%2334c1ed'/%3E%3Cstop offset='.23' stop-color='%232fc2df'/%3E%3Cstop offset='.31' stop-color='%232bc3d2'/%3E%3Cstop offset='.67' stop-color='%2336c752'/%3E%3C/radialGradient%3E%3CradialGradient id='G' cx='24247' cy='7758' r='9734' gradientTransform='matrix(.28109 .95968 -.78353 .22949 24510 -16292)' xlink:href='%23A'%3E%3Cstop offset='0' stop-color='%2366eb6e'/%3E%3Cstop offset='1' stop-color='%2366eb6e' stop-opacity='0'/%3E%3C/radialGradient%3E%3Cpath id='H' d='M24105 20053a9345 9345 0 01-1053 472 10202 10202 0 01-3590 646c-4732 0-8855-3255-8855-7432 0-1175 680-2193 1643-2729-4280 180-5380 4640-5380 7253 0 7387 6810 8137 8276 8137 791 0 1984-230 2704-456l130-44a12834 12834 0 006660-5282c220-350-168-757-535-565z'/%3E%3Cpath id='I' d='M11571 25141a7913 7913 0 01-2273-2137 8145 8145 0 01-1514-4740 8093 8093 0 013093-6395 8082 8082 0 011373-859c312-148 846-414 1554-404a3236 3236 0 012569 1297 3184 3184 0 01636 1866c0-21 2446-7960-8005-7960-4390 0-8004 4166-8004 7820 0 2319 538 4170 1212 5604a12833 12833 0 007684 6757 12795 12795 0 003908 610c1414 0 2774-233 4045-656a7575 7575 0 01-6278-803z'/%3E%3Cpath id='J' d='M16231 15886c-80 105-330 250-330 566 0 260 170 512 472 723 1438 1003 4149 868 4156 868a5954 5954 0 003027-839 6147 6147 0 001133-850 6180 6180 0 001910-4437c26-2242-796-3732-1133-4392-2120-4141-6694-6525-11668-6525-7011 0-12703 5635-12798 12620 47-3654 3679-6605 7996-6605 350 0 2346 34 4200 1007 1634 858 2490 1894 3086 2921 618 1067 728 2415 728 2952s-271 1333-780 1990z'/%3E%3Cuse fill='url(%23B)' xlink:href='%23H'/%3E%3Cuse fill='url(%23D)' opacity='.35' xlink:href='%23H'/%3E%3Cuse fill='url(%23C)' xlink:href='%23I'/%3E%3Cuse fill='url(%23E)' opacity='.4' xlink:href='%23I'/%3E%3Cuse fill='url(%23F)' xlink:href='%23J'/%3E%3Cuse fill='url(%23G)' xlink:href='%23J'/%3E%3C/svg%3E)
' gradientUnits='userSpaceOnUse'%3E%3Cstop offset='.2' stop-color='%239059ff' stop-opacity='0'/%3E%3Cstop offset='.3' stop-color='%238c4ff3' stop-opacity='.1'/%3E%3Cstop offset='.8' stop-color='%237716a8' stop-opacity='.5'/%3E%3Cstop offset='1' stop-color='%236e008b' stop-opacity='.6'/%3E%3C/radialGradient%3E%3CradialGradient id='ff-g' cx='239.1' cy='34.6' r='171.6' gradientUnits='userSpaceOnUse'%3E%3Cstop offset='0' stop-color='%23ffe226'/%3E%3Cstop offset='.1' stop-color='%23ffdb27'/%3E%3Cstop offset='.3' stop-color='%23ffc82a'/%3E%3Cstop offset='.5' stop-color='%23ffa930'/%3E%3Cstop offset='.7' stop-color='%23ff7e37'/%3E%3Cstop offset='.8' stop-color='%23ff7139'/%3E%3C/radialGradient%3E%3CradialGradient id='ff-h' cx='374' cy='-74.3' r='732.2' gradientUnits='userSpaceOnUse'%3E%3Cstop offset='.1' stop-color='%23fff44f'/%3E%3Cstop offset='.5' stop-color='%23ff980e'/%3E%3Cstop offset='.6' stop-color='%23ff5634'/%3E%3Cstop offset='.7' stop-color='%23ff3647'/%3E%3Cstop offset='.9' stop-color='%23e31587'/%3E%3C/radialGradient%3E%3CradialGradient id='ff-i' cx='304.6' cy='7.1' r='536.4' gradientTransform='rotate(84 303 4)' gradientUnits='userSpaceOnUse'%3E%3Cstop offset='0' stop-color='%23fff44f'/%3E%3Cstop offset='.1' stop-color='%23ffe847'/%3E%3Cstop offset='.2' stop-color='%23ffc830'/%3E%3Cstop offset='.3' stop-color='%23ff980e'/%3E%3Cstop offset='.4' stop-color='%23ff8b16'/%3E%3Cstop offset='.5' stop-color='%23ff672a'/%3E%3Cstop offset='.6' stop-color='%23ff3647'/%3E%3Cstop offset='.7' stop-color='%23e31587'/%3E%3C/radialGradient%3E%3CradialGradient id='ff-j' cx='235' cy='98.1' r='457.1' gradientUnits='userSpaceOnUse'%3E%3Cstop offset='.1' stop-color='%23fff44f'/%3E%3Cstop offset='.5' stop-color='%23ff980e'/%3E%3Cstop offset='.6' stop-color='%23ff5634'/%3E%3Cstop offset='.7' stop-color='%23ff3647'/%3E%3Cstop offset='.9' stop-color='%23e31587'/%3E%3C/radialGradient%3E%3CradialGradient id='ff-k' cx='355.7' cy='124.9' r='500.3' gradientUnits='userSpaceOnUse'%3E%3Cstop offset='.1' stop-color='%23fff44f'/%3E%3Cstop offset='.2' stop-color='%23ffe141'/%3E%3Cstop offset='.5' stop-color='%23ffaf1e'/%3E%3Cstop offset='.6' stop-color='%23ff980e'/%3E%3C/radialGradient%3E%3ClinearGradient id='ff-a' x1='446.9' y1='76.8' x2='47.9' y2='461.8' gradientUnits='userSpaceOnUse'%3E%3Cstop offset='.1' stop-color='%23fff44f'/%3E%3Cstop offset='.1' stop-color='%23ffe847'/%3E%3Cstop offset='.2' stop-color='%23ffc830'/%3E%3Cstop offset='.4' stop-color='%23ff980e'/%3E%3Cstop offset='.4' stop-color='%23ff8b16'/%3E%3Cstop offset='.5' stop-color='%23ff672a'/%3E%3Cstop offset='.5' stop-color='%23ff3647'/%3E%3Cstop offset='.7' stop-color='%23e31587'/%3E%3C/linearGradient%3E%3ClinearGradient id='ff-l' x1='442.1' y1='74.8' x2='102.6' y2='414.3' gradientUnits='userSpaceOnUse'%3E%3Cstop offset='.2' stop-color='%23fff44f' stop-opacity='.8'/%3E%3Cstop offset='.3' stop-color='%23fff44f' stop-opacity='.6'/%3E%3Cstop offset='.5' stop-color='%23fff44f' stop-opacity='.2'/%3E%3Cstop offset='.6' stop-color='%23fff44f' stop-opacity='0'/%3E%3C/linearGradient%3E%3C/defs%3E%3Cpath d='M479 166c-11-25-32-52-49-60a249 249 0 0 1 25 73c-27-68-73-95-111-155a255 255 0 0 1-8-14 44 44 0 0 1-4-9 1 1 0 0 0 0-1 1 1 0 0 0-1 0c-60 35-81 101-83 134a120 120 0 0 0-66 25 71 71 0 0 0-6-5 111 111 0 0 1-1-58c-25 11-44 29-58 44-9-12-9-52-8-60l-8 4a175 175 0 0 0-24 21 210 210 0 0 0-22 26 203 203 0 0 0-32 73l-1 2-2 15a229 229 0 0 0-4 34v1a240 240 0 0 0 477 40l1-9c5-41 0-84-15-121zM202 355l3 1-3-1zm55-145zm198-31z' fill='url(%23ff-a)'/%3E%3Cpath d='M479 166c-11-25-32-52-49-60 14 26 22 53 25 72v1a207 207 0 0 1-206 279c-113-3-212-87-231-197-3-17 0-26 2-40-2 11-3 14-4 34v1a240 240 0 0 0 477 40l1-9c5-41 0-84-15-121z' fill='url(%23ff-b)'/%3E%3Cpath d='M479 166c-11-25-32-52-49-60 14 26 22 53 25 72v1a207 207 0 0 1-206 279c-113-3-212-87-231-197-3-17 0-26 2-40-2 11-3 14-4 34v1a240 240 0 0 0 477 40l1-9c5-41 0-84-15-121z' fill='url(%23ff-c)'/%3E%3Cpath d='m362 195 1 1a130 130 0 0 0-22-29C266 92 322 5 331 0c-60 35-81 101-83 134l9-1c45 0 84 25 105 62z' fill='url(%23ff-d)'/%3E%3Cpath d='M257 210c-1 6-22 26-29 26-68 0-80 41-80 41 3 35 28 64 57 79l4 2 7 3a107 107 0 0 0 31 6c120 6 143-143 57-186 22-4 45 5 58 14-21-37-60-62-105-62l-9 1a120 120 0 0 0-66 25l17 16c16 16 58 33 58 35z' fill='url(%23ff-e)'/%3E%3Cpath d='M257 210c-1 6-22 26-29 26-68 0-80 41-80 41 3 35 28 64 57 79l4 2 7 3a107 107 0 0 0 31 6c120 6 143-143 57-186 22-4 45 5 58 14-21-37-60-62-105-62l-9 1a120 120 0 0 0-66 25l17 16c16 16 58 33 58 35z' fill='url(%23ff-f)'/%3E%3Cpath d='m171 151 5 3a111 111 0 0 1-1-58c-25 11-44 29-58 44 1 0 36 0 54 11z' fill='url(%23ff-g)'/%3E%3Cpath d='M18 261a242 242 0 0 0 231 197 207 207 0 0 0 206-279c8 56-20 110-64 146-86 71-169 43-186 31l-3-1c-50-24-71-70-67-110-42 0-57-35-57-35s38-28 89-4c46 22 90 4 90 4 0-2-42-19-58-35l-17-16a71 71 0 0 0-6-5l-5-3c-18-11-52-11-54-11-9-12-9-51-8-60l-8 4a175 175 0 0 0-24 21 210 210 0 0 0-22 26 203 203 0 0 0-32 73c0 1-9 38-5 57z' fill='url(%23ff-h)'/%3E%3Cpath d='M341 167a130 130 0 0 1 22 29 46 46 0 0 1 4 3c55 50 26 121 24 126 44-36 72-90 64-146-27-68-73-95-111-155a255 255 0 0 1-8-14 44 44 0 0 1-4-9 1 1 0 0 0 0-1 1 1 0 0 0-1 0c-9 5-65 92 10 167z' fill='url(%23ff-i)'/%3E%3Cpath d='M367 199a46 46 0 0 0-4-3l-1-1c-13-9-36-18-58-15 86 44 63 193-57 187a107 107 0 0 1-31-6 131 131 0 0 1-11-5c17 12 99 39 186-31 2-5 31-76-24-126z' fill='url(%23ff-j)'/%3E%3Cpath d='M148 277s12-41 80-41c7 0 28-20 29-26s-44 18-90-4c-51-24-89 4-89 4s15 35 57 35c-4 40 16 85 67 110l3 1c-29-15-54-44-57-79z' fill='url(%23ff-k)'/%3E%3Cpath d='M479 166c-11-25-32-52-49-60a249 249 0 0 1 25 73c-27-68-73-95-111-155a255 255 0 0 1-8-14 44 44 0 0 1-4-9 1 1 0 0 0 0-1 1 1 0 0 0-1 0c-60 35-81 101-83 134l9-1c45 0 84 25 105 62-13-9-36-18-58-14 86 43 63 192-57 186a107 107 0 0 1-31-6 131 131 0 0 1-11-5l-3-1 3 1c-29-15-54-44-57-79 0 0 12-41 80-41 7 0 28-20 29-26 0-2-42-19-58-35l-17-16a71 71 0 0 0-6-5 111 111 0 0 1-1-58c-25 11-44 29-58 44-9-12-9-52-8-60l-8 4a175 175 0 0 0-24 21 210 210 0 0 0-22 26 203 203 0 0 0-32 73l-1 2-2 15a279 279 0 0 0-4 34v1a240 240 0 0 0 477 40l1-9c5-41 0-84-15-121zm-24 13z' fill='url(%23ff-l)'/%3E%3C/svg%3E)
' xlink:href='%23s-b'%3E%3Cstop offset='0' stop-color='%2324a5f3' stop-opacity='0' /%3E%3Cstop offset='1' stop-color='%231e8ceb' /%3E%3C/radialGradient%3E%3CradialGradient id='s-j' cx='109.3' cy='13.8' r='93.1' gradientTransform='matrix(-.02 1.1 -1.04 -.02 137 -115)' xlink:href='%23s-b'%3E%3Cstop offset='0' stop-opacity='0' /%3E%3Cstop offset='1' stop-color='%235488d6' stop-opacity='0' /%3E%3Cstop offset='1' stop-color='%235d96eb' /%3E%3C/radialGradient%3E%3C/defs%3E%3Crect width='220' height='220' x='22' y='-107' fill='url(%23s-a)' ry='49' transform='matrix(.57 0 0 .57 187 256)' /%3E%3Cg transform='translate(194 190)'%3E%3Ccircle cx='67.8' cy='67.7' fill='url(%23s-c)' paint-order='stroke fill markers' r='54' /%3E%3Ccircle cx='-69.9' cy='69.3' fill='url(%23s-i)' transform='translate(138 -2)' r='54' /%3E%3C/g%3E%3Cellipse cx='120' cy='14.2' fill='url(%23s-j)' rx='93.1' ry='93.7' transform='matrix(.58 0 0 .58 192 250)' /%3E%3Cg transform='matrix(.58 0 0 .57 197 182)'%3E%3Cpath fill='%23cac7c8' d='M46 192h1l72-48-7-9-66 57Z' /%3E%3Cpath fill='%23fbfffc' d='M46 191v1l66-57-7-9-59 65Z' /%3E%3Cpath fill='url(%23s-d)' d='m119 144-7-9 66-57-59 66Z' /%3E%3Cpath fill='%23fb645c' d='m105 126 7 9 66-57-1-1-72 49Z' /%3E%3C/g%3E%3Cpath stroke='%23fff' stroke-linecap='round' stroke-miterlimit='1' stroke-width='1.3' d='m287 278 3-2m-12-17 8-2m-8-3h4m-4-13 8 2m-8 3h4m-1-13 7 3m-4-11 7 4m-2-11 6 6m0-12 6 7m1-11 4 6m4-10 3 7m5-9 2 7m15-7-1 7m10-5-3 7m11-4-4 7m11-2-5 6m16 7-7 4m10 4-7 3m10 6-8 1m8 16-8-2m5 10-7-3m4 11-7-4m2 11-6-5m0 11-5-6m-2 11-4-7m-4 11-3-8m-6 10-1-8m-16 8 2-8m-10 5 3-7m-11 4 4-7m-11 2 5-6m-8 3 3-3m4 8 2-3m5 8 2-4m6 7 1-4m8 5v-4m8 4v-4m9 3-1-4m9 1-2-4m9 0-2-4m9-2-3-3m8-4-3-2m8-5-4-2m7-6-4-1m5-8h-4m4-8h-4m3-9-4 1m1-9-4 2m-1-9-3 2m-2-9-3 3m-4-8-2 3m-5-8-2 4m-6-6-1 3m-8-5v4m-8-4v4m-9-2 1 3m-9 0 2 3m-9 1 2 3m-9 2 3 3m-8 4 3 2m-8 5 4 2m-7 6 4 1m-4 25 4-1m-2 5 7-3m-6 7 4-2m-2 6 7-4m-13-21h8m41-41v-8m0 99v-8m49-42h-8' transform='translate(-65 8)' /%3E%3C/svg%3E)
動機
提到電腦上的檔案,您可能會想到檔案階層:檔案整理在資料夾中,您可以使用作業系統的檔案總管瀏覽。舉例來說,在 Windows 上,使用者 Tom 的待辦事項清單可能位於 C:\Users\Tom\Documents\ToDo.txt。在這個範例中,ToDo.txt 是檔案名稱,Users、Tom 和 Documents 則是資料夾名稱。在 Windows 上,`C:` 代表磁碟機的根目錄。
在網路上處理檔案的傳統方式
如要在網頁應用程式中編輯待辦事項清單,一般流程如下:
- 使用者將檔案上傳至伺服器,或在用戶端上使用
<input type="file">開啟檔案。 - 使用者進行變更,然後下載產生的檔案,其中包含您透過 JavaScript 以程式輔助方式
click()插入的<a download="ToDo.txt>。 - 如要開啟資料夾,請使用
<input type="file" webkitdirectory>中的特殊屬性。雖然名稱是專有屬性,但實際上幾乎所有瀏覽器都支援。
透過新式方式在網路上處理檔案
這個流程無法代表使用者編輯檔案的方式,而且使用者最終會下載輸入檔案的副本。因此,File System Access API 推出了三種選擇器方法:showOpenFilePicker()、showSaveFilePicker() 和 showDirectoryPicker(),可執行名稱所指的動作。這些選項可啟用下列流程:
- 使用
showOpenFilePicker()開啟ToDo.txt,並取得FileSystemFileHandle物件。 - 從
FileSystemFileHandle物件中,呼叫檔案控點的getFile()方法,取得File。 - 修改檔案,然後在控制代碼上呼叫
requestPermission({mode: 'readwrite'})。 - 如果使用者接受權限要求,請將變更儲存回原始檔案。
- 或者,呼叫
showSaveFilePicker(),讓使用者挑選新檔案。(如果使用者選擇先前開啟的檔案,系統會覆寫該檔案的內容)。如要重複儲存,可以保留檔案控制代碼,這樣就不必再次顯示檔案儲存對話方塊。
在網路上處理檔案的限制
透過這些方法存取的檔案和資料夾位於「使用者可見」的檔案系統中。從網路儲存的檔案 (尤其是可執行檔) 會標示網路標記,因此作業系統會在執行可能有害的檔案前顯示額外警告。此外,從網路取得的檔案也會受到安全瀏覽保護,您可以將這項功能視為雲端病毒掃描,方便理解本文內容。使用 File System Access API 將資料寫入檔案時,系統不會就地寫入,而是使用暫存檔案。除非檔案通過所有安全性檢查,否則不會遭到修改。可想而知,儘管我們盡可能改善,例如在 macOS 上,這項工作仍會導致檔案作業相對緩慢。不過,每個 write() 呼叫都是獨立的,因此在幕後會開啟檔案、搜尋指定位移,最後寫入資料。
以檔案為處理基礎
同時,檔案也是記錄資料的絕佳方式。舉例來說,SQLite 會將整個資料庫儲存在單一檔案中。另一個例子是圖片處理中使用的 mipmap。mipmap 是預先計算的圖片最佳化序列,每個圖片都是前一個圖片的漸進式低解析度表示法,因此可加快許多作業 (例如縮放)。那麼,網頁應用程式如何才能享有檔案的優點,同時避免網頁型檔案處理作業的效能成本?答案是原始私有檔案系統。
使用者可見的檔案系統與來源私有檔案系統
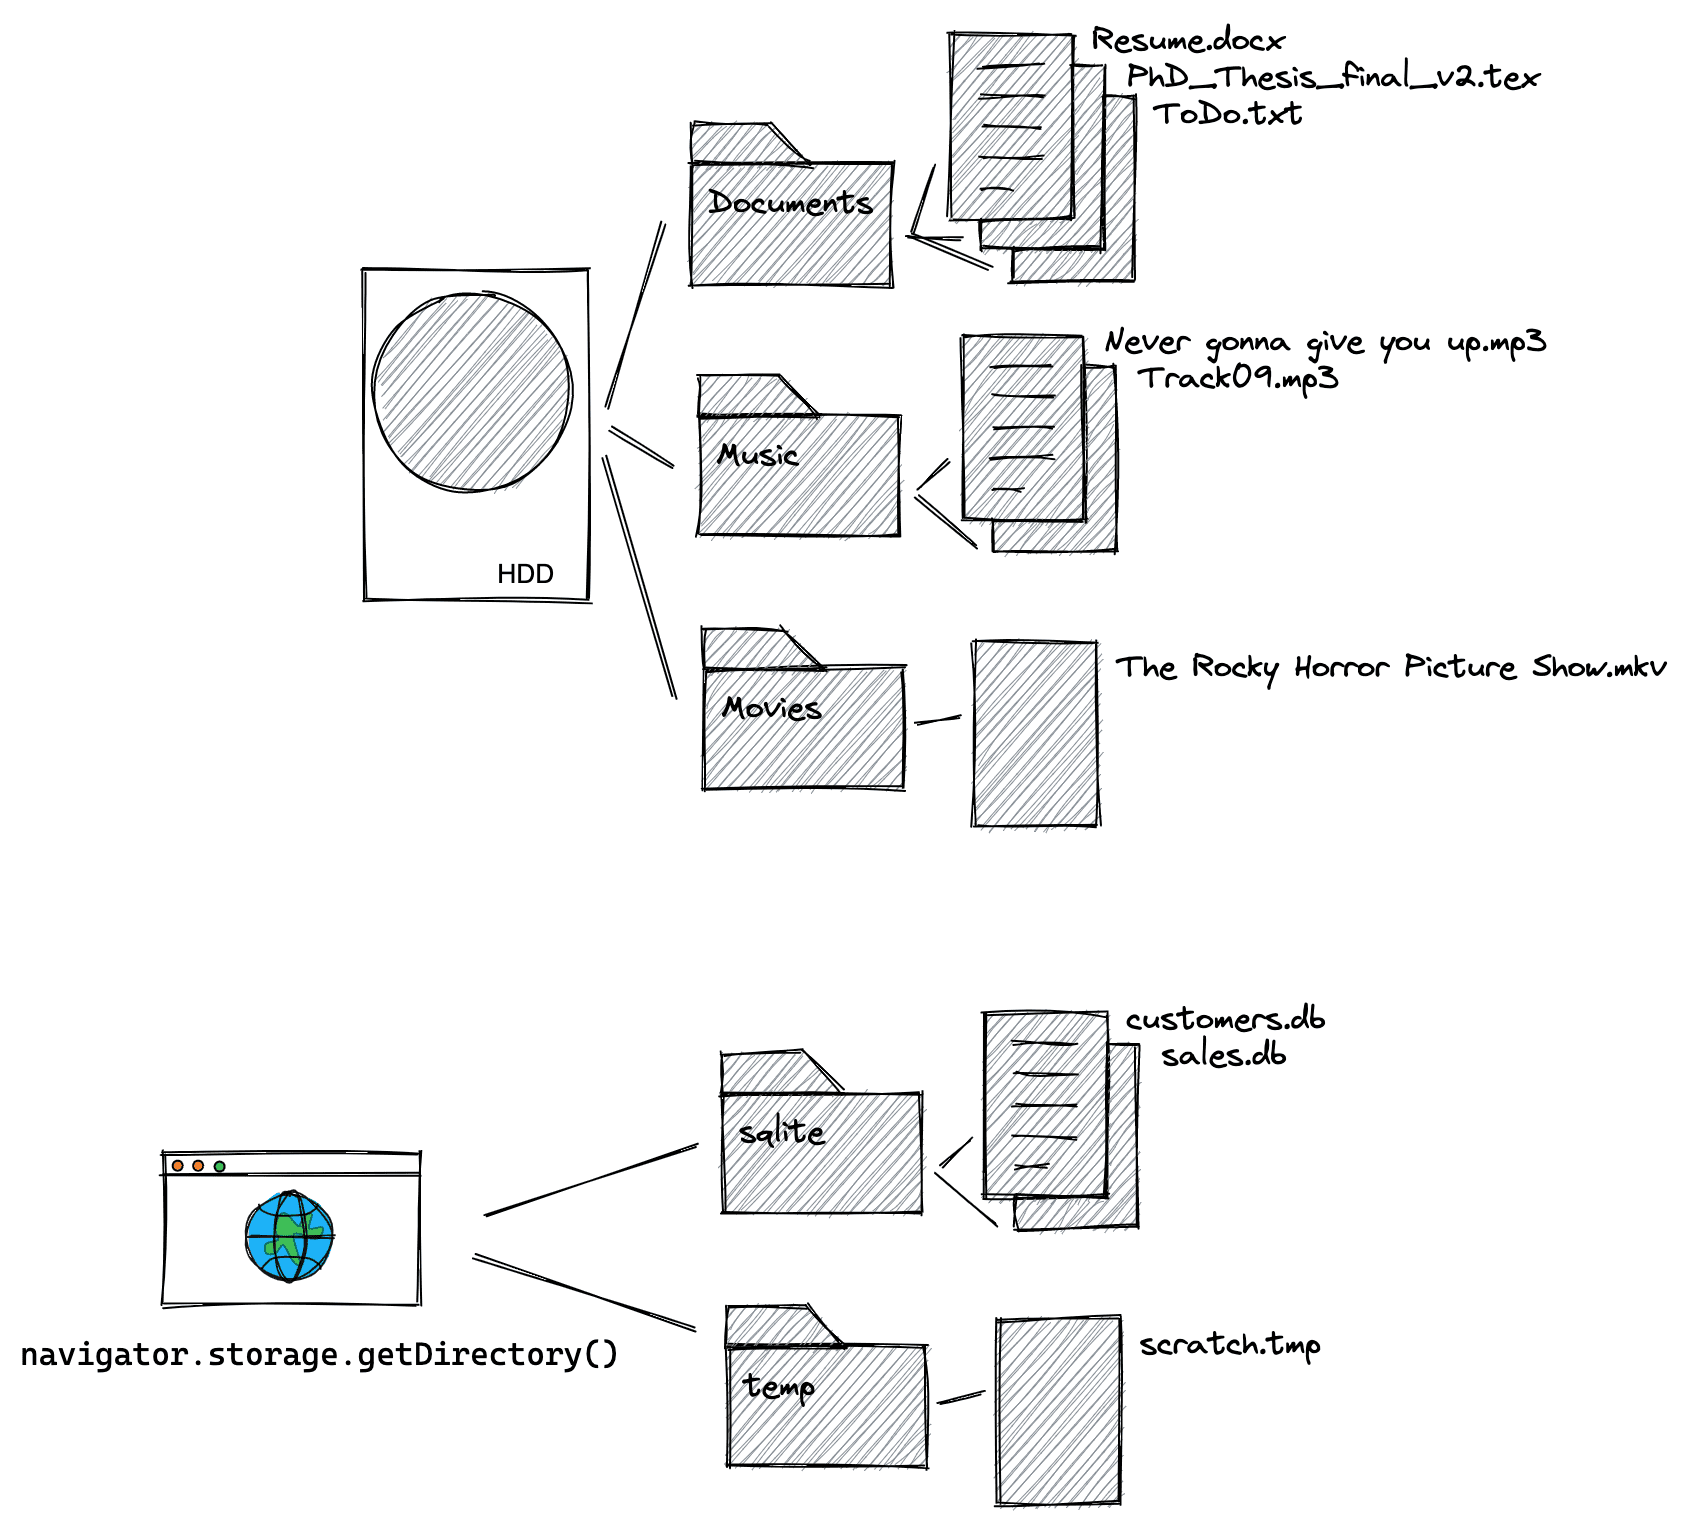
與使用者可見的檔案系統不同 (可透過作業系統的檔案總管瀏覽,並讀取、寫入、移動及重新命名檔案和資料夾),原始私有檔案系統不適合使用者查看。顧名思義,來源私有檔案系統中的檔案和資料夾是私有的,更具體來說,是網站來源的私有檔案。在開發人員工具控制台中輸入 location.origin,即可找出網頁的來源。舉例來說,網頁 https://developer.chrome.com/articles/ 的來源是 https://developer.chrome.com (也就是說,/articles 部分不屬於來源)。如要進一步瞭解來源理論,請參閱「瞭解『同網站』和『同來源』」。凡是共用相同來源的網頁,都能看到相同來源的私有檔案系統資料,因此 https://developer.chrome.com/docs/extensions/mv3/getstarted/extensions-101/ 可以看到與上一個範例相同的詳細資料。每個來源都有各自獨立的來源私有檔案系統,也就是說,https://developer.chrome.com 的來源私有檔案系統與 https://web.dev 的來源私有檔案系統完全不同。在 Windows 中,使用者可見檔案系統的根目錄為 C:\\。
原始私人檔案系統的對等項目是每個來源的初始空白根目錄,可透過呼叫非同步方法 navigator.storage.getDirectory() 存取。如要比較使用者可見的檔案系統和來源私有檔案系統,請參閱下圖。從圖中可以看出,除了根目錄外,其他所有項目在概念上都相同,您可視資料和儲存空間需求,以檔案和資料夾階層來整理及安排。
來源私有檔案系統的具體細節
與瀏覽器中的其他儲存機制 (例如 localStorage 或 IndexedDB) 相同,來源私人檔案系統也受瀏覽器配額限制。使用者清除所有瀏覽資料或所有網站資料時,來源私有檔案系統也會一併刪除。呼叫 navigator.storage.estimate(),並在產生的回應物件中查看 usage 項目,瞭解應用程式已耗用的儲存空間量,這會依 usageDetails 物件中的儲存空間機制細分,您應特別查看 fileSystem 項目。由於使用者看不到來源私有檔案系統,因此不會出現權限提示,也不會進行安全瀏覽檢查。
取得根目錄的存取權
如要存取根目錄,請執行下列指令。您會得到空白目錄控制代碼,更具體來說是 FileSystemDirectoryHandle。
const opfsRoot = await navigator.storage.getDirectory();
// A FileSystemDirectoryHandle whose type is "directory"
// and whose name is "".
console.log(opfsRoot);
主執行緒或 Web Worker
使用來源私人檔案系統的方式有兩種:在主執行緒或 Web Worker 中。Web Worker 無法封鎖主執行緒,因此在此情況下,API 可以是同步,這是在主執行緒上通常不允許的模式。同步 API 可以更快,因為不必處理 Promise,而且在可編譯為 WebAssembly 的 C 等語言中,檔案作業通常是同步的。
// This is synchronous C code.
FILE *f;
f = fopen("example.txt", "w+");
fputs("Some text\n", f);
fclose(f);
如果您需要盡快完成檔案作業,或是處理 WebAssembly,請跳到「在 Web Worker 中使用來源私有檔案系統」。否則請繼續閱讀。
在主執行緒中使用來源私人檔案系統
建立新檔案和資料夾
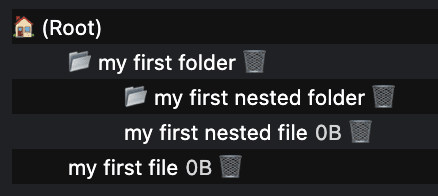
建立根資料夾後,請分別使用 getFileHandle() 和 getDirectoryHandle() 方法建立檔案和資料夾。如果傳遞 {create: true},系統會建立檔案或資料夾 (如果不存在)。以新建立的目錄做為起點,呼叫這些函式來建構檔案階層。
const fileHandle = await opfsRoot
    .getFileHandle('my first file', {create: true});
const directoryHandle = await opfsRoot
    .getDirectoryHandle('my first folder', {create: true});
const nestedFileHandle = await directoryHandle
    .getFileHandle('my first nested file', {create: true});
const nestedDirectoryHandle = await directoryHandle
    .getDirectoryHandle('my first nested folder', {create: true});
存取現有檔案和資料夾
如果您知道檔案或資料夾名稱,可以呼叫 getFileHandle() 或 getDirectoryHandle() 方法,並傳入檔案或資料夾名稱,存取先前建立的檔案和資料夾。
const existingFileHandle = await opfsRoot.getFileHandle('my first file');
const existingDirectoryHandle = await opfsRoot
    .getDirectoryHandle('my first folder');
取得與檔案控制代碼相關聯的檔案以供讀取
FileSystemFileHandle 代表檔案系統中的檔案。如要取得相關聯的 File,請使用 getFile() 方法。File 物件是特定類型的 Blob,可用於 Blob 可用的任何環境。特別是 FileReader、URL.createObjectURL()、createImageBitmap() 和 XMLHttpRequest.send() 同時接受 Blobs 和 Files。取得 FileSystemFileHandle 後,資料就會「釋出」,因此您可以存取資料,並提供給使用者可見的檔案系統。File
const file = await fileHandle.getFile();
console.log(await file.text());
透過串流寫入檔案
呼叫 createWritable() 將資料串流至檔案,這會建立 FileSystemWritableFileStream,然後您會 write() 內容。最後,您需要close()串流。
const contents = 'Some text';
// Get a writable stream.
const writable = await fileHandle.createWritable();
// Write the contents of the file to the stream.
await writable.write(contents);
// Close the stream, which persists the contents.
await writable.close();
刪除檔案和資料夾
呼叫檔案或目錄控制代碼的特定 remove() 方法,即可刪除檔案和資料夾。如要刪除資料夾 (包括所有子資料夾),請傳遞 {recursive: true} 選項。
await fileHandle.remove();
await directoryHandle.remove({recursive: true});
或者,如果您知道要刪除的檔案或資料夾名稱,可以使用 removeEntry() 方法。
directoryHandle.removeEntry('my first nested file');
移動及重新命名檔案和資料夾
使用 move() 方法重新命名及移動檔案和資料夾。移動和重新命名可以同時進行,也可以分開進行。
// Rename a file.
await fileHandle.move('my first renamed file');
// Move a file to another directory.
await fileHandle.move(nestedDirectoryHandle);
// Move a file to another directory and rename it.
await fileHandle
    .move(nestedDirectoryHandle, 'my first renamed and now nested file');
解析檔案或資料夾的路徑
如要瞭解指定檔案或資料夾相對於參照目錄的位置,請使用 resolve() 方法,並將 FileSystemHandle 做為引數傳遞。如要取得來源私有檔案系統中檔案或資料夾的完整路徑,請使用透過 navigator.storage.getDirectory() 取得的根目錄做為參考目錄。
const relativePath = await opfsRoot.resolve(nestedDirectoryHandle);
// `relativePath` is `['my first folder', 'my first nested folder']`.
檢查兩個檔案或資料夾控制代碼是否指向同一個檔案或資料夾
有時您會有兩個控制代碼,但不知道是否指向相同檔案或資料夾。如要確認是否為這種情況,請使用 isSameEntry() 方法。
fileHandle.isSameEntry(nestedFileHandle);
// Returns `false`.
列出資料夾內容
FileSystemDirectoryHandle 是 非同步疊代器,您可以使用 for await…of 迴圈疊代。做為非同步疊代器,它也支援 entries()、values() 和 keys() 方法,您可以根據所需資訊選擇:
for await (let [name, handle] of directoryHandle) {}
for await (let [name, handle] of directoryHandle.entries()) {}
for await (let handle of directoryHandle.values()) {}
for await (let name of directoryHandle.keys()) {}
以遞迴方式列出資料夾和所有子資料夾的內容
處理非同步迴圈和與遞迴配對的函式時,很容易出錯。以下函式可做為起點,列出資料夾及其所有子資料夾的內容,包括所有檔案及其大小。如果不需要檔案大小,可以簡化函式,在顯示 directoryEntryPromises.push 的位置,不要推送 handle.getFile() 承諾,而是直接推送 handle。
  const getDirectoryEntriesRecursive = async (
    directoryHandle,
    relativePath = '.',
  ) => {
    const fileHandles = [];
    const directoryHandles = [];
    const entries = {};
    // Get an iterator of the files and folders in the directory.
    const directoryIterator = directoryHandle.values();
    const directoryEntryPromises = [];
    for await (const handle of directoryIterator) {
      const nestedPath = `${relativePath}/${handle.name}`;
      if (handle.kind === 'file') {
        fileHandles.push({ handle, nestedPath });
        directoryEntryPromises.push(
          handle.getFile().then((file) => {
            return {
              name: handle.name,
              kind: handle.kind,
              size: file.size,
              type: file.type,
              lastModified: file.lastModified,
              relativePath: nestedPath,
              handle
            };
          }),
        );
      } else if (handle.kind === 'directory') {
        directoryHandles.push({ handle, nestedPath });
        directoryEntryPromises.push(
          (async () => {
            return {
              name: handle.name,
              kind: handle.kind,
              relativePath: nestedPath,
              entries:
                  await getDirectoryEntriesRecursive(handle, nestedPath),
              handle,
            };
          })(),
        );
      }
    }
    const directoryEntries = await Promise.all(directoryEntryPromises);
    directoryEntries.forEach((directoryEntry) => {
      entries[directoryEntry.name] = directoryEntry;
    });
    return entries;
  };
在 Web Worker 中使用來源私人檔案系統
如先前所述,Web Worker 無法封鎖主要執行緒,因此允許使用同步方法。
取得同步存取控制代碼
如要以最快速度執行檔案作業,請使用 FileSystemSyncAccessHandle,並透過呼叫 createSyncAccessHandle() 從一般 FileSystemFileHandle 取得。
const fileHandle = await opfsRoot
    .getFileHandle('my highspeed file.txt', {create: true});
const syncAccessHandle = await fileHandle.createSyncAccessHandle();
同步就地檔案方法
取得同步存取控制代碼後,您就能存取所有同步的快速就地檔案方法。
getSize():傳回檔案大小 (以位元組為單位)。write():將緩衝區的內容寫入檔案 (可選擇指定偏移),並傳回寫入的位元組數。檢查傳回的寫入位元組數,可讓呼叫端偵測及處理錯誤和部分寫入作業。read():將檔案內容讀取到緩衝區,可選擇是否要指定偏移量。truncate():將檔案大小調整為指定大小。flush():確保檔案內容包含透過write()完成的所有修改。close():關閉存取控制代碼。
以下範例會使用上述所有方法。
const opfsRoot = await navigator.storage.getDirectory();
const fileHandle = await opfsRoot.getFileHandle('fast', {create: true});
const accessHandle = await fileHandle.createSyncAccessHandle();

const textEncoder = new TextEncoder();
const textDecoder = new TextDecoder();

// Initialize this variable for the size of the file.
let size;
// The current size of the file, initially `0`.
size = accessHandle.getSize();
// Encode content to write to the file.
const content = textEncoder.encode('Some text');
// Write the content at the beginning of the file.
accessHandle.write(content, {at: size});
// Flush the changes.
accessHandle.flush();
// The current size of the file, now `9` (the length of "Some text").
size = accessHandle.getSize();

// Encode more content to write to the file.
const moreContent = textEncoder.encode('More content');
// Write the content at the end of the file.
accessHandle.write(moreContent, {at: size});
// Flush the changes.
accessHandle.flush();
// The current size of the file, now `21` (the length of
// "Some textMore content").
size = accessHandle.getSize();

// Prepare a data view of the length of the file.
const dataView = new DataView(new ArrayBuffer(size));

// Read the entire file into the data view.
accessHandle.read(dataView);
// Logs `"Some textMore content"`.
console.log(textDecoder.decode(dataView));

// Read starting at offset 9 into the data view.
accessHandle.read(dataView, {at: 9});
// Logs `"More content"`.
console.log(textDecoder.decode(dataView));

// Truncate the file after 4 bytes.
accessHandle.truncate(4);
將檔案從原始私有檔案系統複製到使用者可見的檔案系統
如上所述,您無法將檔案從原始私人檔案系統移至使用者可見的檔案系統,但可以複製檔案。由於 showSaveFilePicker() 只會顯示在主執行緒上,不會顯示在 Worker 執行緒中,請務必在主執行緒中執行程式碼。
// On the main thread, not in the Worker. This assumes
// `fileHandle` is the `FileSystemFileHandle` you obtained
// the `FileSystemSyncAccessHandle` from in the Worker
// thread. Be sure to close the file in the Worker thread first.
const fileHandle = await opfsRoot.getFileHandle('fast');
try {
  // Obtain a file handle to a new file in the user-visible file system
  // with the same name as the file in the origin private file system.
  const saveHandle = await showSaveFilePicker({
    suggestedName: fileHandle.name || ''
  });
  const writable = await saveHandle.createWritable();
  await writable.write(await fileHandle.getFile());
  await writable.close();
} catch (err) {
  console.error(err.name, err.message);
}
偵錯來源私有檔案系統
在新增內建開發人員工具支援功能前 (請參閱 crbug/1284595),請使用 OPFS Explorer Chrome 擴充功能偵錯原始私有檔案系統。順帶一提,上方「建立新檔案和資料夾」部分中的螢幕截圖,是直接從擴充功能擷取的。
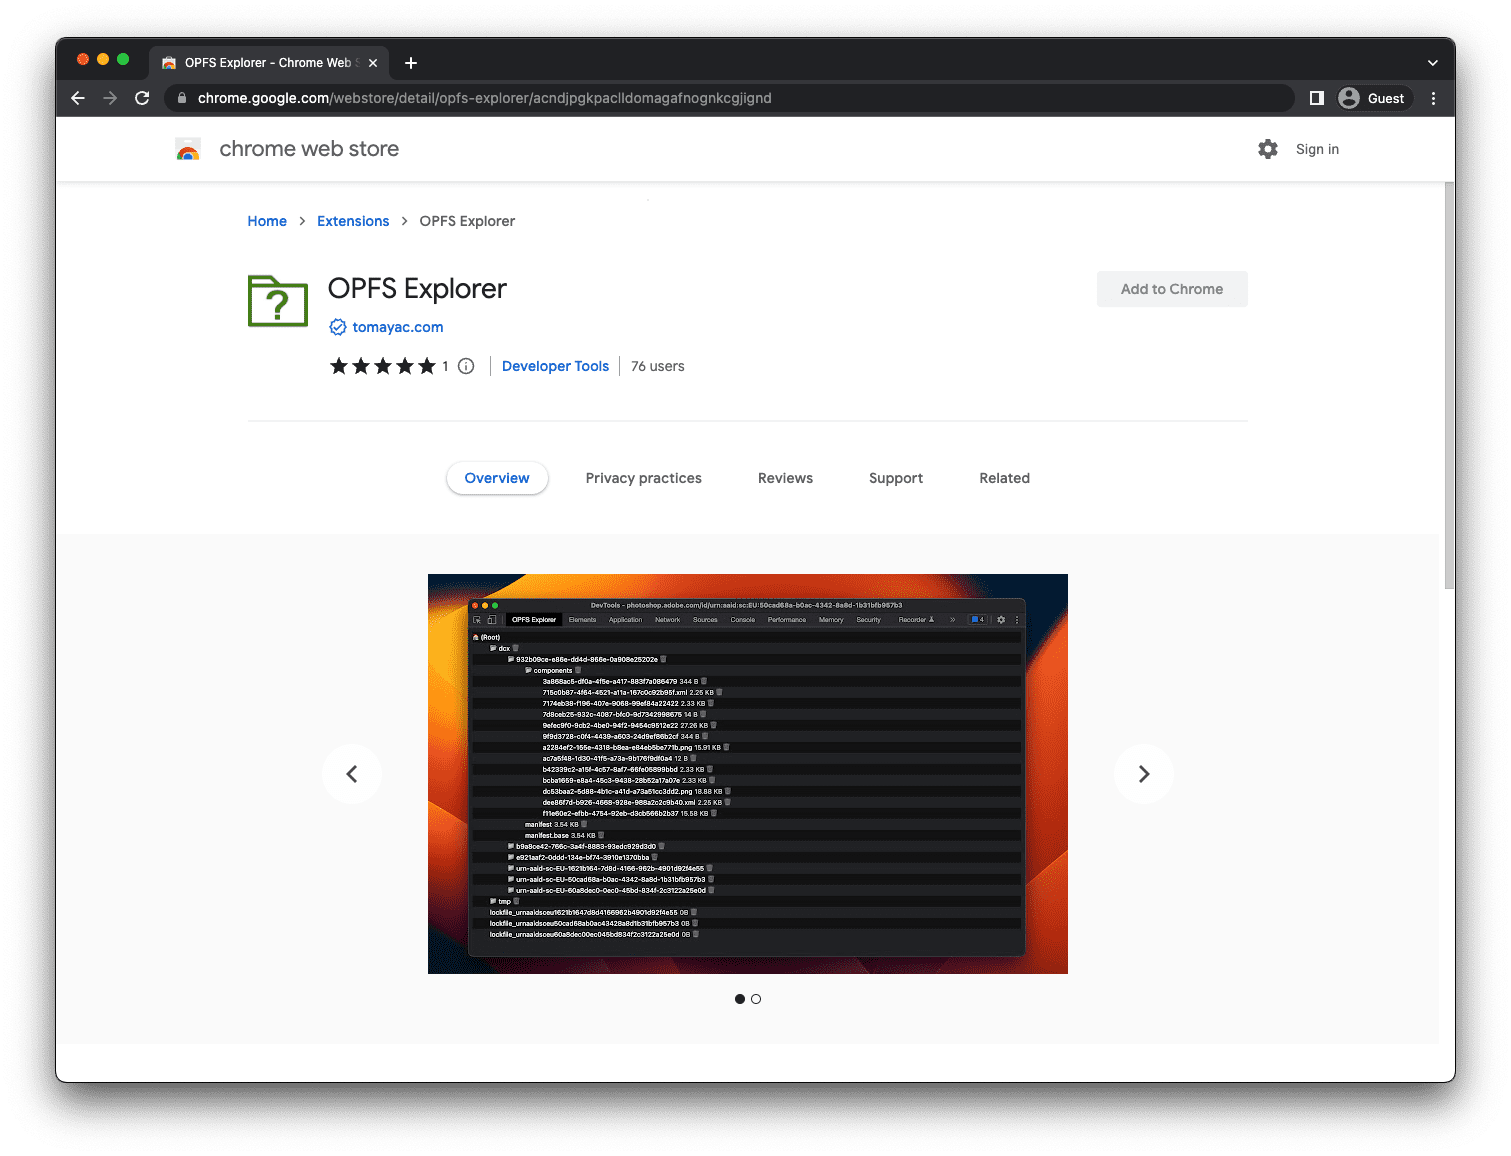
安裝擴充功能後,開啟 Chrome 開發人員工具,選取「OPFS Explorer」分頁標籤,即可檢查檔案階層。按一下檔案名稱,將原始私人檔案系統中的檔案儲存到使用者可見的檔案系統,然後按一下垃圾桶圖示,刪除檔案和資料夾。
示範
在示範中,您可以看到來源私人檔案系統的實際運作情形 (如果安裝 OPFS Explorer 擴充功能),該示範會將來源私人檔案系統做為編譯為 WebAssembly 的 SQLite 資料庫後端。請務必查看 GitHub 上的原始碼。請注意,下方的內嵌版本不會使用原始私人檔案系統後端 (因為 iframe 是跨來源),但您在另一個分頁中開啟這個示範時,就會使用。
結論
WHATWG 指定的原始私有檔案系統,改變了我們在網路上使用及互動檔案的方式。這項技術支援了許多新用途,而這些用途是使用者可見檔案系統無法實現的。Apple、Mozilla 和 Google 等主要瀏覽器供應商都已加入,並分享共同願景。來源私有檔案系統的開發工作需要各方共同努力,開發人員和使用者的意見回饋對進展至關重要。我們會持續改善標準,歡迎透過 Issue 或 Pull Request 的形式,在 whatwg/fs 存放區提供意見回饋。
相關連結
特別銘謝
本文由 Austin Sully、Etienne Noël 和 Rachel Andrew 審查。主頁橫幅圖片來源:Christina Rumpf,Unsplash。