我的背景
我于 2006 年 Firefox v2.0 发布时首次了解到 <canvas>。在 Ajaxian 上看到一篇介绍转换矩阵的文章,这启发了我创建自己的第一个 <canvas> Web 应用:Color Sphere(2007 年)。这让我沉浸在色彩和图形基元的世界中,并激发了我创作 Sketchpad(2007-2008 年),希望在浏览器中打造一款“比 Paint 更好用”的应用。
这些实验最终促成了我与多年好友 Charles Pritchard 共同创办初创公司 Mugtug。我们正在使用 HTML5 <canvas> 开发暗室。Darkroom 是一款无损照片分享应用,将基于像素的滤镜的强大功能与基于矢量的排版和绘图功能相结合。
简介

<canvas> 让 JavaScript 程序员可以完全控制屏幕上的颜色、矢量和像素,即监视器的视觉构成。
以下示例介绍了 <canvas> 中一个尚未受到太多关注的领域:创建文本效果。您可以想象,在 <canvas> 中可以创建的各种文本效果非常丰富 - 这些演示仅涵盖了可实现效果的一小部分。虽然本文中涉及的是“文本”,但这些方法可以应用于任何矢量对象,在游戏和其他应用中创建令人兴奋的视觉效果:
<canvas>中的文本阴影。<canvas>中的类似 CSS 文本效果:创建剪裁遮罩、在<canvas>中查找指标以及使用阴影属性。- 霓虹彩虹、斑马反射 - 链式效果。
- 类似 Photoshop 的文本效果。
<canvas>中的内部阴影和外部阴影- 揭示一项鲜为人知的功能:使用顺时针和逆时针绕线来创建阴影的反向(内阴影)。
- Spaceage - 生成式特效。
- 基于生成式文本效果,使用 hsl() 颜色循环和
window.requestAnimationFrame来营造动感。
<canvas>使用 globalCompositeOperation、createLinearGradient、createPattern 的示例中<canvas> 中的Canvas 中的文本阴影
在 CSS3 规范中,我最喜欢的新增功能之一(除了 border-radius、web-gradients 等)就是能够创建阴影。请务必了解 CSS 阴影和 <canvas> 阴影之间的区别,具体而言:
CSS 使用两种方法:box-shadow 适用于框元素(例如 div、span 等);text-shadow 适用于文本内容。
<canvas> 只有一种阴影;它适用于所有矢量对象:ctx.moveTo、ctx.lineTo、ctx.bezierCurveTo、ctx.quadradicCurveTo、ctx.arc、ctx.rect、ctx.fillText、ctx.strokeText 等。如需在 <canvas> 中创建阴影,请利用以下四个属性:
- ctx.shadowColor = "red" // string
- 阴影的颜色;RGB、RGBA、HSL、十六进制和其他输入均有效。
- ctx.shadowOffsetX = 0; // integer
- 阴影相对于文本的水平距离。
- ctx.shadowOffsetY = 0; // integer
- 阴影相对于文本的垂直距离。
- ctx.shadowBlur = 10; // integer
- 对阴影应用的模糊处理效果,值越大,模糊程度越高。
首先,我们来看看 <canvas> 如何模拟 CSS 效果。
在 Google 图片中搜索“css text-shadow”后,我们找到了一些非常棒的演示,可以用来仿效:Line25、立体和阴影 3D。
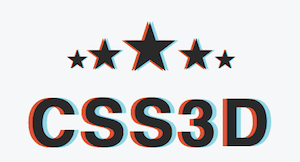
立体 3D 效果(如需了解详情,请参阅立体图像)就是一行简单代码的绝佳用例。通过以下 CSS 代码,我们可以通过 3D 红/青色眼镜(3D 电影院发放的那种)营造出深度错觉:
text-shadow: -0.06em 0 0 red, 0.06em 0 0 cyan;
将此字符串转换为 <canvas> 时,需要注意以下两点:
- 没有 shadow-blur(第三个值),因此没有理由实际运行 shadow,因为 fillText 会产生相同的结果:
var text = "Hello world!"
ctx.fillStyle = "#000"
ctx.fillText(text, -7, 0);
ctx.fillStyle = "red"
ctx.fillText(text, 0, 0);
ctx.fillStyle = "cyan"
ctx.fillText(text, 7, 0);</pre>
<canvas>不支持 EM,因此必须将其转换为 PX。我们可以通过在 DOM 中创建具有相同 font-properties 的元素,并将宽度设置为要衡量的格式,来查找 PT、PC、EM、EX、PX 等之间的转换比率;例如,如需捕获 EM 到 PX 的转换,我们会使用“height: 1em”衡量 DOM 元素,生成的 offsetHeight 将是每个 EM 中的 PX 数量。
var font = "20px sans-serif"
var d = document.createElement("span");
d.style.cssText = "font: " + font + " height: 1em; display: block"
// the value to multiply PX 's by to convert to EM 's
var EM2PX = 1 / d.offsetHeight;</pre>
防止 alpha 乘法
在更复杂的示例(例如 Line25 中显示的霓虹效果)中,必须使用 shadowBlur 属性才能正确模拟该效果。由于霓虹效果依赖于多个阴影,因此我们遇到了一个问题:在 <canvas> 中,每个矢量对象只能有一个阴影。因此,为了绘制多个阴影,您必须在文本上方绘制多个文本版本。这会导致 Alpha 乘法,最终导致锯齿边缘。
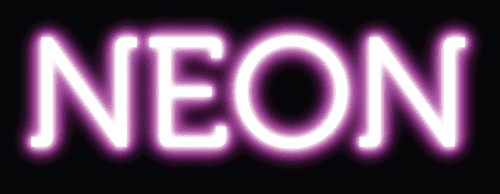
我尝试运行 ctx.fillStyle = "rgba(0,0,0,0)" 或 "transparent" 来隐藏文本,同时显示阴影... 不过,这尝试是徒劳的;由于阴影是 fillStyle alpha 的乘积,因此阴影绝不可能比 fillStyle 更不透明。
幸运的是,我们可以通过以下方法解决此问题:我们可以将阴影绘制在文本之外,使它们保持分离(以免重叠),从而将文本隐藏在屏幕边缘:
var text = "Hello world!"
var blur = 10;
var width = ctx.measureText(text).width + blur * 2;
ctx.textBaseline = "top"
ctx.shadowColor = "#000"
ctx.shadowOffsetX = width;
ctx.shadowOffsetY = 0;
ctx.shadowBlur = blur;
ctx.fillText(text, -width, 0);
剪裁文本块
为了稍微清理一下,我们可以通过添加剪裁路径来阻止系统首先绘制 fillText(同时允许绘制阴影)。为了创建文本周围的剪裁路径,我们需要知道文本的高度(称为“em-height”,历史上是指印刷机上的字母“M”的高度)和文本的宽度。我们可以使用 ctx.measureText().width 获取宽度,但 ctx.measureText().height 不存在。
幸运的是,通过 CSS 黑客攻击(如需了解使用 CSS 测量功能修复旧版 <canvas> 实现的更多方法,请参阅排版测量),我们可以通过测量具有相同 font-properties 的 <span> 的 offsetHeight 来确定文本的高度:
var d = document.createElement("span");
d.font = "20px arial"
d.textContent = "Hello world!"
var emHeight = d.offsetHeight;
然后,我们可以创建一个矩形来用作剪裁路径,将“阴影”封闭起来,同时移除虚构形状。
ctx.rect(0, 0, width, emHeight);
ctx.clip();
将所有内容整合在一起,并不断优化 - 如果阴影没有模糊处理,可以使用 fillText 来实现相同的效果,这样就无需设置剪裁遮罩:
var width = ctx.measureText(text).width;
var style = shadowStyles[text];
// add a background to the current effect
ctx.fillStyle = style.background;
ctx.fillRect(0, offsetY, ctx.canvas.width, textHeight - 1)
// parse text-shadows from css
var shadows = parseShadow(style.shadow);
// loop through the shadow collection
var n = shadows.length; while(n--) {
var shadow = shadows[n];
var totalWidth = width + shadow.blur * 2;
ctx.save();
ctx.beginPath();
ctx.rect(offsetX - shadow.blur, offsetY, offsetX + totalWidth, textHeight);
ctx.clip();
if (shadow.blur) { // just run shadow (clip text)
    ctx.shadowColor = shadow.color;
    ctx.shadowOffsetX = shadow.x + totalWidth;
    ctx.shadowOffsetY = shadow.y;
    ctx.shadowBlur = shadow.blur;
    ctx.fillText(text, -totalWidth + offsetX, offsetY + metrics.top);
} else { // just run pseudo-shadow
    ctx.fillStyle = shadow.color;
    ctx.fillText(text, offsetX + (shadow.x||0), offsetY - (shadow.y||0) + metrics.top);
}
ctx.restore();
}
// drawing the text in the foreground
if (style.color) {
ctx.fillStyle = style.color;
ctx.fillText(text, offsetX, offsetY + metrics.top);
}
// jump to next em-line
ctx.translate(0, textHeight);
由于您不想手动输入所有这些 <canvas> 命令,因此我在演示源代码中添加了一个简单的文本阴影解析器;这样,您就可以向其提供 CSS 命令,让它生成 <canvas> 命令。现在,我们的 <canvas> 元素可以与各种样式相关联。这些相同的阴影效果可用于任何矢量对象,从 Web 字体到从 SVG 导入的复杂形状,再到生成式矢量形状等!

插播内容(与像素推送相关)
在撰写本文的这一部分时,我对立体示例产生了好奇心。使用 <canvas> 和从略有不同视角拍摄的两张图片来创建 3D 电影屏幕效果有多难?显然,并不难。以下内核会将第一个图片 (data) 的红色通道与第二个图片 (data2) 的青色通道相结合:
data[i] = data[i] * 255 / 0xFF;
data[i+1] = 255 * data2[i+1] / 0xFF;
data[i+2] = 255 * data2[i+2] / 0xFF;
现在,只需将两部 iPhone 用胶带粘在额头上,同时点击“录制视频”,我们就可以在 HTML5 中制作自己的 3D 电影了。有没有人愿意自告奋勇?

霓虹彩虹、斑马反射 - 链式效果
在 <canvas> 中串联多个效果可能很简单,但需要具备对 globalCompositeOperation (GCO) 的基本了解。如需将这些操作与 GIMP(或 Photoshop)进行比较:<canvas> 中有 12 个 GCO,darker 和 lighter 可以视为图层混合模式;其他 10 个操作会作为 Alpha 遮罩应用于图层(一个图层会移除另一个图层的像素)。globalCompositeOperation 会将“图层”(在本例中为代码字符串)绑定在一起,以令人兴奋的新方式将它们组合起来:
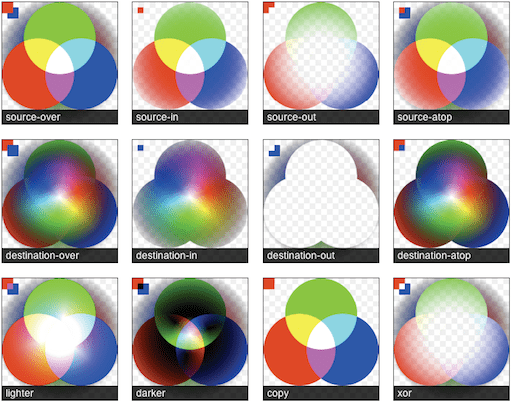
globalCompositeOperation 图表显示了 GCO 模式的运作方式;此图表使用了大部分颜色谱和多级 Alpha 透明度,以便详细了解预期结果。建议您查看 Mozilla 的 globalCompositeOperation 参考文档,了解文本说明。如需进一步研究,您可以参阅 Porter Duff 的数字图片合成,了解该操作的工作原理。
我最喜欢的模式是 globalCompositeOperation="lighter"。更亮的功能会混合附加的像素,就像光线混合一样;当红色、绿色和白色光线的强度达到最大时,我们会看到白光。这是一个非常有趣的功能,尤其是当 <canvas> 设置为较低的 globalAlpha 时,可以实现更精细的控制和更平滑的边缘。打火机有很多用途,我最近最喜欢的用途是用来制作 HTML5 桌面背景,具体方法可参见 http://weavesilk.com/。我的一个演示(Breathing Galaxies [JS1k])也使用了较轻的模式。通过这两个示例绘制图案,您可以开始了解这种模式会产生什么效果。
globalCompositeOperation 浏览器处理。
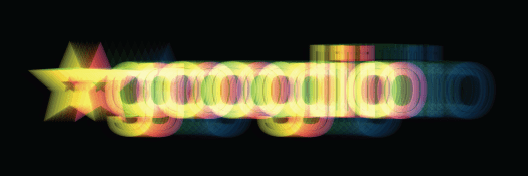
霓虹彩虹抖动效果
在以下演示中,我们将使用 globalCompositeOperation(source-in、lighter 和 darker)将效果串联起来,实现类似 Photoshop 的霓虹彩虹发光效果,并带有抖动的轮廓。此演示是“<canvas> 中的文本阴影”演示的延续,在将阴影与文本分离时使用了相同的策略(请参阅上一部分):

function neonLightEffect() {
var text = "alert('"+String.fromCharCode(0x2665)+"')";
var font = "120px Futura, Helvetica, sans-serif";
var jitter = 25; // the distance of the maximum jitter
var offsetX = 30;
var offsetY = 70;
var blur = getBlurValue(100);
// save state
ctx.save();
ctx.font = font;
// calculate width + height of text-block
var metrics = getMetrics(text, font);
// create clipping mask around text-effect
ctx.rect(offsetX - blur/2, offsetY - blur/2,
        offsetX + metrics.width + blur, metrics.height + blur);
ctx.clip();
// create shadow-blur to mask rainbow onto (since shadowColor doesn't accept gradients)
ctx.save();
ctx.fillStyle = "#fff";
ctx.shadowColor = "rgba(0,0,0,1)";
ctx.shadowOffsetX = metrics.width + blur;
ctx.shadowOffsetY = 0;
ctx.shadowBlur = blur;
ctx.fillText(text, -metrics.width + offsetX - blur, offsetY + metrics.top);
ctx.restore();
// create the rainbow linear-gradient
var gradient = ctx.createLinearGradient(0, 0, metrics.width, 0);
gradient.addColorStop(0, "rgba(255, 0, 0, 1)");
gradient.addColorStop(0.15, "rgba(255, 255, 0, 1)");
gradient.addColorStop(0.3, "rgba(0, 255, 0, 1)");
gradient.addColorStop(0.5, "rgba(0, 255, 255, 1)");
gradient.addColorStop(0.65, "rgba(0, 0, 255, 1)");
gradient.addColorStop(0.8, "rgba(255, 0, 255, 1)");
gradient.addColorStop(1, "rgba(255, 0, 0, 1)");
// change composite so source is applied within the shadow-blur
ctx.globalCompositeOperation = "source-atop";
// apply gradient to shadow-blur
ctx.fillStyle = gradient;
ctx.fillRect(offsetX - jitter/2, offsetY,
            metrics.width + offsetX, metrics.height + offsetY);
// change composite to mix as light
ctx.globalCompositeOperation = "lighter";
// multiply the layer
ctx.globalAlpha = 0.7
ctx.drawImage(ctx.canvas, 0, 0);
ctx.drawImage(ctx.canvas, 0, 0);
ctx.globalAlpha = 1
// draw white-text ontop of glow
ctx.fillStyle = "rgba(255,255,255,0.95)";
ctx.fillText(text, offsetX, offsetY + metrics.top);
// created jittered stroke
ctx.lineWidth = 0.80;
ctx.strokeStyle = "rgba(255,255,255,0.25)";
var i = 10; while(i--) {
    var left = jitter / 2 - Math.random() * jitter;
    var top = jitter / 2 - Math.random() * jitter;
    ctx.strokeText(text, left + offsetX, top + offsetY + metrics.top);
}
ctx.strokeStyle = "rgba(0,0,0,0.20)";
ctx.strokeText(text, offsetX, offsetY + metrics.top);
ctx.restore();
};
斑马反射效果
斑马反射效果的灵感来自 WebDesignerWall 上有关如何使用 CSS 为网页增添趣味的优秀资源。这进一步延伸了这个想法,为文本创建了“反射”效果,例如您在 iTunes 中看到的效果。该效果结合了 fillColor(白色)、createPattern(zebra.png)和 linearGradient(闪光);这说明您可以对每个矢量对象应用多种填充类型:

function sleekZebraEffect() {
// inspired by - http://www.webdesignerwall.com/demo/css-gradient-text/
var text = "Sleek Zebra...";
var font = "100px Futura, Helvetica, sans-serif";

// save state
ctx.save();
ctx.font = font;

// getMetrics calculates:
// width + height of text-block
// top + middle + bottom baseline
var metrics = getMetrics(text, font);
var offsetRefectionY = -20;
var offsetY = 70;
var offsetX = 60;

// throwing a linear-gradient in to shine up the text
var gradient = ctx.createLinearGradient(0, offsetY, 0, metrics.height + offsetY);
gradient.addColorStop(0.1, '#000');
gradient.addColorStop(0.35, '#fff');
gradient.addColorStop(0.65, '#fff');
gradient.addColorStop(1.0, '#000');
ctx.fillStyle = gradient
ctx.fillText(text, offsetX, offsetY + metrics.top);

// draw reflected text
ctx.save();
ctx.globalCompositeOperation = "source-over";
ctx.translate(0, metrics.height + offsetRefectionY)
ctx.scale(1, -1);
ctx.font = font;
ctx.fillStyle = "#fff";
ctx.fillText(text, offsetX, -metrics.height - offsetY + metrics.top);
ctx.scale(1, -1);

// cut the gradient out of the reflected text
ctx.globalCompositeOperation = "destination-out";
var gradient = ctx.createLinearGradient(0, offsetY, 0, metrics.height + offsetY);
gradient.addColorStop(0.0, 'rgba(0,0,0,0.65)');
gradient.addColorStop(1.0, '#000');
ctx.fillStyle = gradient;
ctx.fillRect(offsetX, offsetY, metrics.width, metrics.height);

// restore back to original transform state
ctx.restore();

// using source-atop to allow the transparent .png to show through to the gradient
ctx.globalCompositeOperation = "source-atop";

// creating pattern from <image> sourced.
ctx.fillStyle = ctx.createPattern(image, 'repeat');

// fill the height of two em-boxes, to encompass both normal and reflected state
ctx.fillRect(offsetX, offsetY, metrics.width, metrics.height * 2);
ctx.restore();
};
Canvas 中的内/外阴影
<canvas> 规范未提及“内部”阴影与“外部”阴影的主题。事实上,乍一看,您可能会认为系统不支持“内”阴影。事实并非如此。
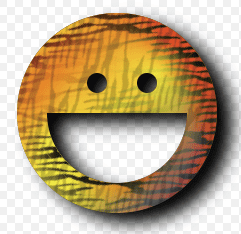
启用起来稍微有点难度 ;) 正如 F1LT3R 在最近的一篇文章中提出的那样,您可以使用顺时针与逆时针绕线规则的独特属性来创建内阴影。为此,您可以通过绘制容器矩形来创建“内阴影”,然后使用相反的绕行规则绘制剪裁形状,从而创建形状的反向。
在以下示例中,您可以同时使用颜色+渐变+图案为内阴影和 fillStyle 设置样式。您可以单独指定图案旋转;请注意,斑马条纹现在彼此垂直。使用与边界框大小相同的剪裁遮罩,无需使用超大型容器来封闭剪裁形状,从而避免处理阴影的不需要部分,从而提高速度。
function innerShadow() {

function drawShape() { // draw anti-clockwise
ctx.arc(0, 0, 100, 0, Math.PI * 2, true); // Outer circle
ctx.moveTo(70, 0);
ctx.arc(0, 0, 70, 0, Math.PI, false); // Mouth
ctx.moveTo(-20, -20);
ctx.arc(30, -30, 10, 0, Math.PI * 2, false); // Left eye
ctx.moveTo(140, 70);
ctx.arc(-20, -30, 10, 0, Math.PI * 2, false); // Right eye
};

var width = 200;
var offset = width + 50;
var innerColor = "rgba(0,0,0,1)";
var outerColor = "rgba(0,0,0,1)";

ctx.translate(150, 170);

// apply inner-shadow
ctx.save();
ctx.fillStyle = "#000";
ctx.shadowColor = innerColor;
ctx.shadowBlur = getBlurValue(120);
ctx.shadowOffsetX = -15;
ctx.shadowOffsetY = 15;

// create clipping path (around blur + shape, preventing outer-rect blurring)
ctx.beginPath();
ctx.rect(-offset/2, -offset/2, offset, offset);
ctx.clip();

// apply inner-shadow (w/ clockwise vs. anti-clockwise cutout)
ctx.beginPath();
ctx.rect(-offset/2, -offset/2, offset, offset);
drawShape();
ctx.fill();
ctx.restore();

// cutout temporary rectangle used to create inner-shadow
ctx.globalCompositeOperation = "destination-out";
ctx.fill();

// prepare vector paths
ctx.beginPath();
drawShape();

// apply fill-gradient to inner-shadow
ctx.save();
ctx.globalCompositeOperation = "source-in";
var gradient = ctx.createLinearGradient(-offset/2, 0, offset/2, 0);
gradient.addColorStop(0.3, '#ff0');
gradient.addColorStop(0.7, '#f00');
ctx.fillStyle = gradient;
ctx.fill();

// apply fill-pattern to inner-shadow
ctx.globalCompositeOperation = "source-atop";
ctx.globalAlpha = 1;
ctx.rotate(0.9);
ctx.fillStyle = ctx.createPattern(image, 'repeat');
ctx.fill();
ctx.restore();

// apply fill-gradient
ctx.save();
ctx.globalCompositeOperation = "destination-over";
var gradient = ctx.createLinearGradient(-offset/2, -offset/2, offset/2, offset/2);
gradient.addColorStop(0.1, '#f00');
gradient.addColorStop(0.5, 'rgba(255,255,0,1)');
gradient.addColorStop(1.0, '#00f');
ctx.fillStyle = gradient
ctx.fill();

// apply fill-pattern
ctx.globalCompositeOperation = "source-atop";
ctx.globalAlpha = 0.2;
ctx.rotate(-0.4);
ctx.fillStyle = ctx.createPattern(image, 'repeat');
ctx.fill();
ctx.restore();

// apply outer-shadow (color-only without temporary layer)
ctx.globalCompositeOperation = "destination-over";
ctx.shadowColor = outerColor;
ctx.shadowBlur = 40;
ctx.shadowOffsetX = 15;
ctx.shadowOffsetY = 10;
ctx.fillStyle = "#fff";
ctx.fill();
};
从这些示例中,您可以看到,使用 globalCompositeOperation,我们可以将多种效果串联起来,从而产生更精细的效果(利用遮罩和混合)。屏幕是您的专属舞台 ;)
太空时代 - 生成式特效
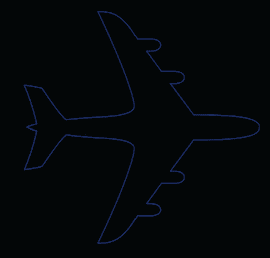
在 <canvas> 中,从 Unicode 字符 0x2708 开始:
…变成了这个阴影示例:
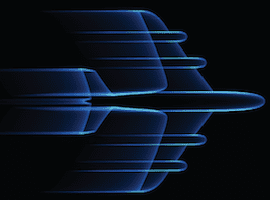
…可以通过多次调用 ctx.strokeText() 并使用较小的线条宽度 (0.25) 来实现,同时缓慢减小 x 偏移量和 alpha 值,从而使矢量元素具有动感。
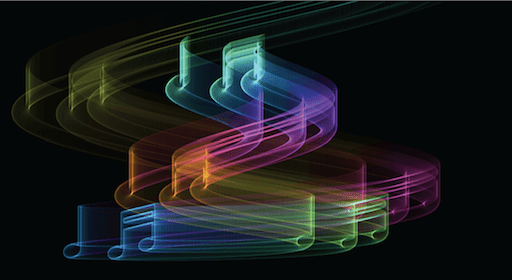
通过将元素的 XY 位置映射到正弦/余弦波,并使用 HSL 属性循环颜色,我们可以创建更有趣的效果,例如下面的“生物危害”示例:

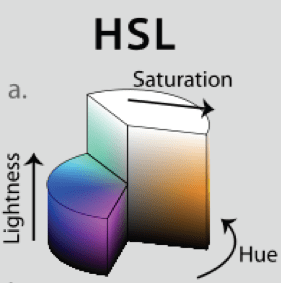
HSL:色调、饱和度、亮度 (1978)
HSL 是 CSS3 规范中新支持的格式。HEX 适用于计算机,而 HSL 则是人类可读的。
说明 HSL 的易用性;如需循环颜色谱,只需从 360 开始递增“色相”;色相以圆柱形方式映射到谱。亮度用于控制颜色的深浅;0% 表示黑色像素,而 100% 表示白色像素。饱和度用于控制颜色的亮度或鲜艳程度;饱和度为 0% 时,系统会创建灰色,饱和度为 100% 时,系统会创建鲜艳的颜色。
由于 HSL 是一种新标准,因此您可能希望继续支持旧版浏览器,这可以通过色彩空间转换来实现。以下代码接受 HSL 对象 { H: 360, S: 100, L: 100},并输出 RGB 对象 { R: 255, G: 255, B: 255 }。然后,您可以使用这些值创建 rgb 或 rgba 字符串。如需了解更多深入信息,请参阅维基百科上有关 HSL 的深入文章。
// HSL (1978) = H: Hue / S: Saturation / L: Lightness
HSL_RGB = function (o) { // { H: 0-360, S: 0-100, L: 0-100 }
var H = o.H / 360,
    S = o.S / 100,
    L = o.L / 100,
    R, G, B, _1, _2;

function Hue_2_RGB(v1, v2, vH) {
if (vH < 0) vH += 1;
if (vH > 1) vH -= 1;
if ((6 * vH) < 1) return v1 + (v2 - v1) * 6 * vH;
if ((2 * vH) < 1) return v2;
if ((3 * vH) < 2) return v1 + (v2 - v1) * ((2 / 3) - vH) * 6;
return v1;
}

if (S == 0) { // HSL from 0 to 1
R = L * 255;
G = L * 255;
B = L * 255;
} else {
if (L < 0.5) {
    _2 = L * (1 + S);
} else {
    _2 = (L + S) - (S * L);
}
_1 = 2 * L - _2;

R = 255 * Hue_2_RGB(_1, _2, H + (1 / 3));
G = 255 * Hue_2_RGB(_1, _2, H);
B = 255 * Hue_2_RGB(_1, _2, H - (1 / 3));
}

return {
R: R,
G: G,
B: B
};
};
使用 requestAnimationFrame 创建动画
过去,若要在 JavaScript 中创建动画,有两个选择:setTimeout 和 setInterval。
window.requestAnimationFrame 是取代这两者的新标准;它允许浏览器根据可用资源来调节动画,从而为世界节省电力(并为您的计算机节省几次心跳时间)。一些重要功能包括:
- 当用户离开框架时,动画可能会减速或完全停止,以防止使用不需要的资源。
- 帧速率上限为 60 FPS。原因在于,该帧速率远远高于人类能够察觉的水平(大多数人类在 30 FPS 时会认为动画是“流畅”的)。
在撰写本文时,使用 requestAnimationFrame 需要使用特定于供应商的前缀。Paul Irish 在用于智能动画的 requestAnimationFrame 中创建了一个支持跨供应商的 shim 层:
// shim layer with setTimeout fallback
window.requestAnimFrame = (function(){
return  window.requestAnimationFrame       ||
        window.webkitRequestAnimationFrame ||
        window.mozRequestAnimationFrame    ||
        window.oRequestAnimationFrame      ||
        window.msRequestAnimationFrame     ||
        function(/* function */ callback, /* DOMElement */ element){
        window.setTimeout(callback, 1000 / 60);
        };
})();
更进一步,抱有更大雄心的开发者可能会将其与 requestAnimationFrame.js 等多重填充项(需要解决一些功能)结合使用,以便在改用此新标准的同时,进一步支持旧版浏览器。
(function animate() {
var i = 50;
while(i--) {
    if (n > endpos) return;

    n += definition;
    ctx.globalAlpha = (0.5 - (n + startpos) / endpos) * alpha;
    if (doColorCycle) {
        hue = n + color;
        ctx.strokeStyle = "hsl(" + (hue % 360) + ",99%,50%)"; // iterate hue
    }
    var x = cos(n / cosdiv) * n * cosmult; // cosine
    var y = sin(n / sindiv) * n * sinmult; // sin
    ctx.strokeText(text, x + xoffset, y + yoffset); // draw rainbow text
}
timeout = window.requestAnimationFrame(animate, 0);
})();

源代码
在各浏览器供应商的支持下,<canvas> 的未来无疑是光明的:它可以使用 PhoneGap 移植到 iPhone/Android/桌面平台可执行文件,或者

