

はじめに
Media Source Extensions(MSE)は、HTML5 の <audio> 要素と <video> 要素のバッファリングと再生制御を拡張します。元々は Dynamic Adaptive Streaming over HTTP(DASH)ベースの動画プレーヤーを容易にするために開発されたものですが、以下では、これらを音声、特にギャップレス再生に使用する方法について説明します。
曲がトラックをまたいでシームレスに流れる音楽アルバムを聴いたことがあるでしょう。今まさに聴いているかもしれません。アーティストは、芸術的な選択として、また、音声が 1 つの連続したストリームとして書き込まれたレコードや CD のアーティファクトとして、ギャップレス再生エクスペリエンスを作成します。残念ながら、MP3 や AAC などの最新のオーディオ コーデックの仕組みにより、シームレスな聴覚体験は失われることが多くなっています。
理由については後で詳しく説明しますが、まずはデモから始めましょう。以下は、優れた Sintel の最初の 30 秒を 5 つの別々の MP3 ファイルに分割し、MSE を使用して再組み立てしたものです。赤い線は、各 MP3 の作成(エンコード)中に発生したギャップを示しています。これらのポイントでグリッチが発生します。
うわっ!これは望ましい状態ではありません。改善が必要です。少し手間はかかりますが、上記のデモで使った MP3 ファイルをそのまま使用して、MSE であの煩わしいギャップを削除できます。次のデモの緑色の線は、ファイルが結合され、ギャップが削除された場所を示しています。Chrome 38 以降では、シームレスに再生されます。
ギャップレス コンテンツを作成する方法はさまざまです。このデモでは、通常のユーザーが持っている可能性のあるファイルの種類に焦点を当てます。各ファイルが、前後の音声セグメントを考慮せずに個別にエンコードされている場合。
基本的な設定
まず、MediaSource インスタンスの基本設定について説明します。Media Source Extensions は、その名のとおり、既存のメディア要素の拡張機能です。以下では、標準の URL を設定する場合と同様に、MediaSource インスタンスを表す Object URL を音声要素のソース属性に割り当てています。
var audio = document.createElement('audio');
var mediaSource = new MediaSource();
var SEGMENTS = 5;

mediaSource.addEventListener('sourceopen', function () {
  var sourceBuffer = mediaSource.addSourceBuffer('audio/mpeg');

  function onAudioLoaded(data, index) {
    // Append the ArrayBuffer data into our new SourceBuffer.
    sourceBuffer.appendBuffer(data);
  }

  // Retrieve an audio segment via XHR.  For simplicity, we're retrieving the
  // entire segment at once, but we could also retrieve it in chunks and append
  // each chunk separately.  MSE will take care of assembling the pieces.
  GET('sintel/sintel_0.mp3', function (data) {
    onAudioLoaded(data, 0);
  });
});

audio.src = URL.createObjectURL(mediaSource);
MediaSource オブジェクトが接続されると、初期化が実行され、最終的に sourceopen イベントがトリガーされます。この時点で、SourceBuffer を作成できます。上記の例では、MP3 セグメントを解析してデコードできる audio/mpeg を作成しています。他の型もいくつかあります。
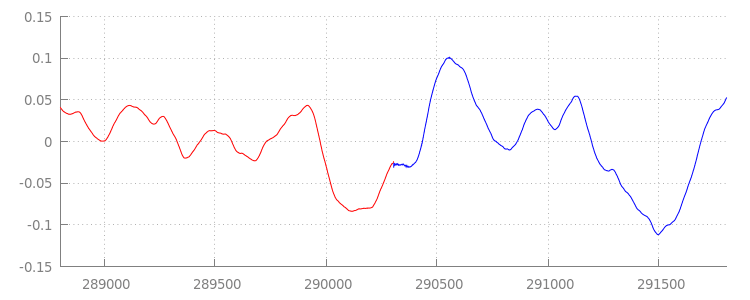
異常な波形
コードについては後で説明しますが、ここでは、先ほど追加したファイル、特にその末尾を詳しく見てみましょう。以下は、sintel_0.mp3 トラックの 2 つのチャネルで平均した最後の 3, 000 個のサンプルを示したグラフです。赤い線の各ピクセルは、[-1.0, 1.0] の範囲の浮動小数点サンプルです。

ゼロ(無音)のサンプルが多すぎるのはなぜですか?実際には、エンコード時に導入された圧縮アーティファクトが原因です。ほとんどのエンコーダは、なんらかのパディングを導入します。この場合、LAME はファイルの末尾に 576 個のパディング サンプルを追加しました。
各ファイルには、末尾のパディングに加えて、先頭にもパディングが追加されていました。sintel_1.mp3 トラックを先読みすると、先頭に 576 個のパディング サンプルがあることがわかります。パディングの量はエンコーダとコンテンツによって異なりますが、各ファイルに含まれる metadata に基づいて正確な値がわかります。
各ファイルの最初と最後の無音部分が、前のデモでセグメント間のグリッチの原因となっています。ギャップレス再生を実現するには、これらの無音部分を削除する必要があります。幸いなことに、これは MediaSource で簡単に実行できます。以下では、追加ウィンドウとタイムスタンプ オフセットを使用してこの無音部分を削除するように onAudioLoaded() メソッドを変更します。
コード例
function onAudioLoaded(data, index) {
  // Parsing gapless metadata is unfortunately non trivial and a bit messy, so
  // we'll glaze over it here; see the appendix for details.
  // ParseGaplessData() will return a dictionary with two elements:
  //
  //    audioDuration: Duration in seconds of all non-padding audio.
  //    frontPaddingDuration: Duration in seconds of the front padding.
  //
  var gaplessMetadata = ParseGaplessData(data);

  // Each appended segment must be appended relative to the next.  To avoid any
  // overlaps, we'll use the end timestamp of the last append as the starting
  // point for our next append or zero if we haven't appended anything yet.
  var appendTime = index > 0 ? sourceBuffer.buffered.end(0) : 0;

  // Simply put, an append window allows you to trim off audio (or video) frames
  // which fall outside of a specified time range.  Here, we'll use the end of
  // our last append as the start of our append window and the end of the real
  // audio data for this segment as the end of our append window.
  sourceBuffer.appendWindowStart = appendTime;
  sourceBuffer.appendWindowEnd = appendTime + gaplessMetadata.audioDuration;

  // The timestampOffset field essentially tells MediaSource where in the media
  // timeline the data given to appendBuffer() should be placed.  I.e., if the
  // timestampOffset is 1 second, the appended data will start 1 second into
  // playback.
  //
  // MediaSource requires that the media timeline starts from time zero, so we
  // need to ensure that the data left after filtering by the append window
  // starts at time zero.  We'll do this by shifting all of the padding we want
  // to discard before our append time (and thus, before our append window).
  sourceBuffer.timestampOffset =
    appendTime - gaplessMetadata.frontPaddingDuration;

  // When appendBuffer() completes, it will fire an updateend event signaling
  // that it's okay to append another segment of media.  Here, we'll chain the
  // append for the next segment to the completion of our current append.
  if (index == 0) {
    sourceBuffer.addEventListener('updateend', function () {
      if (++index < SEGMENTS) {
        GET('sintel/sintel_' + index + '.mp3', function (data) {
          onAudioLoaded(data, index);
        });
      } else {
        // We've loaded all available segments, so tell MediaSource there are no
        // more buffers which will be appended.
        mediaSource.endOfStream();
        URL.revokeObjectURL(audio.src);
      }
    });
  }

  // appendBuffer() will now use the timestamp offset and append window settings
  // to filter and timestamp the data we're appending.
  //
  // Note: While this demo uses very little memory, more complex use cases need
  // to be careful about memory usage or garbage collection may remove ranges of
  // media in unexpected places.
  sourceBuffer.appendBuffer(data);
}
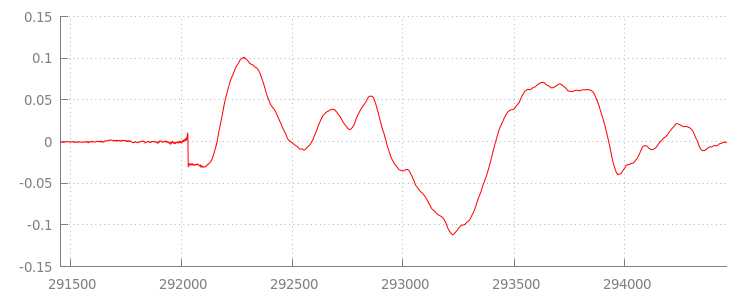
シームレスな波形
アペンド ウィンドウを適用した後の波形をもう一度見て、新しいコードで何が達成されたかを確認しましょう。下の図では、sintel_0.mp3(赤色)の末尾の無音部分と sintel_1.mp3(青色)の先頭の無音部分が削除され、セグメント間のシームレスなトランジションが残っています。
まとめ
これで、5 つのセグメントが 1 つにシームレスに統合され、デモは終了しました。最後に、onAudioLoaded() メソッドではコンテナやコーデックが考慮されていないことに気づかれたかもしれません。つまり、これらの手法はコンテナやコーデックのタイプに関係なく機能します。以下では、MP3 ではなく、元のデモの DASH 対応の断片化された MP4 を再生できます。
詳しくは、付録でギャップレス コンテンツの作成とメタデータの解析について詳しく説明しています。gapless.js を確認して、このデモを動かすコードの詳細を確認することもできます。
今後ともよろしくお願いいたします。
付録 A: ギャップレス コンテンツの作成
ギャップのないコンテンツを作成するのは難しい場合があります。以下では、このデモで使用される Sintel メディアの作成について説明します。まず、Sintel のロスレス FLAC サウンドトラックのコピーが必要です。後世のために、SHA1 を以下に記載します。ツールについては、FFmpeg、MP4Box、LAME、および afconvert を含む OSX インストールが必要です。
    unzip Jan_Morgenstern-Sintel-FLAC.zip
    sha1sum 1-Snow_Fight.flac
    # 0535ca207ccba70d538f7324916a3f1a3d550194  1-Snow_Fight.flac
まず、1-Snow_Fight.flac トラックの最初の 31.5 秒を分割します。また、再生終了後のクリックを避けるため、28 秒から 2.5 秒のフェードアウトを追加します。次の FFmpeg コマンドラインを使用すると、これらすべてを実行して、結果を sintel.flac に保存できます。
ffmpeg -i 1-Snow_Fight.flac -t 31.5 -af "afade=t=out:st=28:d=2.5" sintel.flac
次に、ファイルを 6.5 秒の wave ファイル 5 つに分割します。ほとんどのエンコーダが取り込みをサポートしているため、wave を使用するのが最も簡単です。FFmpeg を使用すると、これを正確に行うことができます。その後、sintel_0.wav、sintel_1.wav、sintel_2.wav、sintel_3.wav、sintel_4.wav が得られます。
    ffmpeg -i sintel.flac -acodec pcm_f32le -map 0 -f segment \
           -segment_list out.list -segment_time 6.5 sintel_%d.wav
次に、MP3 ファイルを作成します。LAME には、ギャップレス コンテンツを作成するためのオプションがいくつかあります。コンテンツを制御できる場合は、すべてのファイルのバッチ エンコードで --nogap を使用して、セグメント間のパディングを完全に回避することを検討してください。ただし、このデモではパディングが必要なので、波形ファイルの標準的な高画質 VBR エンコードを使用します。
    lame -V=2 sintel_0.wav sintel_0.mp3
    lame -V=2 sintel_1.wav sintel_1.mp3
    lame -V=2 sintel_2.wav sintel_2.mp3
    lame -V=2 sintel_3.wav sintel_3.mp3
    lame -V=2 sintel_4.wav sintel_4.mp3
MP3 ファイルの作成に必要なのはこれだけです。次に、フラグメント化された MP4 ファイルの作成について説明します。Apple の iTunes 用マスターのメディア作成に関する指示に従います。以下では、推奨パラメータを使用して、指示に従って、波形ファイルを中間 CAF ファイルに変換してから、MP4 コンテナで AAC としてエンコードします。
    afconvert sintel_0.wav sintel_0_intermediate.caf -d 0 -f caff \
              --soundcheck-generate
    afconvert sintel_1.wav sintel_1_intermediate.caf -d 0 -f caff \
              --soundcheck-generate
    afconvert sintel_2.wav sintel_2_intermediate.caf -d 0 -f caff \
              --soundcheck-generate
    afconvert sintel_3.wav sintel_3_intermediate.caf -d 0 -f caff \
              --soundcheck-generate
    afconvert sintel_4.wav sintel_4_intermediate.caf -d 0 -f caff \
              --soundcheck-generate
    afconvert sintel_0_intermediate.caf -d aac -f m4af -u pgcm 2 --soundcheck-read \
              -b 256000 -q 127 -s 2 sintel_0.m4a
    afconvert sintel_1_intermediate.caf -d aac -f m4af -u pgcm 2 --soundcheck-read \
              -b 256000 -q 127 -s 2 sintel_1.m4a
    afconvert sintel_2_intermediate.caf -d aac -f m4af -u pgcm 2 --soundcheck-read \
              -b 256000 -q 127 -s 2 sintel_2.m4a
    afconvert sintel_3_intermediate.caf -d aac -f m4af -u pgcm 2 --soundcheck-read \
              -b 256000 -q 127 -s 2 sintel_3.m4a
    afconvert sintel_4_intermediate.caf -d aac -f m4af -u pgcm 2 --soundcheck-read \
              -b 256000 -q 127 -s 2 sintel_4.m4a
これで、MediaSource で使用する前に適切にフラグメント化する必要がある M4A ファイルがいくつかできました。ここでは、フラグメント サイズを 1 秒とします。MP4Box は、各フラグメント化された MP4 を sintel_#_dashinit.mp4 として書き出し、破棄可能な MPEG-DASH マニフェスト(sintel_#_dash.mpd)も書き出します。
    MP4Box -dash 1000 sintel_0.m4a && mv sintel_0_dashinit.mp4 sintel_0.mp4
    MP4Box -dash 1000 sintel_1.m4a && mv sintel_1_dashinit.mp4 sintel_1.mp4
    MP4Box -dash 1000 sintel_2.m4a && mv sintel_2_dashinit.mp4 sintel_2.mp4
    MP4Box -dash 1000 sintel_3.m4a && mv sintel_3_dashinit.mp4 sintel_3.mp4
    MP4Box -dash 1000 sintel_4.m4a && mv sintel_4_dashinit.mp4 sintel_4.mp4
    rm sintel_{0,1,2,3,4}_dash.mpd
これで、これで、ギャップレス再生に必要な正しいメタデータを含む、断片化された MP4 ファイルと MP3 ファイルができました。メタデータの詳細については、付録 B をご覧ください。
付録 B: ギャップレス メタデータの解析
ギャップレス コンテンツの作成と同様に、ギャップレス メタデータの解析も、保存の標準的な方法がないため、難しい場合があります。以下では、最も一般的なエンコーダである LAME と iTunes がギャップレス メタデータを保存する方法について説明します。まず、上記の ParseGaplessData() で使用するヘルパー メソッドとアウトラインを設定します。
    // Since most MP3 encoders store the gapless metadata in binary, we'll need a
    // method for turning bytes into integers.  Note: This doesn't work for values
    // larger than 2^30 since we'll overflow the signed integer type when shifting.
    function ReadInt(buffer) {
      var result = buffer.charCodeAt(0);
      for (var i = 1; i < buffer.length; ++i) {
        result <<= 8;
        result += buffer.charCodeAt(i);
      }
      return result;
    }

    function ParseGaplessData(arrayBuffer) {
      // Gapless data is generally within the first 512 bytes, so limit parsing.
      var byteStr = new TextDecoder().decode(arrayBuffer.slice(0, 512));

      var frontPadding = 0, endPadding = 0, realSamples = 0;

      // ... we'll fill this in as we go below.
まず、解析と説明が最も簡単な Apple の iTunes メタデータ形式について説明します。MP3 ファイルと M4A ファイル内で、iTunes(および afconvert)は次のように ASCII で短いセクションを書き込みます。
iTunSMPB[ 26 bytes ]0000000 00000840 000001C0 0000000000046E00
これは、MP3 コンテナ内の ID3 タグと、MP4 コンテナ内のメタデータ アトム内に書き込まれます。ここでは、最初の 0000000 トークンは無視してかまいません。次の 3 つのトークンは、先頭のパディング、末尾のパディング、パディングなしの合計サンプル数です。これらの値を音声のサンプルレートで割ると、それぞれの期間が求められます。
// iTunes encodes the gapless data as hex strings like so:
//
//    'iTunSMPB[ 26 bytes ]0000000 00000840 000001C0 0000000000046E00'
//    'iTunSMPB[ 26 bytes ]####### frontpad  endpad    real samples'
//
// The approach here elides the complexity of actually parsing MP4 atoms. It
// may not work for all files without some tweaks.
var iTunesDataIndex = byteStr.indexOf('iTunSMPB');
if (iTunesDataIndex != -1) {
  var frontPaddingIndex = iTunesDataIndex + 34;
  frontPadding = parseInt(byteStr.substr(frontPaddingIndex, 8), 16);

  var endPaddingIndex = frontPaddingIndex + 9;
  endPadding = parseInt(byteStr.substr(endPaddingIndex, 8), 16);

  var sampleCountIndex = endPaddingIndex + 9;
  realSamples = parseInt(byteStr.substr(sampleCountIndex, 16), 16);
}
一方、ほとんどのオープンソース MP3 エンコーダは、無音の MPEG フレーム内に配置された特別な Xing ヘッダー内にギャップレス メタデータを保存します(無音なので、Xing ヘッダーを理解しないデコーダは単に無音を再生します)。残念ながら、このタグは常に存在するとは限らず、多くの省略可能なフィールドがあります。このデモではメディアを制御できますが、実際には、ギャップレス メタデータが実際に利用可能かどうかを判断するために、追加の妥当性チェックが必要になります。
まず、サンプルの総数を解析します。わかりやすくするために、ここでは Xing ヘッダーから読み取りますが、通常の MPEG オーディオ ヘッダーから構築することもできます。Xing ヘッダーは、Xing タグまたは Info タグでマークできます。このタグの 4 バイト後に、ファイル内のフレームの合計数を表す 32 ビットがあります。この値にフレームあたりのサンプル数を掛けると、ファイル内の合計サンプル数が得られます。
    // Xing padding is encoded as 24bits within the header.  Note: This code will
    // only work for Layer3 Version 1 and Layer2 MP3 files with XING frame counts
    // and gapless information.  See the following document for more details:
    // http://www.codeproject.com/Articles/8295/MPEG-Audio-Frame-Header
    var xingDataIndex = byteStr.indexOf('Xing');
    if (xingDataIndex == -1) xingDataIndex = byteStr.indexOf('Info');
    if (xingDataIndex != -1) {
      // See section 2.3.1 in the link above for the specifics on parsing the Xing
      // frame count.
      var frameCountIndex = xingDataIndex + 8;
      var frameCount = ReadInt(byteStr.substr(frameCountIndex, 4));

      // For Layer3 Version 1 and Layer2 there are 1152 samples per frame.  See
      // section 2.1.5 in the link above for more details.
      var paddedSamples = frameCount * 1152;

      // ... we'll cover this below.
これでサンプルの総数がわかったので、パディング サンプルの数を読み取ることができます。エンコーダによっては、Xing ヘッダー内の LAME タグまたは Lavf タグに書き込まれることがあります。このヘッダーの 17 バイト後に、それぞれ 12 ビットの先頭と末尾のパディングを表す 3 バイトがあります。
        xingDataIndex = byteStr.indexOf('LAME');
        if (xingDataIndex == -1) xingDataIndex = byteStr.indexOf('Lavf');
        if (xingDataIndex != -1) {
          // See http://gabriel.mp3-tech.org/mp3infotag.html#delays for details of
          // how this information is encoded and parsed.
          var gaplessDataIndex = xingDataIndex + 21;
          var gaplessBits = ReadInt(byteStr.substr(gaplessDataIndex, 3));

          // Upper 12 bits are the front padding, lower are the end padding.
          frontPadding = gaplessBits >> 12;
          endPadding = gaplessBits & 0xFFF;
        }

        realSamples = paddedSamples - (frontPadding + endPadding);
      }

      return {
        audioDuration: realSamples * SECONDS_PER_SAMPLE,
        frontPaddingDuration: frontPadding * SECONDS_PER_SAMPLE
      };
    }
これで、ギャップレス コンテンツの大部分を解析する完全な関数ができました。ただし、エッジケースは多数存在するため、本番環境で同様のコードを使用する前に注意することをおすすめします。
付録 C: ガベージ コレクションについて
SourceBuffer インスタンスに属するメモリは、コンテンツ タイプ、プラットフォーム固有の制限、現在の再生位置に応じて、積極的にガベージ コレクションされます。Chrome では、まず再生済みのバッファからメモリが再利用されます。ただし、メモリ使用量がプラットフォーム固有の上限を超えると、再生されていないバッファからメモリが削除されます。
再生が、メモリの再利用によってタイムラインに生じたギャップに達すると、ギャップが小さい場合はグリッチが発生し、ギャップが大きすぎる場合は完全に停止することがあります。どちらも優れたユーザー エクスペリエンスとは言えません。そのため、一度に大量のデータを追加することを避け、不要になった範囲をメディア タイムラインから手動で削除することが重要です。
範囲は、各 SourceBuffer の remove() メソッドで削除できます。このメソッドは、秒単位の [start, end] 範囲を受け取ります。appendBuffer() と同様に、各 remove() は完了すると updateend イベントを 1 回呼び出します。イベントが発生するまで、他の削除や追加は発行しないでください。
デスクトップ版 Chrome では、一度に約 12 メガバイトの音声コンテンツと 150 メガバイトの動画コンテンツをメモリに保持できます。これらの値はブラウザやプラットフォーム間で信頼できるものではありません。たとえば、モバイル デバイスの代表値として使用することはできません。
ガベージ コレクションは SourceBuffers に追加されたデータにのみ影響します。JavaScript 変数にバッファリングできるデータ量に制限はありません。必要に応じて、同じデータを同じ位置に再追加することもできます。