
מבוא
המאמר הזה עוסק בשימוש בספרייה JSARToolKit עם ממשק ה-getUserMedia API של WebRTC כדי ליצור אפליקציות מציאות רבודה באינטרנט. לצורך עיבוד, אני משתמש ב-WebGL בגלל הביצועים המשופרים שהוא מציע. התוצאה הסופית של המאמר הזה היא אפליקציית הדגמה שמציבה מודל תלת-ממד מעל לסמן של מציאות רבודה בסרטון ממצלמת אינטרנט.
JSARToolKit היא ספריית מציאות רבודה ל-JavaScript. זוהי ספריית קוד פתוח שפורסמה במסגרת GPL, והיא פורט ישיר של FLARToolKit ל-Flash שיצרתי לדמו של Remixing Reality של Mozilla. FLARToolKit עצמו הוא גרסת פורט של NyARToolKit ל-Java, שהיא גרסת פורט של ARToolKit ל-C. הדרך הייתה ארוכה, אבל הגענו.
JSARToolKit פועל על רכיבי לוח הציור. מכיוון שהיא צריכה לקרוא את התמונה מהקנבס, התמונה צריכה להגיע מאותו מקור כמו הדף או להשתמש ב-CORS כדי לעקוף את מדיניות המקור הזהה. בקצרה, מגדירים את המאפיין crossOrigin ברכיב התמונה או הסרטון שרוצים להשתמש בו כטקסטורה לערך '' או 'anonymous'.
כשמעבירים ל-JSARToolKit לוח קנבס לצורך ניתוח, המערכת מחזירה רשימה של סמלי AR שנמצאים בתמונה ומטריצות הטרנספורמציה התואמות. כדי לצייר אובייקט תלת-ממדי מעל סמן, מעבירים את מטריצת הטרנספורמציה לספריית הרינדור התלת-ממדית שבה משתמשים, כדי שהאובייקט יתבצע באמצעות המטריצה. לאחר מכן, מציירים את מסגרת הסרטון בסצנה של WebGL ומציירים את האובייקט מעליו, וזהו זה, הכל מוכן.
כדי לנתח סרטון באמצעות JSARToolKit, מציירים את הסרטון על לוח ואז מעבירים את הלוח אל JSARToolKit. צריך לעשות את זה לכל פריים כדי לקבל מעקב AR בסרטון. JSARToolKit מספיק מהיר במנועי JavaScript מודרניים כדי לעשות זאת בזמן אמת, גם בפריימים של וידאו בגודל 640x480. עם זאת, ככל שמסגרת הסרטון גדולה יותר, כך עיבוד הסרטון נמשך זמן רב יותר. גודל מסגרת טוב לסרטון הוא 320x240, אבל אם אתם מתכננים להשתמש בסימנים קטנים או בכמה סימנים, עדיף להשתמש בגודל 640x480.
הדגמה (דמו)
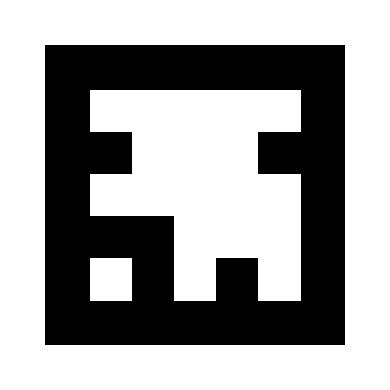
כדי לצפות בדמו של מצלמת האינטרנט, צריך להפעיל את WebRTC בדפדפן (ב-Chrome, עוברים אל about:flags ומפעילים את MediaStream). בנוסף, צריך להדפיס את סמן ה-AR שבהמשך. אפשר גם לנסות לפתוח את התמונה של הסמן בטלפון או בטאבלט ולהציג אותה למצלמת האינטרנט.
הגדרת JSARToolKit
ה-API של JSARToolKit דומה מאוד ל-Java, כך שתצטרכו לבצע כמה שינויים כדי להשתמש בו. הרעיון הבסיסי הוא שיש לכם אובייקט גלאי שפועל על אובייקט רסטר. בין הגלאי לבין הרשתית נמצא אובייקט של פרמטר מצלמה שממיר קואורדינטות רשתיות לקווי אורך ורוחב של מצלמה. כדי לקבל מהגלאי את הסמנים שזוהו, צריך לבצע איטרציה עליהם ולהעתיק את מטריצות הטרנספורמציה שלהם לקוד.
השלב הראשון הוא ליצור את אובייקט הרשת, את אובייקט הפרמטר של המצלמה ואת אובייקט הגלאי.
// Create a RGB raster object for the 2D canvas.
// JSARToolKit uses raster objects to read image data.
// Note that you need to set canvas.changed = true on every frame.
var raster = new NyARRgbRaster_Canvas2D(canvas);

// FLARParam is the thing used by FLARToolKit to set camera parameters.
// Here we create a FLARParam for images with 320x240 pixel dimensions.
var param = new FLARParam(320, 240);

// The FLARMultiIdMarkerDetector is the actual detection engine for marker detection.
// It detects multiple ID markers. ID markers are special markers that encode a number.
var detector = new FLARMultiIdMarkerDetector(param, 120);

// For tracking video set continue mode to true. In continue mode, the detector
// tracks markers across multiple frames.
detector.setContinueMode(true);

// Copy the camera perspective matrix from the FLARParam to the WebGL library camera matrix.
// The second and third parameters determine the zNear and zFar planes for the perspective matrix.
param.copyCameraMatrix(display.camera.perspectiveMatrix, 10, 10000);
שימוש ב-getUserMedia כדי לגשת למצלמת האינטרנט
בשלב הבא, אסביר איך יוצרים רכיב וידאו שמקבל וידאו ממצלמת אינטרנט דרך ממשקי ה-API של WebRTC. בסרטונים שהוקלטו מראש, פשוט מגדירים את מאפיין המקור של הסרטון ככתובת ה-URL של הסרטון. אם אתם מבצעים זיהוי סמנים מתמונות סטילס, אתם יכולים להשתמש ברכיב תמונה באותו אופן.
מאחר ש-WebRTC ו-getUserMedia הן עדיין טכנולוגיות חדשות ומתפתחות, צריך לזהות אותן. פרטים נוספים זמינים במאמר של Eric Bidelman בנושא צילום אודיו ווידאו ב-HTML5.
var video = document.createElement('video');
video.width = 320;
video.height = 240;

var getUserMedia = function(t, onsuccess, onerror) {
  if (navigator.getUserMedia) {
    return navigator.getUserMedia(t, onsuccess, onerror);
  } else if (navigator.webkitGetUserMedia) {
    return navigator.webkitGetUserMedia(t, onsuccess, onerror);
  } else if (navigator.mozGetUserMedia) {
    return navigator.mozGetUserMedia(t, onsuccess, onerror);
  } else if (navigator.msGetUserMedia) {
    return navigator.msGetUserMedia(t, onsuccess, onerror);
  } else {
    onerror(new Error("No getUserMedia implementation found."));
  }
};

var URL = window.URL || window.webkitURL;
var createObjectURL = URL.createObjectURL || webkitURL.createObjectURL;
if (!createObjectURL) {
  throw new Error("URL.createObjectURL not found.");
}

getUserMedia({'video': true},
  function(stream) {
    var url = createObjectURL(stream);
    video.src = url;
  },
  function(error) {
    alert("Couldn't access webcam.");
  }
);
זיהוי סמנים
אחרי שהגלאי פועל כמו שצריך, אפשר להתחיל להזין לו תמונות כדי לזהות מטריצות AR. קודם מציירים את התמונה על לוח הציור של אובייקט הרסטר, ואז מריצים את הגלאי על אובייקט הרסטר. הגלאי מחזיר את מספר הסמנים שנמצאו בתמונה.
// Draw the video frame to the raster canvas, scaled to 320x240.
canvas.getContext('2d').drawImage(video, 0, 0, 320, 240);

// Tell the raster object that the underlying canvas has changed.
canvas.changed = true;

// Do marker detection by using the detector object on the raster object.
// The threshold parameter determines the threshold value
// for turning the video frame into a 1-bit black-and-white image.
//
var markerCount = detector.detectMarkerLite(raster, threshold);
השלב האחרון הוא לעבור על כל הסמנים שזוהו ולקבל את מטריצות הטרנספורמציה שלהם. משתמשים במטריצות הטרנספורמציה כדי להציב אובייקטים תלת-ממדיים מעל הסמנים.
// Create a NyARTransMatResult object for getting the marker translation matrices.
var resultMat = new NyARTransMatResult();
var markers = {};
// Go through the detected markers and get their IDs and transformation matrices.
for (var idx = 0; idx < markerCount; idx++) {
// Get the ID marker data for the current marker.
// ID markers are special kind of markers that encode a number.
// The bytes for the number are in the ID marker data.
var id = detector.getIdMarkerData(idx);
// Read bytes from the id packet.
var currId = -1;
// This code handles only 32-bit numbers or shorter.
if (id.packetLength <= 4) {
currId = 0;
for (var i = 0; i < id.packetLength; i++) {
currId = (currId << 8) | id.getPacketData(i);
}
}
// If this is a new id, let's start tracking it.
if (markers[currId] == null) {
markers[currId] = {};
}
// Get the transformation matrix for the detected marker.
detector.getTransformMatrix(idx, resultMat);
// Copy the result matrix into our marker tracker object.
markers[currId].transform = Object.asCopy(resultMat);
}
מיפוי מטריציוני
זהו הקוד להעתקת מטריצות של JSARToolKit למטריצות של glMatrix (שהן FloatArrays עם 16 רכיבים, עם עמודת התרגום בארבעת הרכיבים האחרונים). זה עובד כמו קסם (כלומר, אין לי מושג איך מגדירים מטריצות של ARToolKit. ההשערה שלי היא שציר ה-Y הפוך). בכל מקרה, הטריק הזה של היפוך הסימן מאפשר למטריצה של JSARToolKit לפעול כמו glMatrix.
כדי להשתמש בספרייה עם ספרייה אחרת, כמו Three.js, צריך לכתוב פונקציה שממירה את המטריצות של ARToolKit לפורמט המטריצה של הספרייה. צריך גם לקשר את הקוד ל-method FLARParam.copyCameraMatrix. השיטה copyCameraMatrix כותבת את מטריצת הפרספקטיבה של FLARParam למטריצה בסגנון glMatrix.
function copyMarkerMatrix(arMat, glMat) {
  glMat[0] = arMat.m00;
  glMat[1] = -arMat.m10;
  glMat[2] = arMat.m20;
  glMat[3] = 0;
  glMat[4] = arMat.m01;
  glMat[5] = -arMat.m11;
  glMat[6] = arMat.m21;
  glMat[7] = 0;
  glMat[8] = -arMat.m02;
  glMat[9] = arMat.m12;
  glMat[10] = -arMat.m22;
  glMat[11] = 0;
  glMat[12] = arMat.m03;
  glMat[13] = -arMat.m13;
  glMat[14] = arMat.m23;
  glMat[15] = 1;
}
שילוב עם Three.js
Three.js הוא מנוע JavaScript 3D פופולרי. אראה איך משתמשים בפלט של JSARToolKit ב-Three.js. נדרשים שלושה דברים: מלבן מלא במסך שבו מצוירת תמונה של וידאו, מצלמה עם מטריצת הפרספקטיבה של FLARParam ואובייקט עם מטריצת סמן כטרנספורמציה שלו. אראה לכם איך לשלב את הקוד בהמשך.
// I'm going to use a glMatrix-style matrix as an intermediary.
// So the first step is to create a function to convert a glMatrix matrix into a Three.js Matrix4.
THREE.Matrix4.prototype.setFromArray = function(m) {
  return this.set(
    m[0], m[4], m[8], m[12],
    m[1], m[5], m[9], m[13],
    m[2], m[6], m[10], m[14],
    m[3], m[7], m[11], m[15]
  );
};

// glMatrix matrices are flat arrays.
var tmp = new Float32Array(16);

// Create a camera and a marker root object for your Three.js scene.
var camera = new THREE.Camera();
scene.add(camera);

var markerRoot = new THREE.Object3D();
markerRoot.matrixAutoUpdate = false;

// Add the marker models and suchlike into your marker root object.
var cube = new THREE.Mesh(
  new THREE.CubeGeometry(100,100,100),
  new THREE.MeshBasicMaterial({color: 0xff00ff})
);
cube.position.z = -50;
markerRoot.add(cube);

// Add the marker root to your scene.
scene.add(markerRoot);

// Next we need to make the Three.js camera use the FLARParam matrix.
param.copyCameraMatrix(tmp, 10, 10000);
camera.projectionMatrix.setFromArray(tmp);


// To display the video, first create a texture from it.
var videoTex = new THREE.Texture(videoCanvas);

// Then create a plane textured with the video.
var plane = new THREE.Mesh(
  new THREE.PlaneGeometry(2, 2, 0),
  new THREE.MeshBasicMaterial({map: videoTex})
);

// The video plane shouldn't care about the z-buffer.
plane.material.depthTest = false;
plane.material.depthWrite = false;

// Create a camera and a scene for the video plane and
// add the camera and the video plane to the scene.
var videoCam = new THREE.Camera();
var videoScene = new THREE.Scene();
videoScene.add(plane);
videoScene.add(videoCam);

...

// On every frame do the following:
function tick() {
  // Draw the video frame to the canvas.
  videoCanvas.getContext('2d').drawImage(video, 0, 0);
  canvas.getContext('2d').drawImage(videoCanvas, 0, 0, canvas.width, canvas.height);

  // Tell JSARToolKit that the canvas has changed.
  canvas.changed = true;

  // Update the video texture.
  videoTex.needsUpdate = true;

  // Detect the markers in the video frame.
  var markerCount = detector.detectMarkerLite(raster, threshold);
  for (var i=0; i<markerCount; i++) {
    // Get the marker matrix into the result matrix.
    detector.getTransformMatrix(i, resultMat);

    // Copy the marker matrix to the tmp matrix.
    copyMarkerMatrix(resultMat, tmp);

    // Copy the marker matrix over to your marker root object.
    markerRoot.matrix.setFromArray(tmp);
  }

  // Render the scene.
  renderer.autoClear = false;
  renderer.clear();
  renderer.render(videoScene, videoCam);
  renderer.render(scene, camera);
}
סיכום
במאמר הזה העברנו סקירה כללית על JSARToolKit. עכשיו אתם מוכנים ליצור אפליקציות מציאות רבודה משלכם באמצעות מצלמת אינטרנט באמצעות JavaScript.
שילוב של JSARToolKit עם Three.js הוא קצת מסורבל, אבל אפשרי בהחלט. אני לא בטוח ב-100% שאני עושה את זה נכון בהדגמה שלי, אז אשמח לדעת אם יש לך דרך טובה יותר להשיג את השילוב. טלאים יתקבלו בברכה :)